Windows Server Backup: A Step-by-Step Guide

How familiar are you with Windows Server Backup? You may be surprised by its value in your organization. I’ll explain what its main purpose is and how to use Windows Server Backup to back up Windows Server file servers and an Active Directory (AD) domain controller.
Find out more at Cayosoft.com
What is Windows Server Backup?
Windows Server has had a built-in backup application since Windows Server 2008. I know, right? As far as I recall, Microsoft had an agreement with Seagate back in the day to offer a ‘simple’ version of a basic backup application/feature in Windows Server. Like Active Directory, they haven’t offered a lot of updates to this core feature in the product. However, it does have value in certain real-world scenarios.
Windows Server Backup provides a set of wizards to guide IT Pros through to accomplish data protection in an isolated or AD-based domain. You can use WSB to back up a full server (bare metal recovery). individual files and folders, and remote servers and computers. You can also recover volumes, folders, files, and even the System State.
Is Windows Server Backup any good?
The consensus is this – Windows Server Backup is a basic data protection solution. It does do a very good job of backing up a single server and being able to back up and restore sets of folders/files, and/or the server’s system state.
It is free, so, you can make a valid assumption that it doesn’t provide the same features and stability of a true enterprise data recovery solution.
What is Windows Server system state?
The system state consists of configuration and files that are critical to the running of Windows Server. Typically the system state includes:
- hardware drivers
- Windows Registry
- files protected by Windows File Protection
- Active Directory configuration and files on domain controllers
When to consider a third-party backup solution
How will you know if Windows Server Backup will be good enough for your needs? There are a few ways to look at this. From my point of view, the more you want your backup environment to be automated, set-it-and-forget-it, you need to move to an enterprise backup product.
Although Windows Server Backup does offer scheduling capabilities, determining whether to use it or to use a paid enterprise-grade data recovery product depends on your specific needs and budget.
Beyond the basic needs, if you require more advanced features, such as global data deduplication, high availability, cloud and local storage, or faster backups, you will want to consider a higher-end product. If you have more scalable storage requirements, that’s another reason to look to a third-party product.
How do I install Windows Server Backup?
Let me walk you through how to install Windows Server Backup. Welcome back to my Hyper-V lab running a Windows Server 2022-based Active Directory domain. I have one of my fileservers running Windows Server 2022. I’ll use it to install the feature. There are different options for installing, but I will use Server Manager.
- Open Server Manager from the Start menu.

- Now click ‘2 – Add roles and features‘.
- In the new features wizard, click Next.
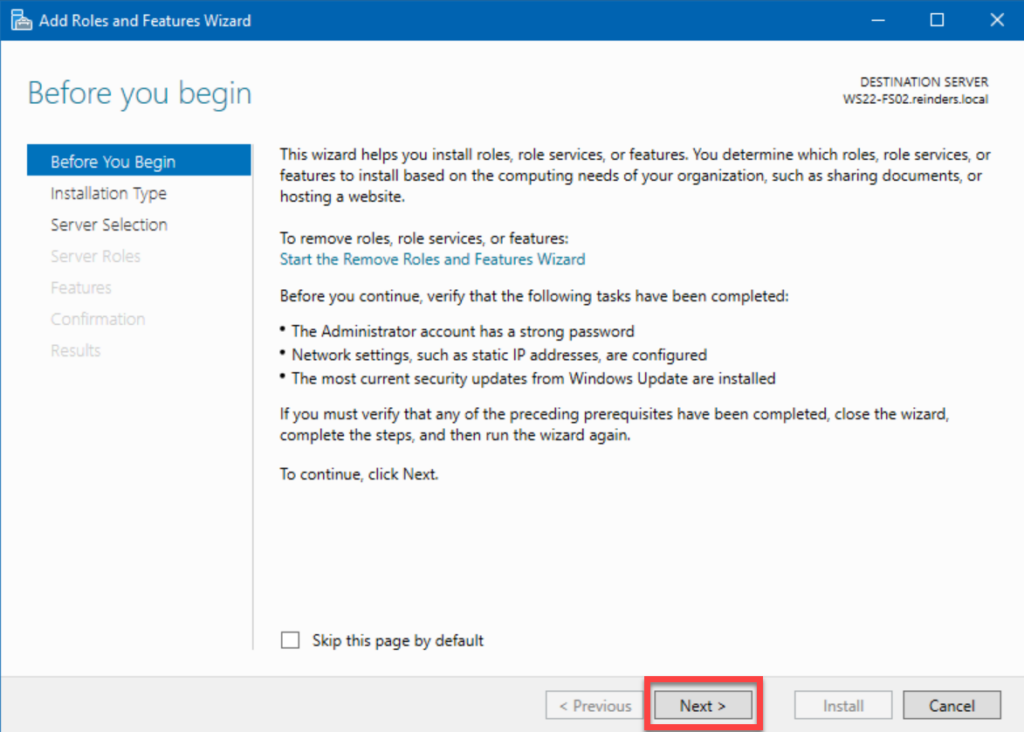
- Click Next a few more times until you get to the ‘Features‘ screen.
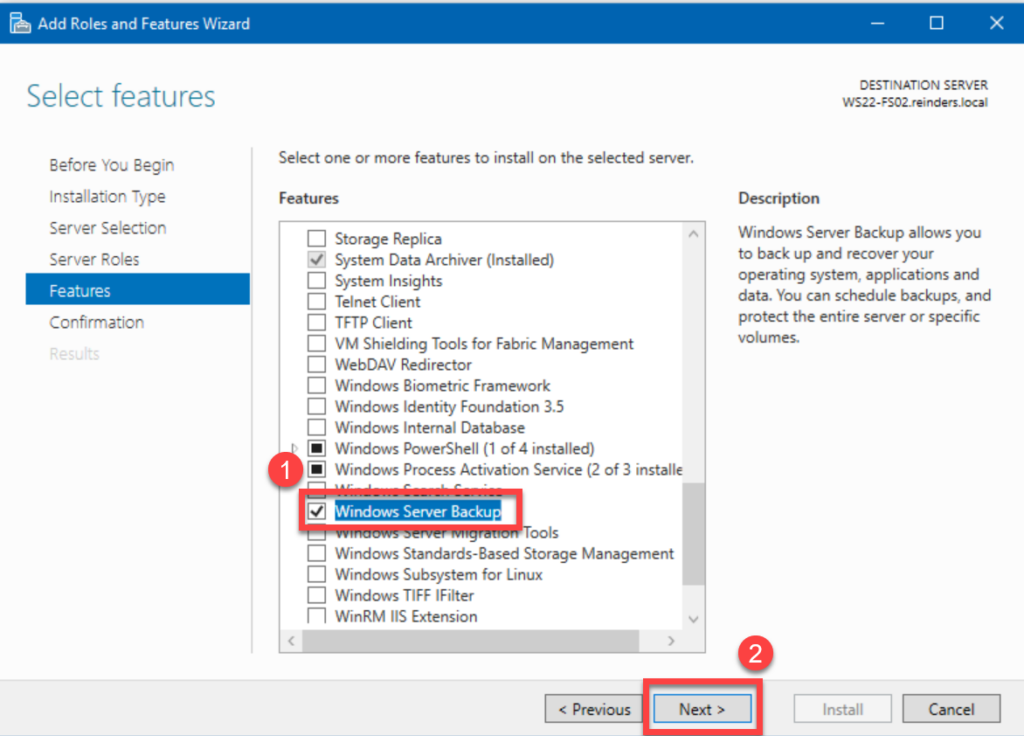
- Scroll down to place a checkmark in the ‘Windows Server Backup‘ item and click Next. You can select the ‘Restart the destination server…’ if you desire.
- Click Install.
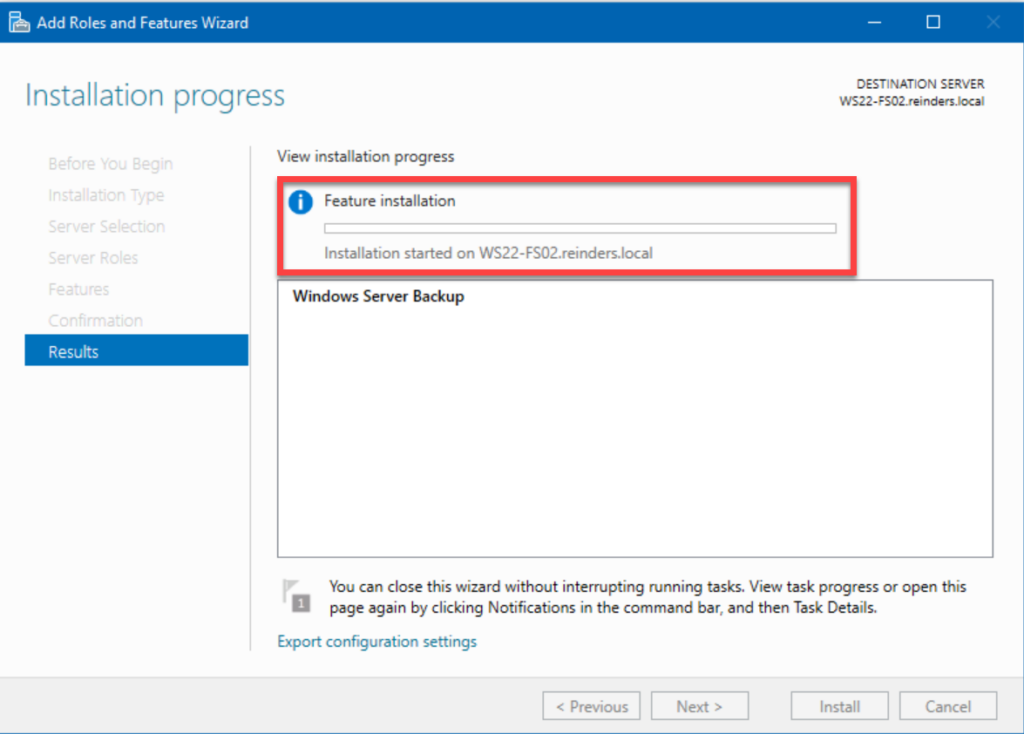
- After the setup is complete, click Close. Done.
How to back up Windows Server
Now that we have Windows Backup installed, let’s open it.
- You can open it by clicking the Tools menu in the upper-right corner of Server Manager, then find and click on Windows Server Backup.
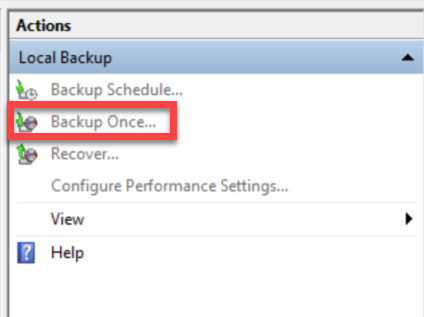
- First, click the ‘Local Backup‘ item on the left.
- Now, we can perform a backup job on the fly, or create a scheduled backup job. Let’s click ‘Backup Once…‘ on the Actions pane on the right.
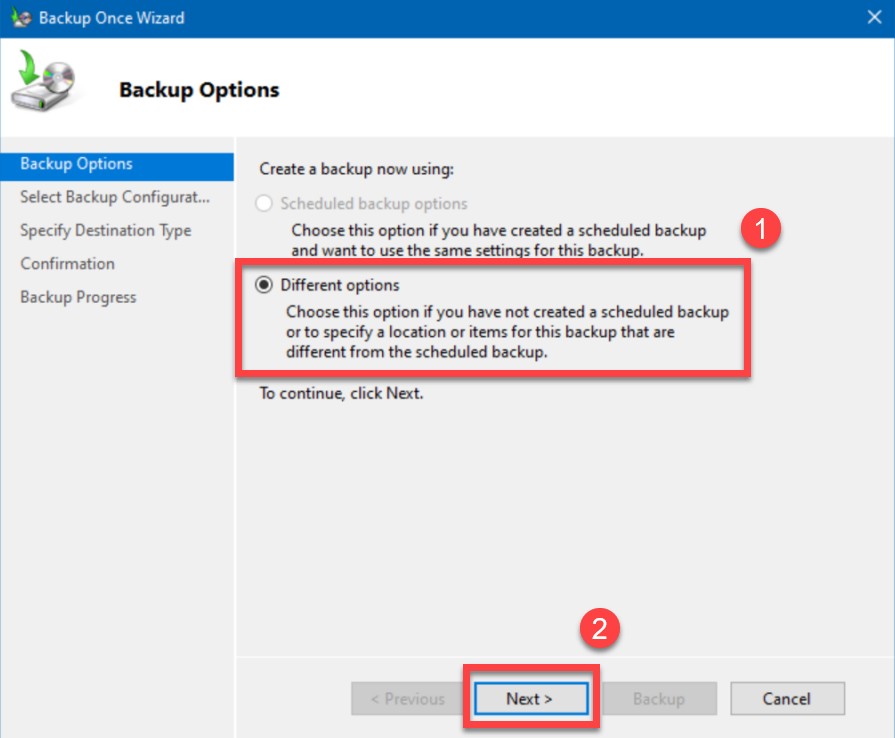
- On the Backup Options screen, click Next. On the ‘Select Backup Configuration‘ screen, always choose Custom and click Next.
In my opinion, you should always confirm exactly what items you are backing up.
Can Windows Server Backup back up remote network shares?
Another note regarding the usability – you can only back up local drives, essentially. There is no option to include a remote server or remote server network share as a backup source. The only way to make this work is to simply connect to the remote server’s running instance of Windows Server Backup. Uh, yes…not ideal. This is another reason to entertain an enterprise-grade software product.
Back up Windows Server files and folders
Let’s continue on our backup workflow here.
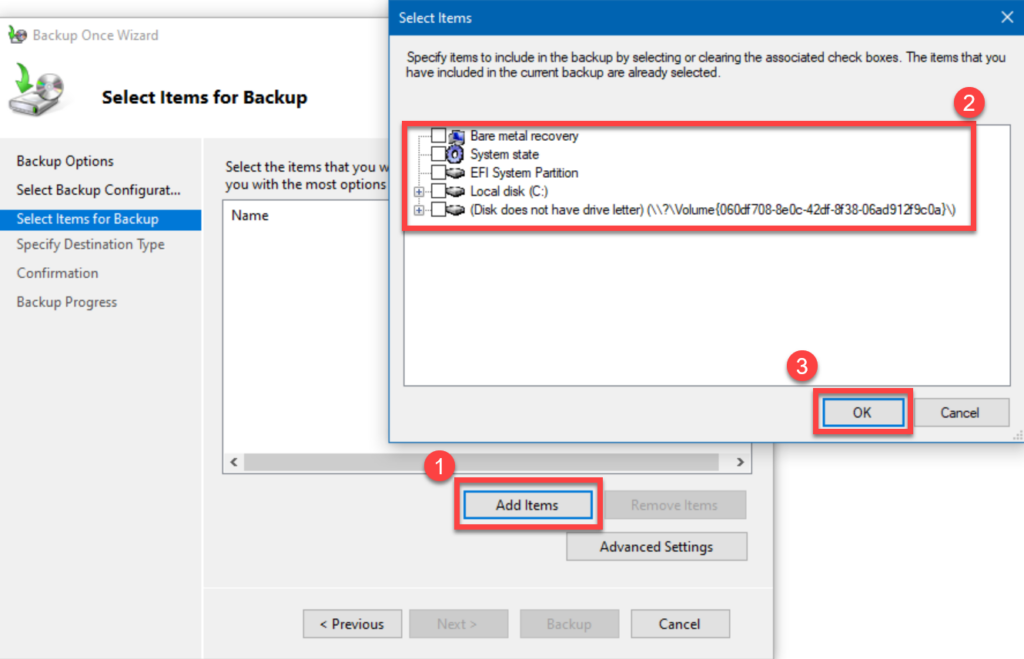
- If you are looking to back up specific files and folders, expand the drive letter containing the files and folders you want to back up and select them.
- Click the Advanced Settings button.
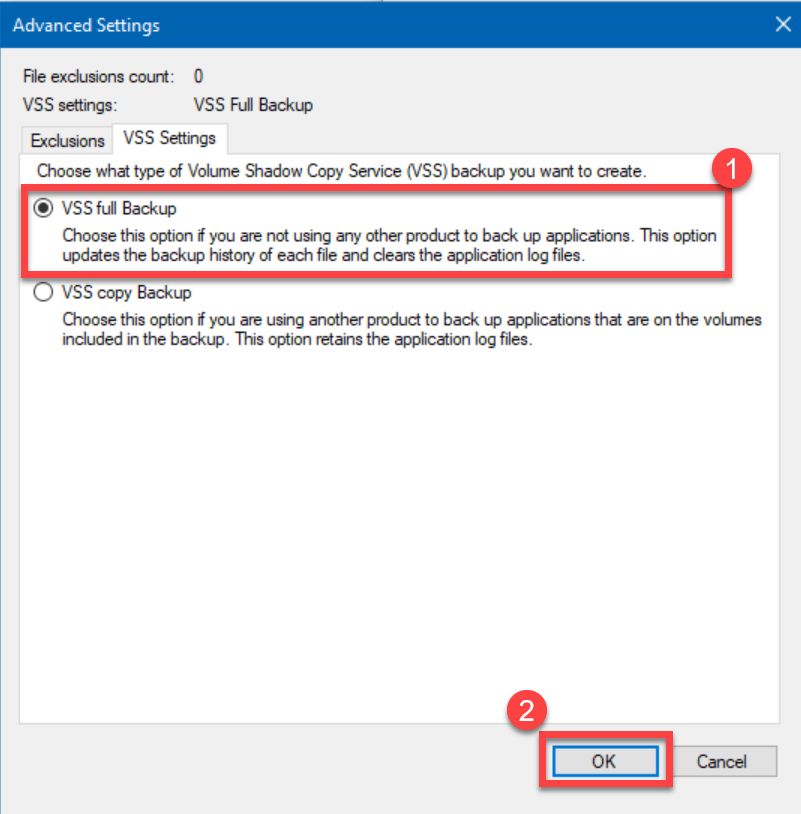
- On the Exclusions tab, you can add specific files or folders within your selected locations to exclude them.
- Click the VSS Settings tab and if you aren’t using another backup product, choose the ‘VSS full Backup‘ radio button, and click OK.
After clicking Next, you can choose either the local server to store the backups or a remote shared folder. I’ll choose the local server for demonstration purposes.
- On the Select Backup Destination screen, you can choose which disk/volume. I’ll choose my E: drive.
- Click Next.
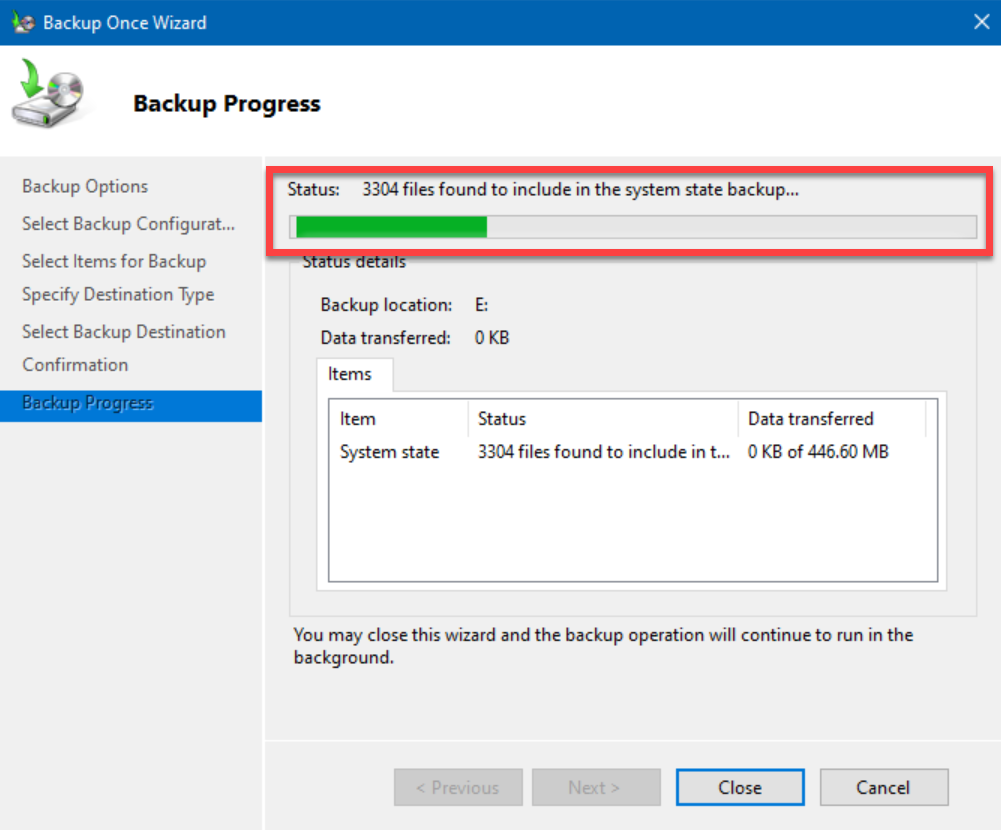
- On the Confirmation screen, confirm all details and click Backup!

It worked!
Back up the System State
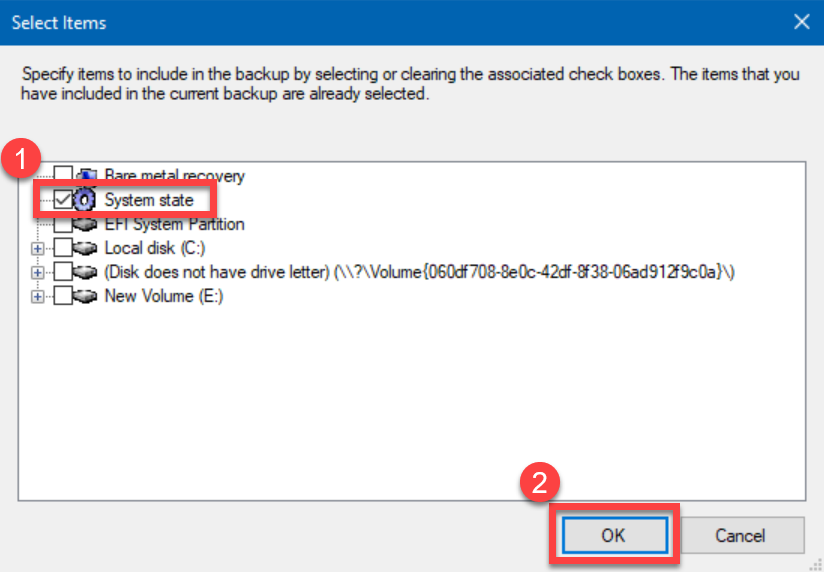
What happens when you need to back up the entire operating system core files, system files, the Registry hives, COM+ class registration databases, and the NTDS and SYSVOL folders involved with Active Directory domain controllers? No, you don’t need to find and select all those items. You can simply choose the ‘System state’ selection. Let me show you.
It’s very easy to back up the System state of your server.
- I’ll start a new ‘Backup Once…‘ job and on the Select Items screen, I will check ‘System state.’
I can keep all the same parameters and go ahead and kick it off.
There you go. All set.
Performing a bare metal recovery (BMR) backup
If you need to be able to fully restore a botched server, you can choose the ‘bare metal recovery’ item in that same ‘Select Items’ screen. As soon as you check it, the software will automatically choose all appropriate items to close that loop.
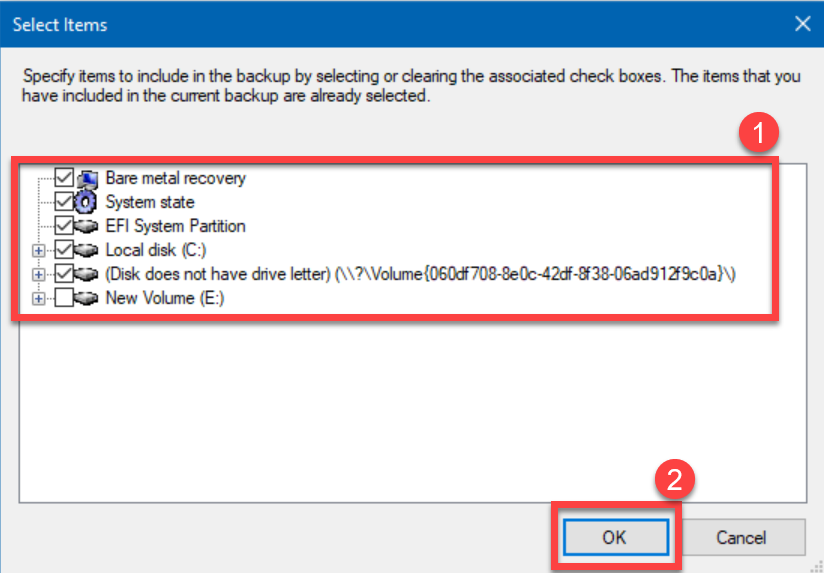
Choosing ‘Bare metal recovery’ will allow you to restore a server exactly as it was backed up to an alternate location, or as a clone (for testing). Very cool technology, honestly.
I will start the backup, but I don’t know if I have the time or disk space for it to finish. However, you get the idea.
Can I back up Hyper-V virtual machines?
You can use Windows Server Backup to back up virtual machines (VMs) but there are a good number of hoops you need to go through to be able to accomplish this, including modifying the registry of your server. The key step is to register the Microsoft Hyper-V VSS writer with Windows Server Backup.
How to restore Windows Server from a backup
Let’s run a Recovery/Restore job, from the homepage of Windows Server Backup.
- Click the ‘Recover…‘ item on the right.
Restoring locally
Let’s restore the files to a local disk.
- On the Getting Started screen, you choose if the backup was saved to your local server or if it was saved from a network location.
- I will keep the local server selected and click Next.
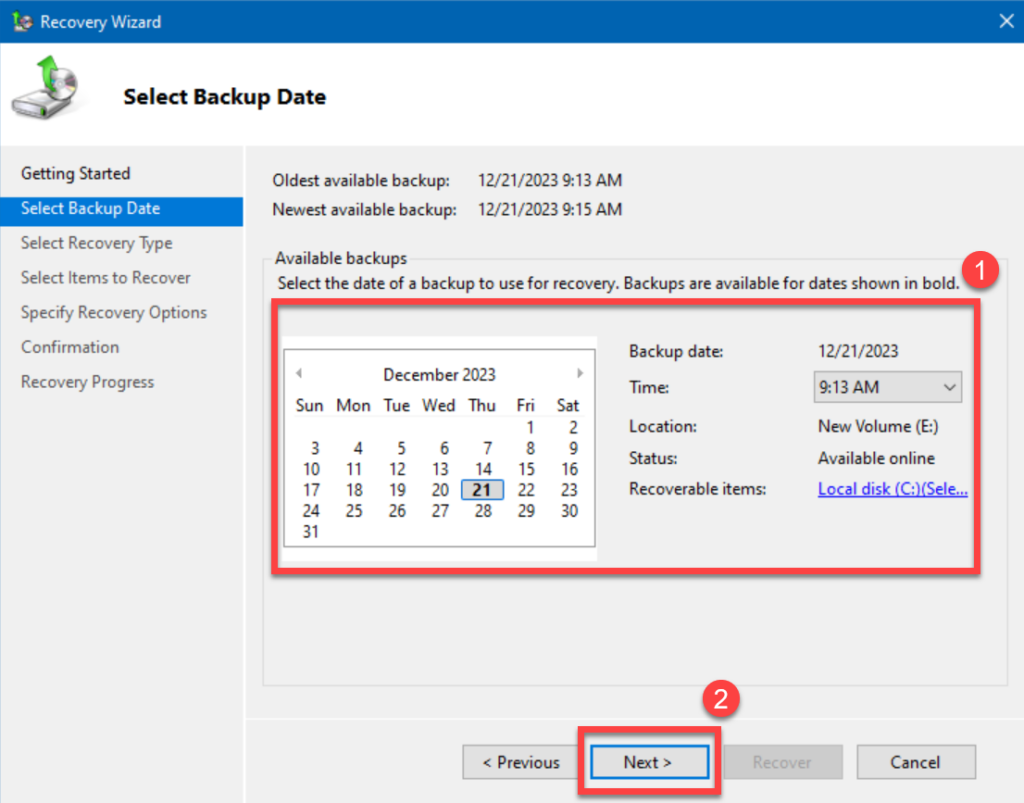
- Next, on the ‘Select Backup Date‘ screen, I will choose the older job that contains the files and folders backup.
- On the ‘Select Recovery Type‘ screen, I will keep the ‘Files and folders‘ selected so I can choose them.
- I clicked on Local Disk (C:) and it shows the two folders on the right. Click Next.
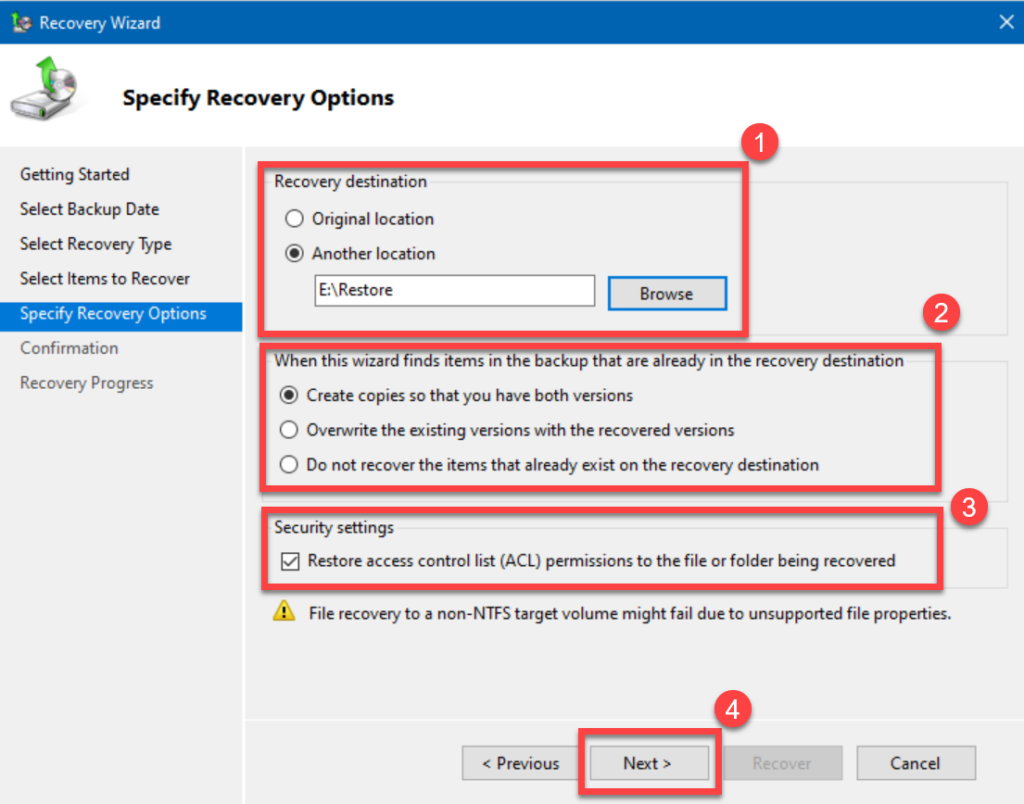
- I will choose ‘Another location‘ and browse to a new folder to restore the files. I will keep the remaining options as is and click Next.
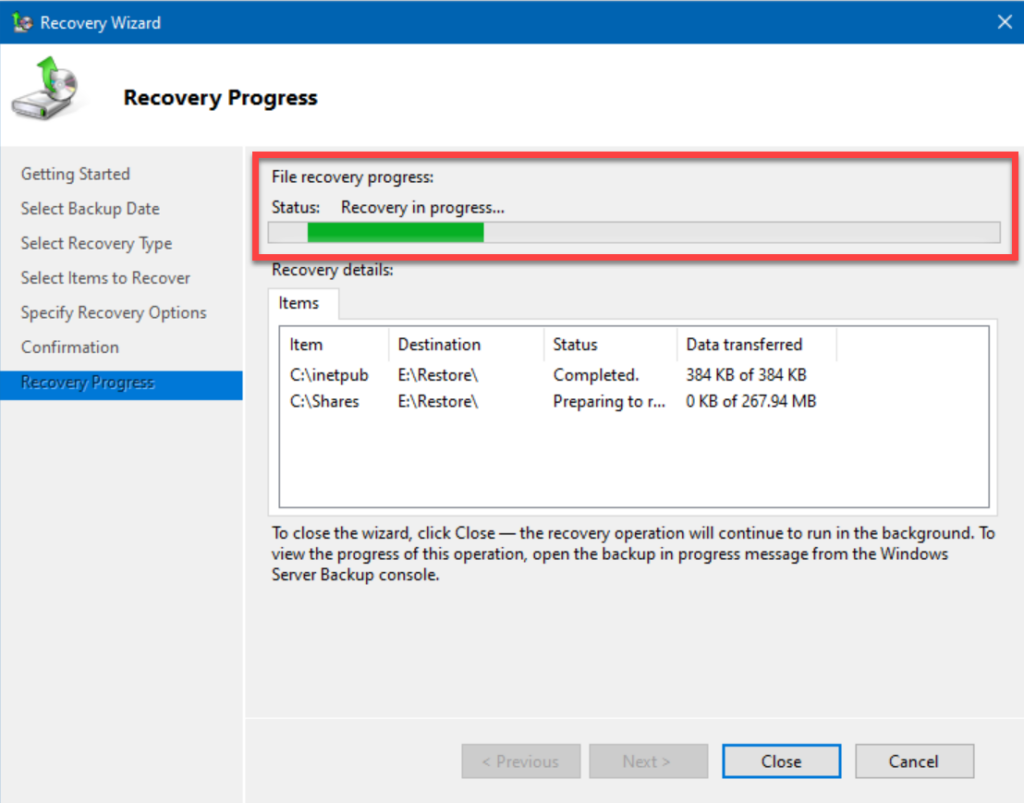
The restore job ran and was completed very quickly.
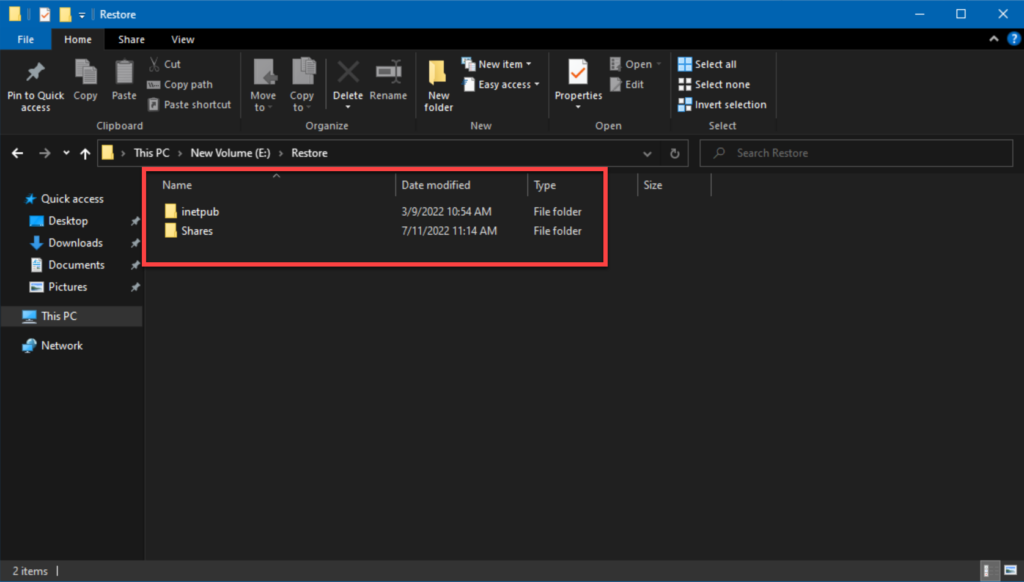
Done, there you go.
Restoring to an alternate location
In terms of restoring to an alternate location, this only means you can restore the files to an alternate folder on your local server. A slight surprise, but you can NOT restore files to a location off your local server. If you try to enter a UNC path, you’ll see an error like this.
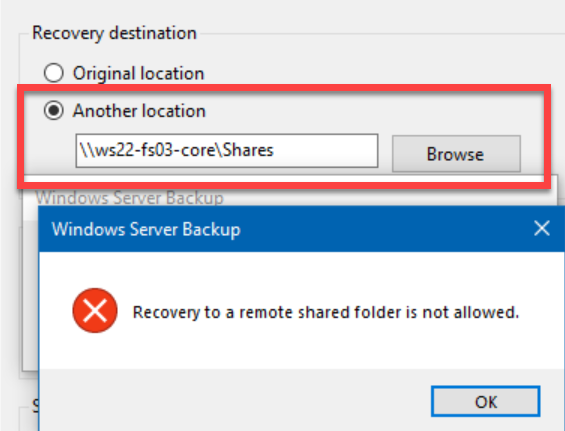
Ouch. So, here’s a major reason to go with an enterprise product.
Using the Windows Scheduler to schedule recurring backups
Let’s hop on the ‘robust’ train by creating a scheduled job. As an example, we could create a nightly job that will back up a specific location every night at 9 pm.
- Click the ‘Backup Schedule…‘ link on the right.

I used the same settings as our first backup but on the ‘Specify Backup Time‘ screen, I will keep the default of backing up once a day at 9 pm.
- On the ‘Specify Destination Type‘ screen, I will choose ‘Back up to a shared network folder.’ And yes, with THIS specific backup type, you CAN backup to a remote location. But, wait for it…
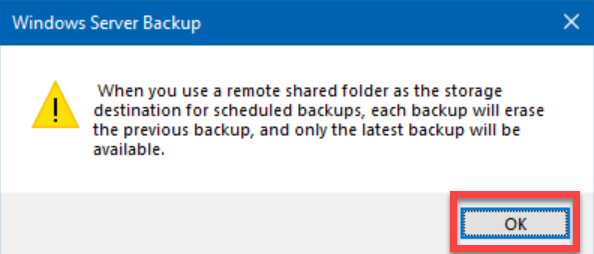
Yep. You can only keep ONE restore point to recover from. Not very robust.
- I chose the remaining default options and clicked Finish at the end.
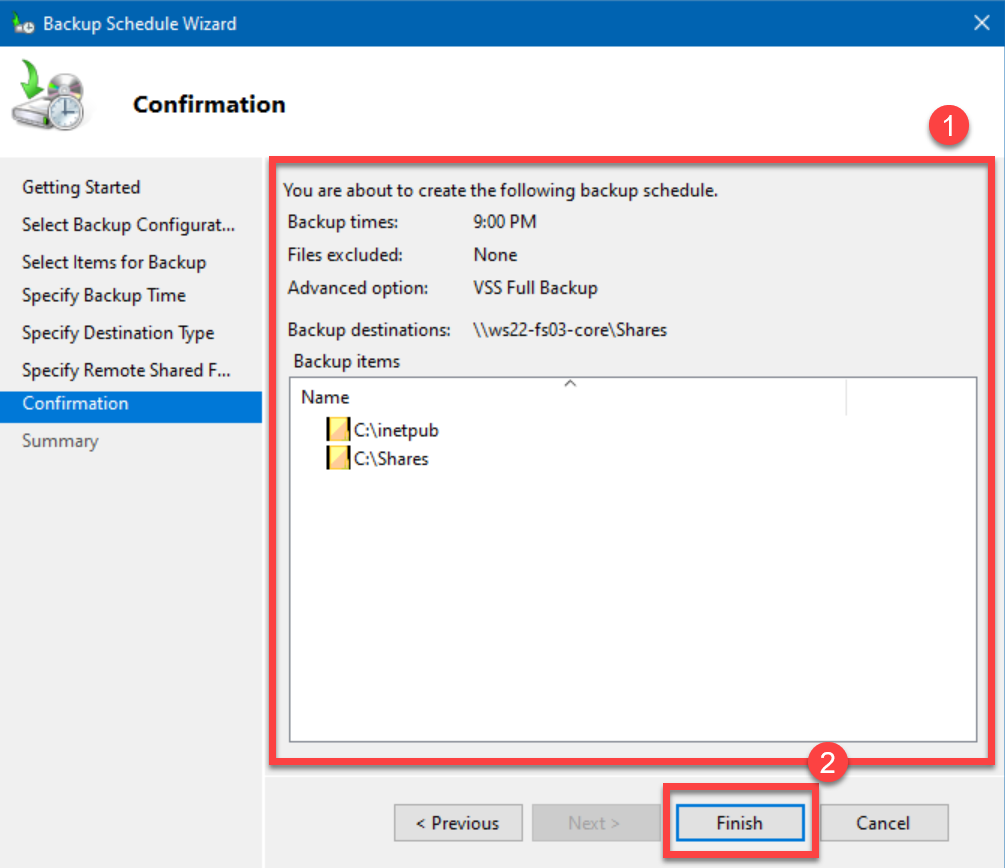
The job is now scheduled.
How to use wbadmin.exe from the command line
You may have noticed in the Title Bar for Windows Server Backup – ‘wbadmin’. What in the world does that mean? wbadmin.exe is the actual name of the application that is running and processes all the backup and restore jobs. The GUI is simply a front-end for IT Pros to make things easier for us that aren’t command-line gurus.

If you open a shell and type in wbadmin and hit Enter, you will see what you see above. Here is one example of a job you could run.
wbadmin start backup -backuptarget:e: -include:C:This will start a backup job immediately and back up everything on the C: drive to the E: drive. Here is another one.
wbadmin start backup -allCritical -backuptarget:e:This one is for a bare metal recovery. Because of that, it doesn’t explicitly include what items or drives to back up – it’s automatic.
Use PowerShell to back up Windows Server
I don’t think anyone should be surprised that PowerShell is another tool you can use to manage Windows Server Backup. We will use ‘Start-WBBackup‘ and ‘Get-WBPolicy‘ to accomplish our goals.
I will enter Get-WBPolicy to see all scheduled backup policies.
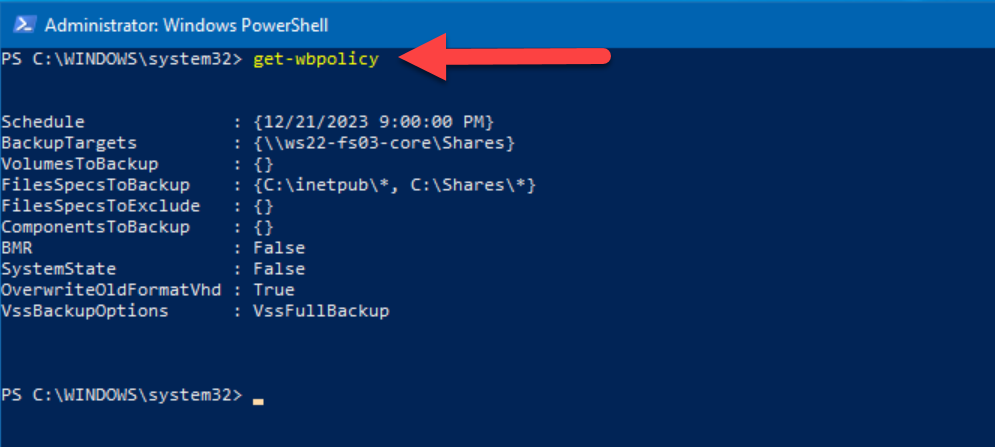
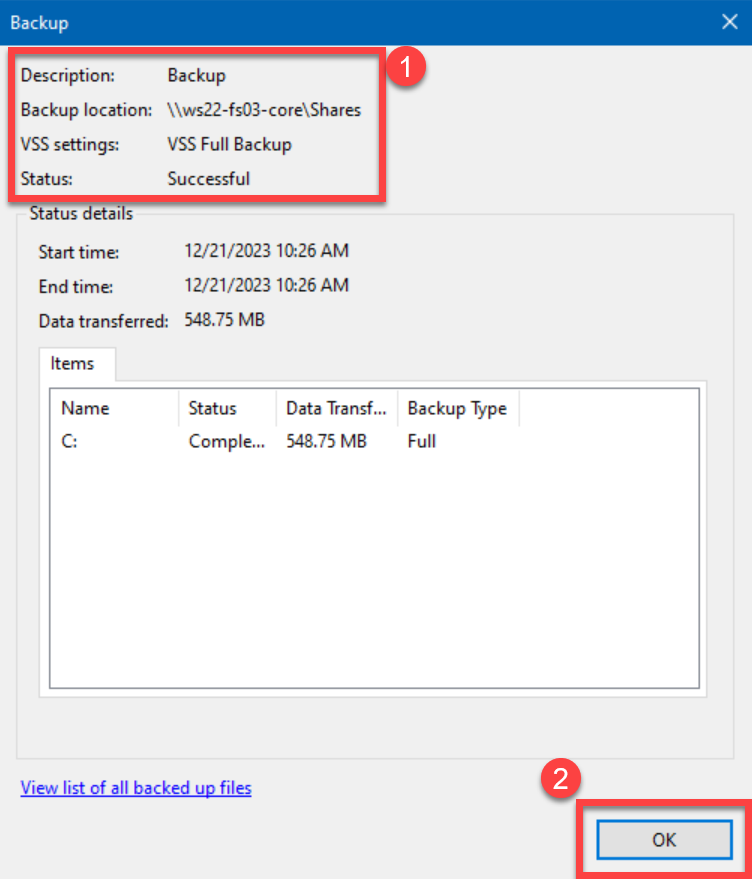
Here is our scheduled backup nightly at 9 pm. Now, we will enter a few commands and store some items in variables.
$Policy = Get-WBPolicy
Start-WBBackup -Policy $Policy -Async
$BackupJob = Get-WBJob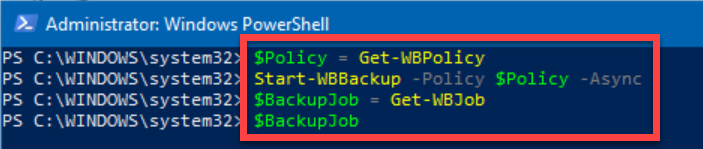
And there is our completed job’s history.
Nice and easy.
Conclusion
Windows Server Backup is a native backup feature integrated into supported versions of Windows Server. It includes basic backup functionalities and helps you manually back up files and folders, system critical data, and applications. You can also use a schedule, albeit not a very robust one, to perform backups daily. You can use the Dashboard/homepage to make changes and to start backup or restore jobs.
An important consideration is whether Windows Server Backup will provide for your needs or not. If not, you will want to look into purchasing an enterprise-grade data recovery solution.
Please leave a comment or question below – thank you for reading.

Michael has been an IT Pro since 1998. He has worked predominantly in the Windows world including client and server operating systems, on-prem systems engineering (AD, DNS, etc.), and over the last ten years or so has embraced and immersed himself in...


