- Blog
- SQL Server
- Post
SQL Server Essentials: Modifying Table Data With SQL Insert, SQL Update, SQL Delete and Truncate

Tables are one of the core components of every relational database system and SQL Server is no different. Tables store the data that the relational database engine uses for queries, reports, and other operations. In this article, I’ll show you how to modify data from a SQL Server table using T-SQL INSERT, T-SQL UPDATE, T-SQL DELETE and TRUNCATE.
In my previous article, Essential SQL Server: Creating Databases and Tables, I showed how you can create basic SQL Server databases and tables. In this article, we’ll take a look at how you populate those tables by adding, updating, and deleting rows making sure to effectively use SQL insert or update techniques.
I created the following table in my previous article. The syntax from this simple example DDL command shows that the table has three columns and each of them uses a different data type:
CREATE TABLE dbo.myLogins
 (
     id INT NOT NULL PRIMARY KEY,
    name VARCHAR (20),
    login_date DATETIME
 );
In this article, we’ll look at adding data to a table using the INSERT statement, modifying data in a table using the UPDATE statement, and deleting data using the DELETE statement, with a focus on SQL insert or update for optimal data operations. Data in a table can be deleted in a couple of different ways, so we’ll also cover the difference between using the DELETE statement and the TRUNCATE statement.
Adding rows using T-SQL INSERT
You can add data to a SQL Server table in a number of ways:
- You can use SQL Server Management Studio’s (SSMS) interactive Query Designer to add rows to a table
- You can use PowerShell
- You can use the SQL Server Import and Export Wizard or Integration Services to import data into a table
- You can use the command line tool bcp utility.
That said, the most common way that data is added to a SQL Server table is by using the SQL INSERT statement. The T-SQL INSERT statement adds one or more rows to a SQL Server table.
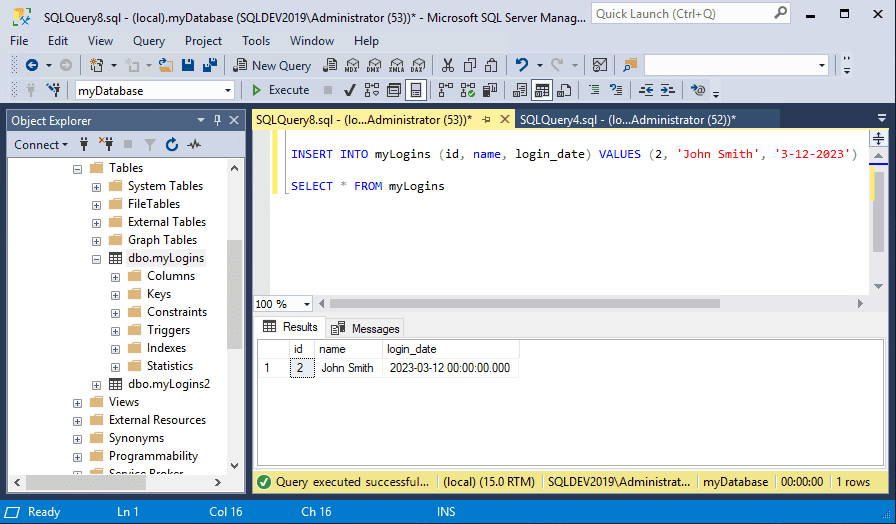
The following example shows how to add a row to the example table that you saw earlier:
INSERT INTO myLogins (id, name, login_date) VALUES (2, 'John Smith', '3-12-2023')
Here, the INSERT INTO statement identifies the table that will contain the inserted rows. Next, within the parenthesis, you can see a list of the columns that will be used. This list uses all of the columns in the table, but you don’t have to do that.
Finally, the VALUES clause provides the actual values that will be inserted into the table. As a shortcut, you can omit the column list in an INSERT statement. For example, the following INSERT statement performs exactly the same function as the previous example:
INSERT INTO myLogins VALUES (2, 'John Smith', '3-12-2023')
Unless the column is defined using the NOT NULL keywords, you can also explicitly specify NULL in the values list of an INSERT statement. Alternatively, when you do not wish to specify a value for a column, you can leave that column out of your column and values lists which will cause it to contain a NULL value.
Inserting table rows from the results of a query
In addition to using a standard T-SQL INSERT statement with a VALUES clause, you can also add rows to a table as a result of a SQL query. The query can be simple or complex, and the results can be inserted into the target table utilizing SQL insert or update methods for efficient data management.
For example, to copy rows from the myLogins2 table to the myLogins table you can use a query like the one you can see below:
INSERT INTO myLogins (id, name, login_date) SELECT id, name, login_date FROM myLogins2 where id > 50.
This example uses the results of the subquery from the myLogins2 table to insert rows into the myLogins table. The INSERT statement inserts data into the three columns in the table. The subquery uses a SELECT statement to select the same three columns from a second table named myLogins2.
However, in this example, only those rows with an id value greater than 50 will be returned and added to the myLogins table. In this simple example, the column names are the same, but that is not a requirement. For this to work, you need one or more rows in the myLogins2 table that have an id value greater than 50 that are not present in the myLogins table.
Updating rows using T-SQL UPDATE
Like adding rows to a table, there are a number of ways you can modify the rows in a table. SSMS’s Query Designer enables you to interactively update rows, but you can also use PowerShell or Integration Services.
However, the most common way to modify existing rows in a database table is to use the SQL UPDATE statement. The T-SQL UPDATE statement modifies the values in one or more rows in a SQL Server table.
Typically, you would want to use the UPDATE statement along with a WHERE clause to specify which rows to update. If you do not use the WHERE clause then all the rows in the table will be updated. The following listing shows a simple example of using the T-SQL UPDATE statement to modify the values in one row of the myLogins table.
UPDATE myLogins SET name = ‘John Smith’ WHERE id = 1
As I mentioned, if you were to omit the WHERE clause, the name column of every row would be set to the new value. Likewise, if the WHERE clause includes multiple rows as it might if you used the < or > operators, then multiple matching rows would be updated.
Updating table rows for the results of a query
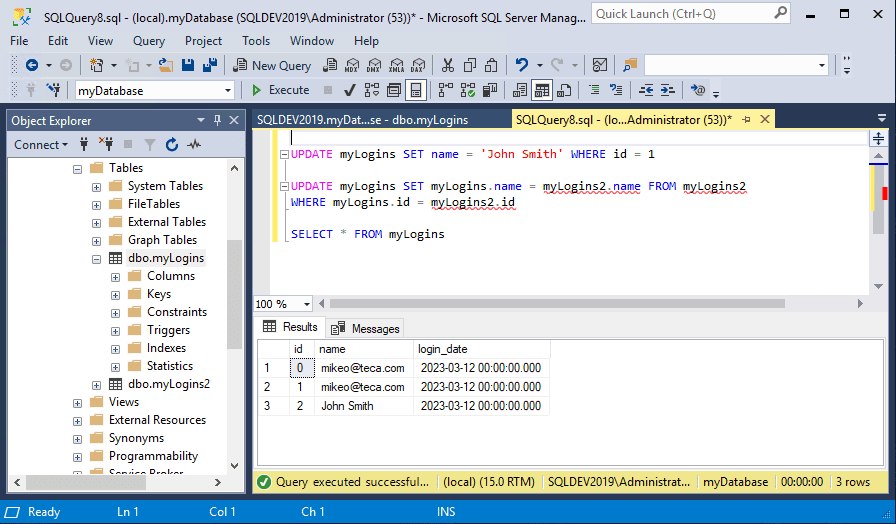
Just like with the INSERT statement, you can also update rows in one table using values from another table, exemplifying SQL insert or update functionality. In the following listing, you can see how to use a SQL update from another table.
UPDATE myLogins SET myLogins.name = myLogins2.name FROM myLogins2 WHERE myLogins.id = myLogins2.id
Here, you can see the UPDATE statement will be acting on the myLogins table, and that the name column will be updated using the values from the myLogins2 table where the value in the id columns of the two tables match.
As you might guess, there are a lot more options for using the UPDATE statement. Your query can update multiple rows, it can be more complex using joins, and you can use the TOP clause, the ORDER BY clause, Common Table Expressions (CTEs) and more to build your update queries.
Deleting rows with T-SQL DELETE and TRUNCATE
As you might expect, you can delete rows from a table using the interactive SSMS Query Designer, PowerShell, or Integration Services. However, the most common method is using the SQL DELETE statement.
The T-SQL DELETE statement removes one or more rows from a SQL Server table. It goes without saying, but you should use the SQL DELETE statement carefully as it permanently deletes data from your tables. If you make a mistake, you might need to restore the data from a snapshot, the transaction log, or a backup.
The following example shows how to delete one row from the myLogins table:
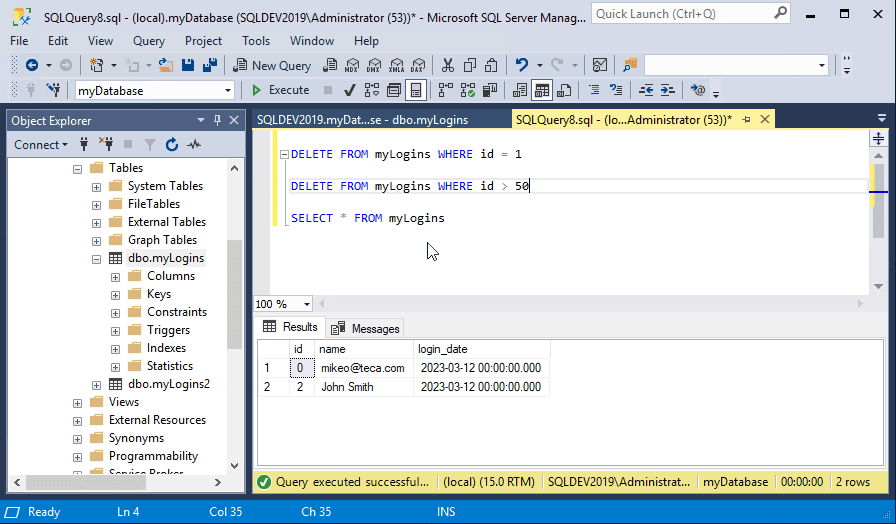
DELETE FROM myLogins WHERE id = 1
Here, you can see that one row in the myLogins table will be deleted where the value of the id column equals 1. You can also delete multiple rows by changing the WHERE clause as in the following statement, which deletes all of the rows where the id value is greater than 50.
DELETE FROM myLogins WHERE id > 50
Like the UPDATE state, if you omit the WHERE clause all of the rows in the table will be deleted. For instance, the following example deletes all of the rows in the myLogins table:
DELETE FROM myLogins
Deleting rows from the results of a query
Like the INSERT and UPDATE statements, the DELETE statement is also capable of acting from the results of a query. The following example shows how you can delete rows based on a query:
DELETE FROM myLogins WHERE login_date < '12-31-2022'
Here, all the rows in the myLogins table that have a date that is less than 12/31/22 in the login_date column will be deleted.
I’ve been using simple examples throughout this article, but like the INSERT and UPDATE statements, your queries can be much more complex. You could use JOINs and multiple tables in the DELETE statement’s subquery, use clauses like TOP and ORDER BY, and more.
DELETE vs TRUNCATE
The T-SQL DELETE command is capable of removing one or more rows from a table. However, it is not the only way to delete rows from a table. You can delete all of the rows in a SQL Server table using the T-SQL TRUNCATE TABLE statement.
The DELETE statement is a fully logged action. On the other hand, the TRUNCATE TABLE statement is a minimally logged action. This means that the TRUNCATE command will perform slightly better and fewer entries will be added to the transaction log. You can see an example of using TRUNCATE in the following listing.
TRUNCATE TABLE myLogins
This will delete all of the data in the myLogins table.
Summary
In this tutorial, you saw how to add, modify and delete rows in a SQL Server table using the T-SQL INSERT, UPDATE, and DELETE statements. In each case, I explained how to work with single-row values and how to work with multiple rows as a result of a subquery. In addition, you saw how the DELETE and TRUNCATE statements are different, even though they can both essentially delete rows from a table. The strategies for SQL insert or update were emphasized for efficient data management.
FAQs
What are the best practices for handling bulk SQL insert or update operations in a high-traffic database?
For bulk SQL insert or update operations, use table partitioning, batch processing, and properly indexed tables. Consider implementing MERGE statements for large datasets, and schedule these operations during off-peak hours to minimize impact on database performance.
How can I implement error handling when performing SQL insert or update operations across multiple tables?
Wrap SQL insert or update operations in try-catch blocks, use transaction management, and implement proper constraint validation. Create error logs to track failed operations and implement rollback mechanisms to maintain data integrity across related tables.
What are the performance differences between using stored procedures versus direct SQL insert or update statements?
Stored procedures offer better performance for complex SQL insert or update operations due to cached execution plans, enhanced security, and reduced network traffic. They also provide better maintenance and reusability compared to direct SQL statements.
How can I optimize concurrent SQL insert or update operations to prevent deadlocks?
Implement proper isolation levels, use optimistic concurrency control, and ensure consistent order of operations when performing SQL insert or update statements. Consider using table hints and indexed views for frequently accessed data.
What are the best strategies for handling SQL insert or update operations in a replicated environment?
Use timestamp columns, implement proper conflict resolution mechanisms, and ensure consistent primary key generation across nodes. Consider using merge replication for bidirectional SQL insert or update operations and maintain transaction consistency across all replicated servers.
Related Article:

Michael Otey is president of TECA, a technical content production, consulting and software development company in Portland, Ore. Michael is a former SQL Server MVP and was Senior Technical Director for Windows IT Pro and SQL Server Pro. He covers the...