


Search XML files with PowerShell using Select-XML
- Blog
- PowerShell
- Post
Now that you’ve familiarized yourself with the terms you’ll need to work with XML files using PowerShell, you’ll want to start looking at XML files and getting information out of those files. This is done with the Select-XML cmdlet and XPath statements.
About XPath statements
XPath statements can be rather intimidating, so instead of giving you information overload, I’m going to show you just enough to get the information out of the files and get you on your way.
Let’s start with an XML file, such as the applicationhost.config file. Enter this command into an elevated, administrative PowerShell session.
[XML]$AppConfig = Get-Content –Path “C:WindowsSystem32inetsrvconfigApplicationHost.config”
We’re now ready to explore the web server configuration with Select-Xml and Xpath.
XPath statement basics
XPath can feel a little like speaking a foreign language, and if you’ve used regular expressions before, then you may be reminded of regex when looking at Xpath. These statements are used as a filter in the Select-XML cmdlet.
Starting an XPath statement
Begin your XPath statement with either a “/” or an “//”. Use the single slash for an absolute path or the double-slash for a relative path. For instance, if your XML starts with:

You could reference webserver with a relative path (//webserver) or an absolute path (/configuration/system/webserver).
If you don’t know exactly where in the XML hierarchy your node is, then the relative path makes it very easy to find items. On the other hand, if you have a specific node that you’re trying to get to or have a common node, such as ‘name’ or ‘title’, then you may choose to use an absolute path to specify exactly the nodes that you’re looking for.
Searching nodes
Pass the variable that is holding the XML content into the Select-XML cmdlet, and use the –Xpath parameter to specify the node or nodes that you’re looking for.
$AppConfig | Select-Xml –Xpath “//modules”
This returns any nodes of the type ‘modules’, regardless of where they are in the file.
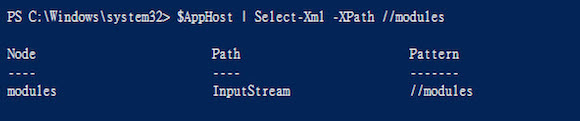
As you can see, it does not provide much information.
This is because the object that is returned is not exactly an XML node. What is returned from the Select-XML cmdlet is an object that includes the node, plus the pattern that was searched to get to it. However, what is most important about that returned object and what we usually care about is the node.
Expanding the nodes
Notice the difference when we take the output from the Select-XML cmdlet and expand the node part of that object. We will use the Select-Object cmdlet to do the expansion.
$AppConfig | Select-Xml –Xpath “//modules” | Select-Object –ExpandProperty “node”

Even with that you can see that we don’t quite see all of the information that we want, but we’re getting close. Specifically, we see that there is a child node called “add”, which looks like it includes several module names. To keep our typing to a minimum and our command lines readable, I’ll go ahead and save that node into a variable.
$ThisNode = $AppConfig | Select-Xml –Xpath “//modules” | Select-Object –ExpandProperty “node”
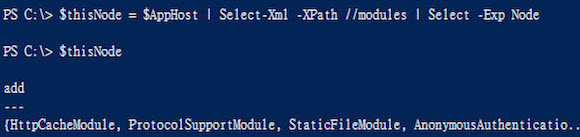
Notice that when saved as a variable there was no output to the screen. However, when we type the variable into PowerShell, we get the same result as we had before, which is proof that it worked. Now we’re free to explore the node.
Finding child nodes
Everything that the node has is now stored in our $thisNode variable.
$thisNode | Select-Object –ExpandProperty ChildNodes
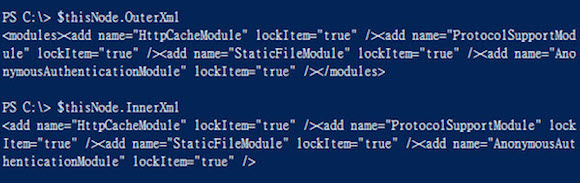
Alternatively, we can look at the XML for the node to find child nodes.
$thisNode.OuterXML (to include the modules node) or $thisNode.InnerXML (to exclude it) shows you the names of the child nodes.
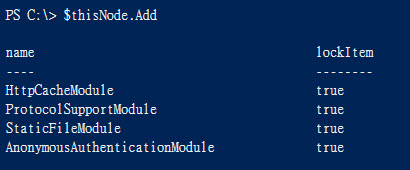
If you have the name of the child node, then you may access it directly from the variable just like any other property.
$thisNode.Add
Searching attributes
Take note of the attributes listed for the “add” child nodes. If you were trying to find one specific module with a specific name, then you would not need to know where it was specifically located.
You can search for attributes by using XPath. You can use “@”, followed by the attribute name. The attribute filter is part of the XPath statement and is included in square brackets. If you’re searching for text, then use single quotes for the value of the attribute that you’re searching for.
$AppHost | Select-XML –Xpath “//*[@name=’StaticFileModule’]”
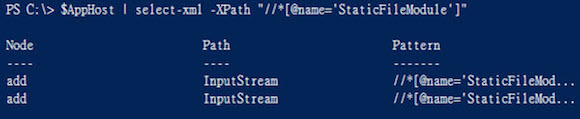
Filtering and Wildcards
Note that multiple nodes were returned because the node path that we’re looking at is using a wildcard. Those nodes can be from any section of the file. Because we know that the item we’re looking for is in the modules node, we can also specify that in our path, along with a wildcard.
$AppHost | Select-XML –Xpath “//modules/*[@name=’StaticFileModule’]”

Searching with multiple levels in the hierarchy
You can use wildcards together with forward slashes to indicate how many levels you want to search.
Remember that everything before the attribute filter is indicating the nodes that you want returned. If you don’t care what the node is, but all you know is that it has a child node with a name attribute, then you can search that by using a wildcard in the node path. But instead of just searching for an attribute, you’ll search for an attribute from a child node.
$AppHost | Select-XML –Xpath “//*[*/@name=’StaticFileModule’]”
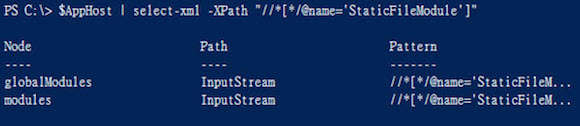
And you can go multiple levels, too. Although the line of code above returns any nodes that have a child node containing the name attribute set to StaticFileModule, you can do the same thing with grandchild nodes.
$AppHost | Select-XML –Xpath “//*[*/*/@name=’StaticFileModule’]”

Knowing where to put the wildcards and how to find the attributes and child nodes to get the information you want out of your XML files takes multiple attempts and a lot of trial and error.
Just keep trying, and take notes. Write scripts and use the PowerShell ISE to keep track of the parts of your XML file that you’ve figured out, and soon you’ll be ready to crack the code of the XML files using PowerShell and Select-XML.
Related content