A PowerShell Script to Find System Uptime: Formatting Results
- Blog
- PowerShell
- Post
I think we’re almost finished with our PowerShell scripting journey. We started with a one-line PowerShell command and we ended up with an advanced PowerShell function to check system uptime that’s complete with help and examples. If you’re joining us at the end of the journey, then take a few minutes to retrace our steps. All set? This looks like a nice place to end our journey.
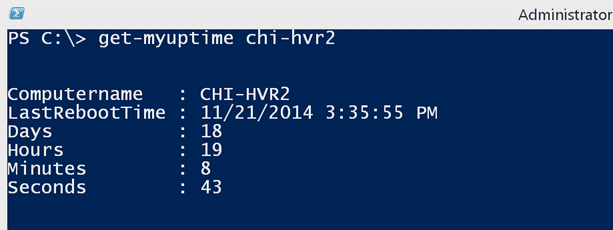
The original command included a formatting cmdlet to properly display the uptime information. As I noted, you should not include formatting in your scripts and functions, as this limits you. Instead, your command should write objects to the pipeline and then use the format cmdlets if you need anything formatted. This is the default output:
It works, but it would probably be nice to have this formatted as a table.
This is much better. But I don’t want to have to always remember to pipe to Format-Table or have to explain this process to anyone running my command. Instead, I want to have the display always formatted as a table, unless I specify otherwise. Here’s how we can achieve this goal.
PowerShell has an extensible type system, which means that you can customize the design of different object types and how they are formatted. I’m going to show you how to create a custom formatting extension so that the result is automatically displayed as a table when I run Get-MyUptime. Here’s the latest version of my function.
Function Get-MyUptime {
<#
.Synopsis
Get computer uptime.
.Description
This command will query the Win32_OperatingSystem class using Get-CimInstance and write an uptime object to the pipeline.
.Parameter Computername
The name of the computer to query. This parameter has an alias of CN and Name. The computer must be running PowerShell 3.0 or later.
.Parameter Test
use Test-WSMan to verify computer can be reached and is running v3 or later of the Windows Management Framework stack.
.Example
PS C:\> get-myuptime chi-dc01,chi-fp02
Computername LastRebootTime         Days Hours Minutes Seconds
------------ --------------         ---- ----- ------- -------
CHI-DC01     11/15/2014 12:02:22 AM   23    17      23      44
CHI-FP02     12/1/2014 8:40:08 AM      7     8      45      58
Formatted results for multiple computers. You can also pipe computer names into this command.
.Notes
Last Updated: December 10, 2014
Version     : 2.0
Learn more about PowerShell:
Essential PowerShell Learning Resources
.Link
Get-Ciminstance
Test-WSMan
.Link
https://petri.com/powershell
#>
[cmdletbinding()]
Param(
[Parameter(Position=0,ValueFromPipeline,ValueFromPipelineByPropertyName)]
[ValidateNotNullorEmpty()]
[Alias("cn","name")]
[String[]]$Computername = $env:Computername,
[Switch]$Test
)
Begin {
    Write-Verbose "Starting $($MyInvocation.Mycommand)"
    #define a private function to be used in this command
    Function IsWsManAvailable {
    [cmdletbinding()]
    Param([string]$Computername)
    Write-Verbose "Testing WSMan for $computername"
    Try {
        $text = (Test-WSMan $computername -ErrorAction Stop).lastchild.innertext
        Write-Verbose $Text
        if ($text.Split(":")[-1] -as [double] -ge 3) {
            $True
        }
        else {
            $False
        }
    } #Try
    Catch {
        #failed to run Test-WSMan most likely due to name resolution or offline
        $False
    } #Catch
    } #close IsWsManAvailable
} #begin
Process {
    Foreach ($computer in $computername) {
        Write-Verbose "Processing $($computer.toUpper())"
        if ($Test -AND (IsWsManAvailable -Computername $computer)) {
           $OK = $True
          }
        elseif ($Test -AND -Not (IsWsManAvailable -Computername $computer)){
            $OK = $False
            Write-Warning "$($Computer.toUpper()) is not accessible"
          }
        else {
            #no testing so assume OK to proceed
            $OK = $True
        }
            #get uptime of OK
        if ($OK) {
            Write-Verbose "Getting uptime from $($computer.toupper())"
            Try {
                $Reboot = Get-CimInstance -classname Win32_OperatingSystem -ComputerName $computer -ErrorAction Stop  |
                Select-Object -property CSName,LastBootUpTime
            } #Try
            Catch {
               Write-Warning "Failed to get CIM instance from $($computer.toupper())"
               Write-Warning $_.exception.message
            } #Catch
            if ($Reboot) {
                Write-Verbose "Calculating timespan from $($reboot.LastBootUpTime)"
                #create a timespan object and pipe to Select-Object to create a custom object
                $obj = New-TimeSpan -Start $reboot.LastBootUpTime -End (Get-Date) |
                Select-Object @{Name = "Computername"; Expression = {$Reboot.CSName}},
                @{Name = "LastRebootTime"; Expression = {$Reboot.LastBootUpTime}},Days,Hours,Minutes,Seconds
                #insert a new type name for the object
                $obj.psobject.Typenames.Insert(0,'My.Uptime')
                #write the object to the pipeline
                $obj
            } #if $reboot
        } #if OK
         #reset variable so it doesn't accidentally get re-used, especially when using the ISE
         #ignore any errors if the variable doesn't exit
         Remove-Variable -Name Reboot -ErrorAction SilentlyContinue
    } #foreach
} #process
End {
    Write-Verbose "Ending $($MyInvocation.Mycommand)"
} #end
} #end function
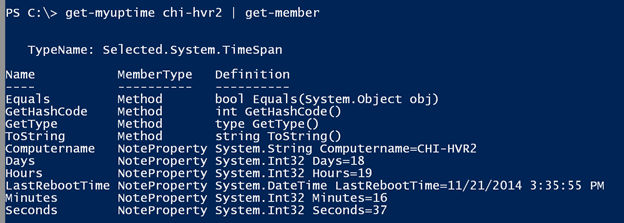
Right now, my function is writing a Selected.System.TimeSpan object to the pipeline.
I need to define my own type name for each object I write to the pipeline. To do that, I need to hold on to the object for a moment.
$obj = New-TimeSpan -Start $reboot.LastBootUpTime -End (Get-Date) |
Select-Object @{Name = "Computername"; Expression = {$Reboot.CSName}},
@{Name = "LastRebootTime"; Expression = {$Reboot.LastBootUpTime}},Days,Hours,Minutes,Seconds
Next, I need to insert my property name into the collection of inherited type names.
#insert a new type name for the object
$obj.psobject.Typenames.Insert(0,'My.Uptime')
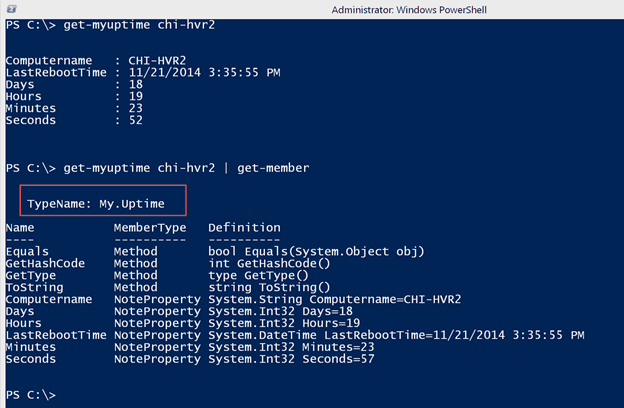
You can use whatever naming convention you prefer. My object will have a typename of My.Uptime. Once that is added, I can write the object to the pipeline.
#write the object to the pipeline
$obj
When I load this version into my session, nothing changes other than the object type.
That’s because I haven’t told PowerShell how to handle a My.Uptime object. This is accomplished with formatting directives stored in a ps1xml file. PowerShell ships with several if you want to take a look.
Notepad C:\Windows\System32\WindowsPowerShell\v1.0\DotNetTypes.format.ps1xml
Just be careful not to make any changes to the file. I’m going to show you how to create your own. Your file will take a structure like this:
<?xml version="1.0" encoding="utf-8" ?>
<Configuration>
    <ViewDefinitions>
        <View>
            <Name>OBJECT.TYPE or name of the view</Name>
            <ViewSelectedBy>
                <TypeName>OBJECT.TYPE</TypeName>
            </ViewSelectedBy>
            <TableControl>
            <!-- ################ TABLE DEFINITIONS ################ -->
            <TableHeaders>
                    <TableColumnHeader>
                        <Label>Name</Label>
                        <Width>7</Width>
                        <Alignment>right</Alignment>
                    </TableColumnHeader>
                    </TableHeaders>
                <TableRowEntries>
                    <TableRowEntry>
                        <TableColumnItems>
                            <TableColumnItem>
                                <PropertyName>Name</PropertyName>
                            </TableColumnItem>
                        </TableColumnItems>
                    </TableRowEntry>
                </TableRowEntries>
            </TableControl>
        </View>
        <View>
            <Name>OBJECT.TYPE or name of the view</Name>
            <ViewSelectedBy>
                <TypeName>OBJECT.TYPE</TypeName>
            </ViewSelectedBy>
            <ListControl>
            <!-- ################ LIST DEFINITIONS ################ -->
            <ListEntries>
					<ListEntry>
						<EntrySelectedBy>
							<TypeName>OBJECT.TYPE</TypeName>
						</EntrySelectedBy>
						<ListItems>
							<ListItem>
								<PropertyName>Name</PropertyName>
							</ListItem>
                        </ListItems>
					</ListEntry>
		        </ListEntries>
            </ListControl>
        </View>
    </ViewDefinitions>
</Configuration>
You can define as many table and list views as you need. Although this sample isn’t complete by any means, it should provide guidance. If you are writing something like this by hand, note that tag names are case-sensitive.
Thus something like <Tablecontrol>…</tablecontrol> will cause errors. What I recommend is find something in an existing ps1xml file that is close to what you want and edit that. But let’s jump right to the end and look at my format file for My.Uptime objects.
<?xml version="1.0" encoding="utf-8" ?>
<Configuration>
    <ViewDefinitions>
        <View>
            <Name>UptimeTable</Name>
            <ViewSelectedBy>
                <TypeName>My.Uptime</TypeName>
            </ViewSelectedBy>
            <TableControl>
            <!-- ################ TABLE DEFINITIONS ################ -->
            <TableHeaders>
                    <TableColumnHeader>
                        <Label>Computername</Label>
                        <Width>16</Width>
                        <Alignment>left</Alignment>
                    </TableColumnHeader>
                    <TableColumnHeader>
                        <Label>LastRebootTime</Label>
                        <Width>23</Width>
                        <Alignment>left</Alignment>
                    </TableColumnHeader>
                    <TableColumnHeader>
                        <Label>Days</Label>
                        <Width>5</Width>
                        <Alignment>right</Alignment>
                    </TableColumnHeader>
                    <TableColumnHeader>
                        <Label>Hours</Label>
                        <Width>5</Width>
                        <Alignment>right</Alignment>
                    </TableColumnHeader>
                    <TableColumnHeader>
                        <Label>Minutes</Label>
                        <Width>7</Width>
                        <Alignment>right</Alignment>
                    </TableColumnHeader>
                    <TableColumnHeader>
                        <Label>Seconds</Label>
                        <Width>7</Width>
                        <Alignment>right</Alignment>
                    </TableColumnHeader>
                    </TableHeaders>
                <TableRowEntries>
                    <TableRowEntry>
                        <TableColumnItems>
                            <TableColumnItem>
                                <PropertyName>Computername</PropertyName>
                            </TableColumnItem>
                            <TableColumnItem>
                                <PropertyName>LastRebootTime</PropertyName>
                            </TableColumnItem>
                            <TableColumnItem>
                                <PropertyName>Days</PropertyName>
                            </TableColumnItem>
                            <TableColumnItem>
                                <PropertyName>Hours</PropertyName>
                            </TableColumnItem>
                            <TableColumnItem>
                                <PropertyName>Minutes</PropertyName>
                            </TableColumnItem>
                            <TableColumnItem>
                                <PropertyName>Seconds</PropertyName>
                            </TableColumnItem>
                        </TableColumnItems>
                    </TableRowEntry>
                </TableRowEntries>
            </TableControl>
        </View>
         <View>
            <Name>UptimeList</Name>
            <ViewSelectedBy>
                <TypeName>My.Uptime</TypeName>
            </ViewSelectedBy>
            <ListControl>
            <!-- ################ LIST DEFINITIONS ################ -->
            <ListEntries>
					<ListEntry>
						<ListItems>
							<ListItem>
								<PropertyName>Computername</PropertyName>
							</ListItem>
                            <ListItem>
                                <Label>LastReboot</Label>
								<PropertyName>LastRebootTime</PropertyName>
							</ListItem>
                            <ListItem>
                                <Label>Uptime</Label>
								<Scriptblock> (New-Timespan -days $_.days -hours $_.hours -minutes $_.minutes -seconds $_.seconds).toString()   </Scriptblock>
							</ListItem>
                        </ListItems>
					</ListEntry>
		        </ListEntries>
            </ListControl>
        </View>
    </ViewDefinitions>
</Configuration>
My file has two views, which includes a table and a list. PowerShell will process them in order so the first one it finds will be the default. In my case this will be the table. The tricky part of creating a formatting file is that there is some trial and error, especially with tables to align everything the way you want. In my file the labels for each column will be the same as the property name, but they don’t have to be. I’ve also defined a list view. This view is defining three lines.
<ListItem>
<PropertyName>Computername</PropertyName>
</ListItem>
<ListItem>
<Label>LastReboot</Label>
<PropertyName>LastRebootTime</PropertyName>
</ListItem>
<ListItem>
<Label>Uptime</Label>
<Scriptblock> (New-Timespan -days $_.days -hours $_.hours -minutes $_.minutes -seconds $_.seconds).toString() </Scriptblock>
</ListItem>
The first line is the Computername property. The second line is the LastRebootTime property but I’m going to display LastBoot. The last line will be called Uptime and its value will be the result of a scriptblock that will display the uptime timespan as a string.
I save the file in my Scripts directory as MyUptime.Format.ps1xml. To load the settings into PowerShell I’ll use the Update-FormatData cmdlet.
Update-FormatData -AppendPath C:\scripts\My.Uptime.Format.ps1xml
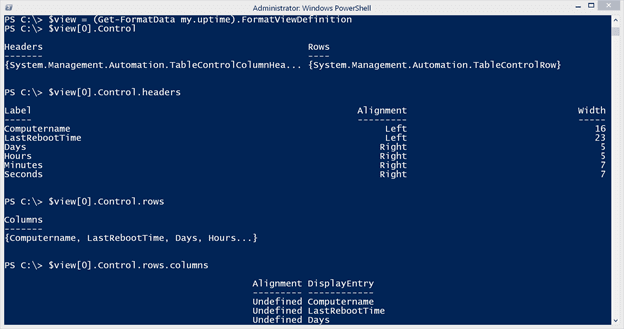
Because this is a new type, it doesn’t really matter if I append or prepend. It only makes a difference if you are loading a type definition that might already exist. Append or prepend determines if your definition is applied first or last. As I mentioned, there might be some trial and error in getting your formatting just right. Fortunately starting in PowerShell 3, you can run Update-Format data as often as you need to in the same session. You can verify with Get-FormatData.
You can drill down the FormatViewDefinition property to see the settings.
Now let’s see what happens when I run Get-MyUptime.
PowerShell looked at the object coming out of the pipeline and checked its type, My.Uptime. It then found a formatting directive for that type and used it. It’s like magic! Nothing changes as far as the underlying object is concerned.
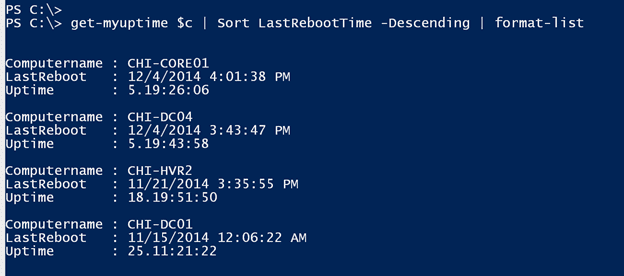
The only thing that changes is how it is formatted by default. But you can still override the default formatting. Remember my list view?
In order for all of this to work, I need to remember to use Update-FormatData to load my ps1xml file. You could add the command after your function definition in the script file that you are dot sourcing. Or you can take the final step and package all of this as a module. We’ll look at that next time.


