How to Use the Office Customization Tool (OCT) to Create Config.xml Files for Click-to-Run Deployments
Generate a configuration XML file with the Office Customization Tool, then use the Office Deployment Tool to install Microsoft 365 Apps with the right apps, languages, update channel, and activation settings.

The Office Customization Tool (OCT) is a Web based tool that generates the Configuration.xml file that the Office Deployment Tool uses to install Microsoft Office.
Here is how to generate the XML file and run the deployment:
- Open the Office Customization Tool (https://config.office.com/deploymentsettings).
- Populate the tool’s Deployment Settings to match your organization’s requirements. This involves selecting your office products, architecture, language, and other basic configuration options.
- Click the Export button to export the XML file.
- Copy the XML file to the same folder where the Office Deployment Tool resides.
- Enter the following command: setup.exe /configure <your_file.xml>
What the Office Customization Tool does for Microsoft 365 apps deployments
The office Customization Tool is available at: https://config.office.com/deploymentsettings. This is a Web-based tool that you can use directly through your browser. You can see what the tool looks like in Figure 1.
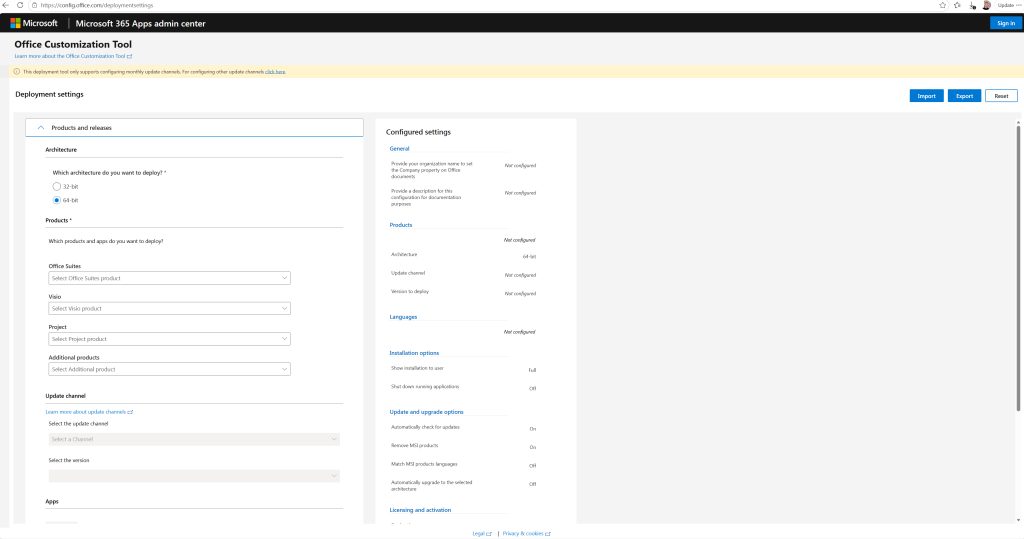
The Office Customization Tool allows you to custom tailor click to run deployments based on your organization’s preferences. The tool allows you to specify:
- Architecture (32-bit vs. 64-bit)
- Office Suite (Standard, Enterprise, Professional, LTSC, etc.)
- Additional products to install, such as Visio or Project
- Microsoft Office Apps to install
- Update Channel
- Language
- Installation Source
- Update and Upgrade Options
- Licensing and Activation
- General Settings (such as the organization name)
- Application Preferences
How to Choose Office Architecture, apps, and update channels in OCT
Choosing the architecture, apps, and update channel effectively means using the Office Customization Tool to select the installation options that match your environment. To do so:
- Choose the Office architecture. You should normally choose the 64-bit option. The 32-bit option exists solely for backward compatibility with older systems.
- Choose the Office products and applications that you want to install.
- You cannot use the Office Customization tool to choose an update channel since only the monthly update channel is supported. You can however, opt to deploy updates from the Office Content Delivery Network, a local source, or from Microsoft Endpoint Configuration Manager. There is also an option to enable or disable automatic update checks.
- Configure any additional deployment preferences before generating the XML file.
How to generate a config.xml file with the Office Customization Tool
To create a config.xml file:
- Open the Office Customization Tool
- Populate the various configuration options, specifying your Office edition, architecture, and deployment preferences.
- Review your selections to make sure that they are correct.
- Click the Export button.
- If prompted, select a default file format.
- Accept the license agreement.
- Enter Config.xml as the filename.
- Click the Export button.
- Copy the Config.xml file to the folder containing the Office Deployment Tool.
How to deploy Office with the Office Deployment Tool
The Office Deployment Tool reads your configuration XML file and installs Office using the options that you selected when you created the XML file. To deploy Office:
- Verify that the Office Deployment Tool has been installed.
- Copy the Config.xml file generated by the Office Customization Tool to the folder where the Office Deployment Tool resides.
- Open a command prompt window and navigate to the folder containing the Office Deployment Tool.
- Enter the following command: setup.exe /configure config.xml
How to validate a Microsoft 365 apps installation after deployment
When the Office deployment completes, you can validate the installation by:
- Open an Office application such as Word or Excel to ensure that it works.
- Click on File, followed by Account to make sure that the version and update channel are correct.
- Verify that all of the expected Office applications have been installed and that no excluded applications are present.
Office Customization Tool walkthrough: Key deployment settings
The key to using the Office Customization Tool effectively is to work through all of the various settings contained within the tool.
Products and Releases: Choose Office apps, architecture, and add-ons
The first section that you will need to complete is the Products and Releases section, which you can see in Figure 2.
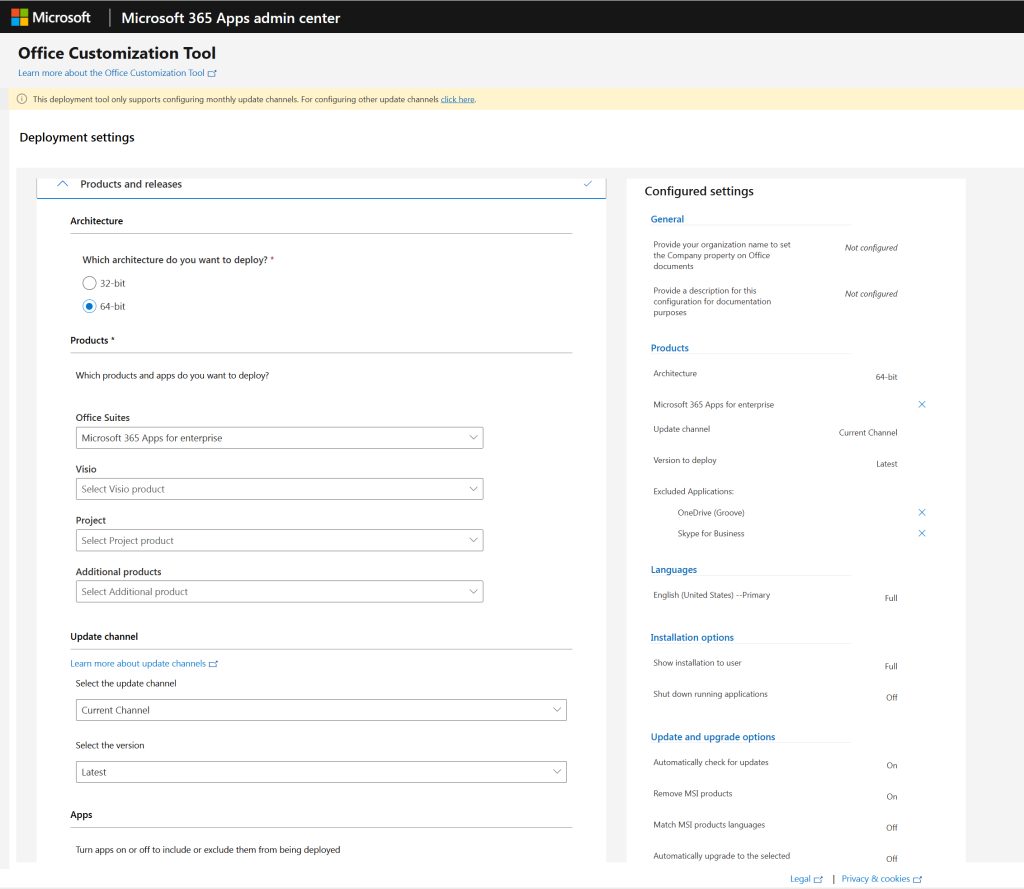
The first thing that you will need to do in this section is to choose the architecture that you want to use. Generally, you will want to choose the 64-bit architecture, but a 32-bit option is available if you need it.
It is worth noting that the 32-bit and 64-bit versions of Office are mutually exclusive, meaning that they cannot exist side by side on the same system. If your system currently contains the 32-bit version of Office, you will need to remove it prior to installing a 64-bit edition.
Next, you will need to choose the Office suite that you want to install. This is also where you specify optional add-ons such as Visio, Project, language packs, or the Office 365 Access Run Time.
Next, you will need to choose your update channel. Options exist for the current channel, current channel preview, and the monthly enterprise channel. As you can see in the previous figure however, a banner at the top of the tool indicates that only the monthly update channels are supported.
The last thing that you will need to do in this section is to choose the apps that you want to install. This includes applications such as Word, Excel, Outlook, and OneDrive.
Language settings: Choose display languages and proofing tools
The Language section, shown in Figure 3, allows you to choose the languages that should be supported by the Office deployment. This section requires you to specify the primary language to be used, but you can also specify additional languages for both Office itself and for the Office proofing tools.
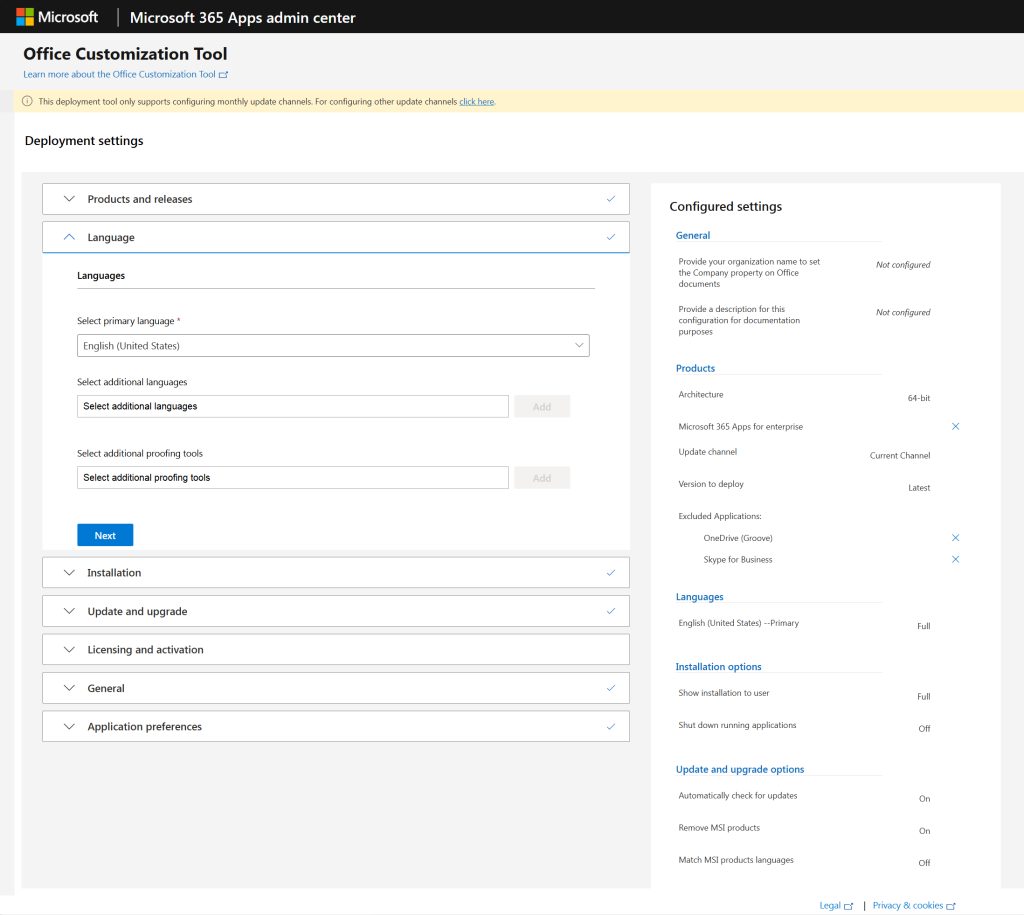
If you think that users may end up needing to use a particular language at some point in the future, it’s best to go ahead and include that language up front rather than trying to add it later. If users attempt to use a language that has not been installed, then Office will often fall back to the default language.
When planning language deployments:
- Define which language should be the display language
- Identify whether proofing tools are required
- Verify regional requirements before deployment
- Test language changes on a representative device group
For large environments, it is often easier to maintain separate XML configurations for different geographic regions rather than attempting to create one universal configuration that serves every use case.
Installation settings: Choose CDN, local source, or Configuration Manager
The Installation section, shown in Figure 4, lets you choose where Office will be installed from. Normally, Office is installed from the Office Content Delivery Network. However, if you are deploying Office within an isolated environment, you can opt to use a local source instead. Deploying Office from Microsoft Endpoint Configuration Manager is also an option.
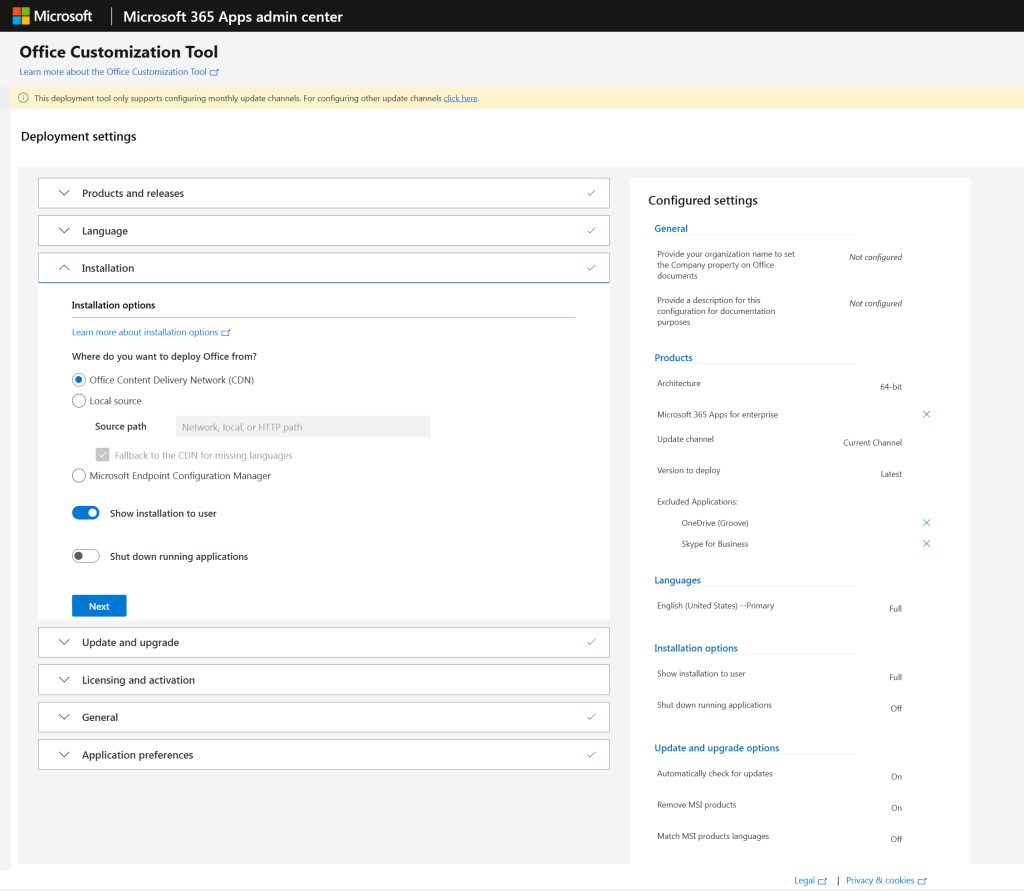
The Installation section also contains an option that you can use to silently install Office, thereby making the installation process invisible to the end user. You can also opt to shut down any running applications at the time of deployment.
A clean redeployment is usually the better option when:
- Migrating from older MSI-based Office versions
- Correcting deployment inconsistencies across a large device fleet
- Moving between 32-bit and 64-bit Office editions
- Repairing damaged installations that have accumulated configuration issues
Update and upgrade settings: Manage channels, updates, and MSI removal
At first glance, the Update and Upgrade section looks very similar to the Installation section. However, the Installation section allows you to choose where Office will be installed from. The Update and Upgrade section lets you specify where updates will be installed from and whether Office will automatically check for updates.
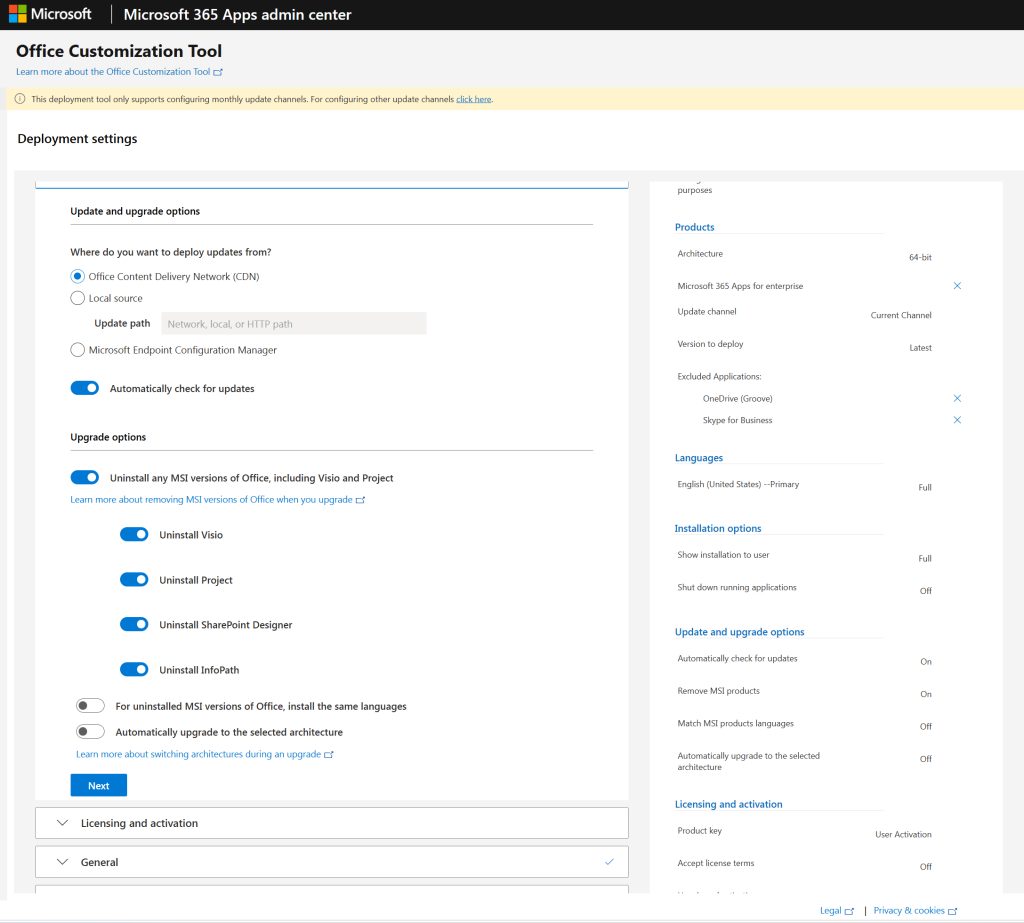
The Update and Upgrade section also allows you to choose whether installed MSI versions of Office should be automatically uninstalled. Options also exist for removing Visio, Project, SharePoint Designer, and InfoPath. If you do opt to uninstall an existing deployment, you can set the new Office installation to use the same languages and the same architecture as the deployment that was removed.
If you have an existing Office deployment, you can usually get away with using the Office Customization Tool to simply modify the existing installation without completely removing it. As an example, you might add or remove an existing application. However, if you are making a major change, such as switching from the 32-bit architecture to 64-bit, then you will need to remove the old version of Office rather than modifying it.
Before switching architectures, verify:
- Line-of-business add-in compatibility
- Macro and VBA dependencies
- Third-party application integrations
- Department-specific Excel workloads
For most organizations, the real challenge isn’t the deployment itself; it’s discovering that a critical finance or engineering add-in only supports a single Office architecture after the migration has begun.
Licensing and activation: Choose user, device, or shared computer activation
The Licensing and Activation section, shown in Figure 6, is primarily used as a means of automatically accepting the license terms, so that the user will not be prompted to accept the license at the time of installation.
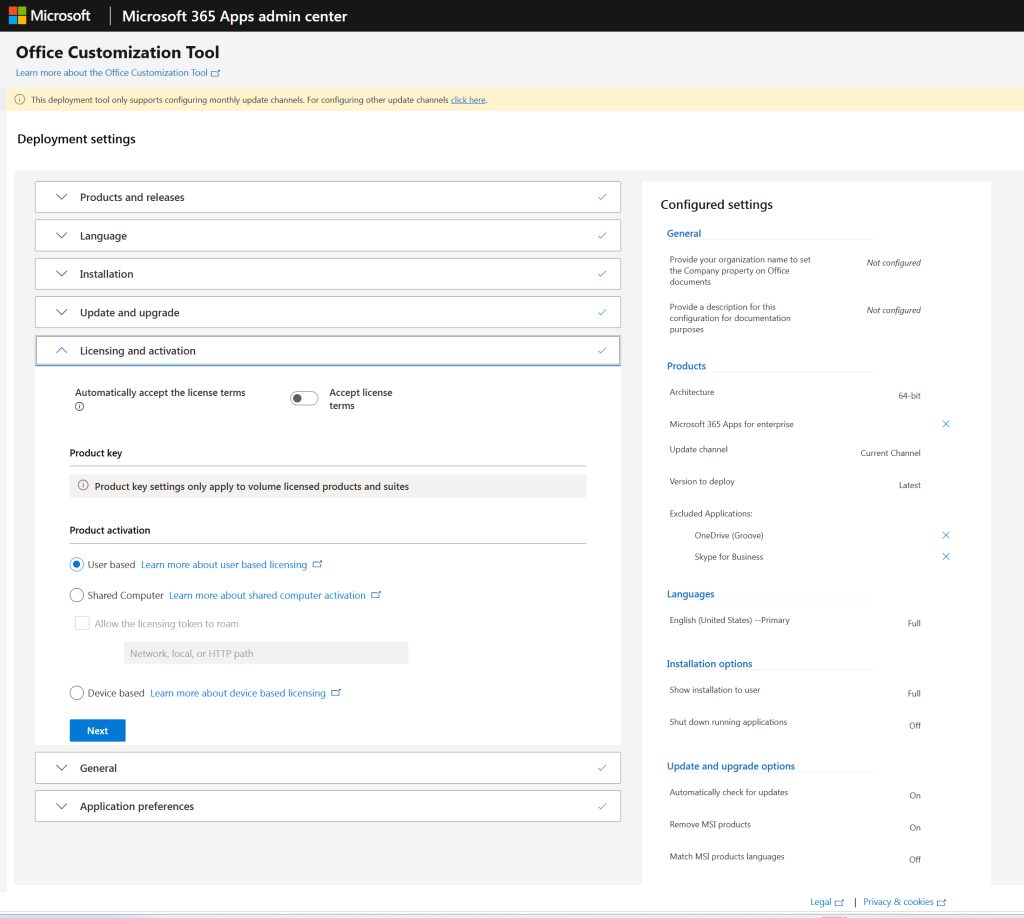
You can also configure the product activation to be user based, device based, or activation can be set for a shared computer.
General settings: Add organization details and configuration notes
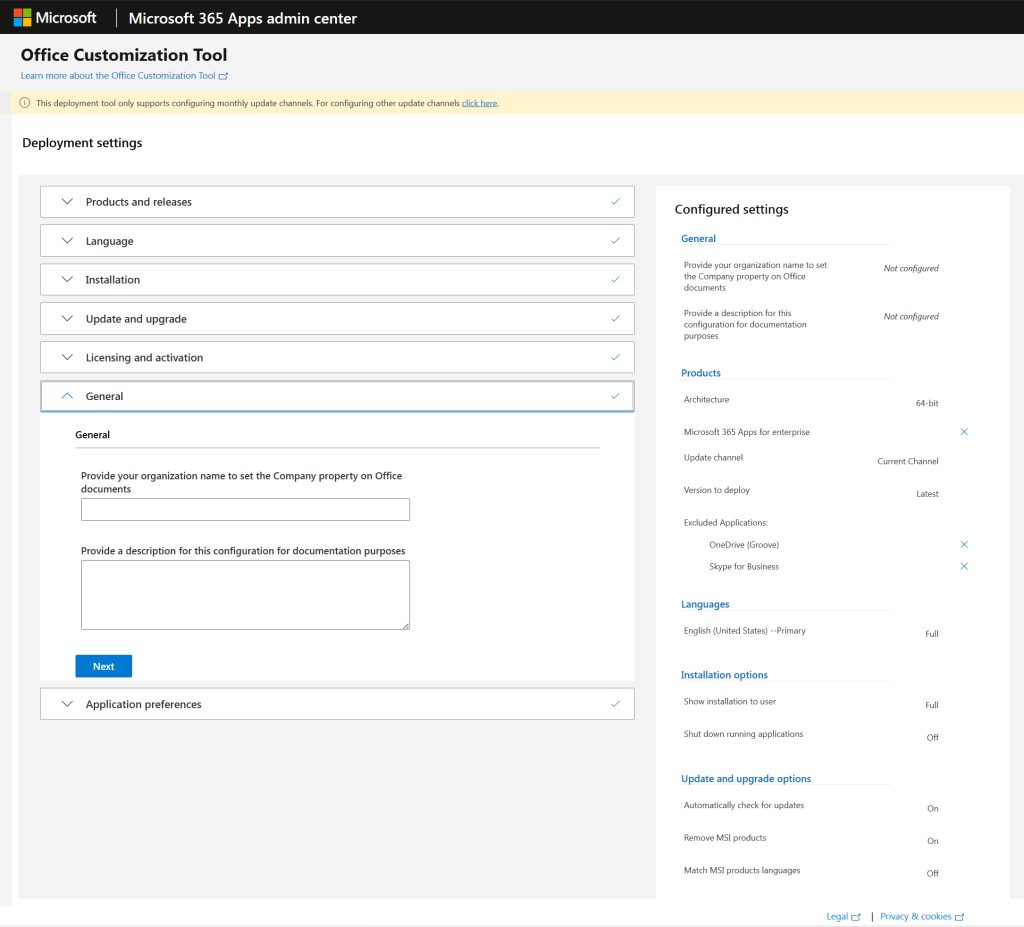
The General section, shown in Figure 7 simply allows you to specify the name of your organization and to provide an optional description of the configuration. This description exists purely for documentation purposes.
Application preferences: Preconfigure Office app settings
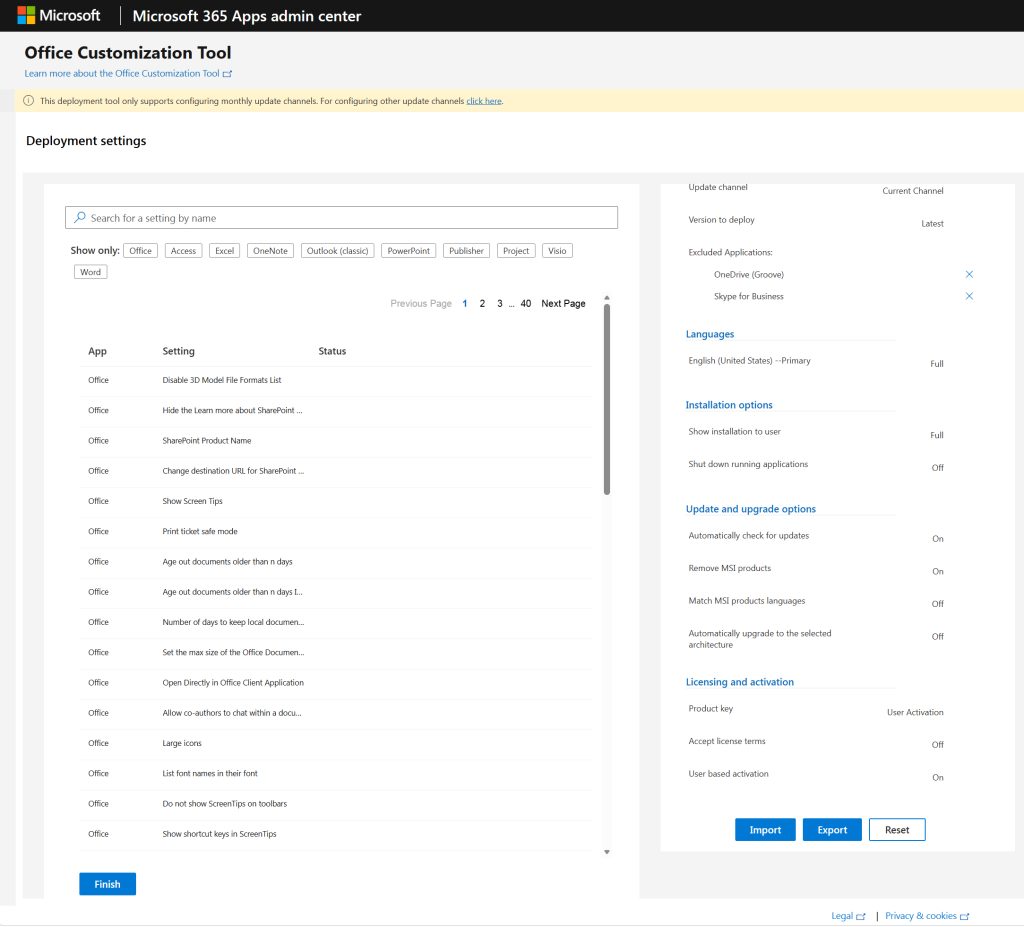
The Application Preferences section, which you can see in Figure 8, is designed as a means for pre-controlling application settings. As an example, you might configure the default font used by Microsoft Word. Because of the sheer number of settings that are exposed, it’s best to use the search box to locate the specific settings that you are interested in.
Deploying the wrong activation model can lead to sign-in prompts, activation failures, or user confusion after rollout.
Before generating your OCT configuration, determine:
- Whether devices are dedicated or shared
- Which Microsoft licensing model is being used
- Whether users connect through virtual desktops
- Whether Visio or Project licensing must be managed separately
Config.xml templates for common Office deployment scenarios
Below you will find various templates. You can save these templates in XML format, import them into the Office Customization Tool, and then simply add anything that might be specific to your organization and export the file.
The Office Customization Tool allows administrators to import existing XML configurations, make changes, and export updated versions. This makes it possible to establish approved deployment templates for different groups of users.
Keeping your XML files under version control provides several benefits:
- Consistent deployments across multiple teams
- Easier troubleshooting
- Faster onboarding for new administrators
- Clear change history when deployment settings are modified
If you’re managing Office deployments at scale, think of XML configurations as infrastructure code rather than disposable setup files. A well-maintained template library can significantly reduce deployment complexity over time.
Config.xml template: Microsoft 365 Apps with core Office apps only
<Configuration ID="68484686-c800-4a8e-bed4-3fdf71140b5d">

  <Add OfficeClientEdition="64" Channel="Current">

    <Product ID="O365ProPlusRetail">

      <Language ID="en-us" />

      <ExcludeApp ID="Access" />

      <ExcludeApp ID="Groove" />

      <ExcludeApp ID="Lync" />

      <ExcludeApp ID="OneDrive" />

      <ExcludeApp ID="OneNote" />

      <ExcludeApp ID="Publisher" />

      <ExcludeApp ID="Teams" />

    </Product>

  </Add>

  <Updates Enabled="TRUE" />

  <RemoveMSI />

</Configuration>
Config.xml template: Microsoft 365 apps with Project and Visio
<Configuration ID="528d234d-5a26-47c6-9ddf-3707c3f97c87">

  <Add OfficeClientEdition="64" Channel="Current">

    <Product ID="O365ProPlusRetail">

      <Language ID="en-us" />

      <ExcludeApp ID="Groove" />

      <ExcludeApp ID="Lync" />

    </Product>

    <Product ID="VisioProRetail">

      <Language ID="en-us" />

      <ExcludeApp ID="Groove" />

      <ExcludeApp ID="Lync" />

    </Product>

    <Product ID="ProjectProRetail">

      <Language ID="en-us" />

      <ExcludeApp ID="Groove" />

      <ExcludeApp ID="Lync" />

    </Product>

  </Add>

  <Updates Enabled="TRUE" />

  <RemoveMSI />

</Configuration>
Config.xml template: Lightweight Office deployment with Word, Excel, and PowerPoint
<Configuration ID="5845bf3d-9899-4e53-84cb-8848d02612c8">

  <Add OfficeClientEdition="64" Channel="Current">

    <Product ID="O365ProPlusRetail">

      <Language ID="en-us" />

      <ExcludeApp ID="Access" />

      <ExcludeApp ID="Groove" />

      <ExcludeApp ID="Lync" />

      <ExcludeApp ID="OneDrive" />

      <ExcludeApp ID="OneNote" />

      <ExcludeApp ID="Outlook" />

      <ExcludeApp ID="OutlookForWindows" />

      <ExcludeApp ID="Publisher" />

      <ExcludeApp ID="Teams" />

    </Product>

  </Add>

  <Updates Enabled="TRUE" />

  <RemoveMSI />

</Configuration>
Frequently asked questions
What is the Office Customization Tool used for?
The Office Customization Tool is a free utility that can be used to automate click to run deployments of Microsoft Office. Normally, when you install Microsoft Office, there are various questions asked during the Setup process. The Office Customization Tool allows you to save the answers to those questions in a configuration file so that you do not have to answer the questions during Office Setup. The tool also allows you to specify other options such as the architecture to be used, update preferences, and which applications should be installed.
How do I deploy only Word and Excel
How Do I DeployAs you are working through the Office Customization Tool, expand the Products and Releases section and then scroll down. Near the bottom of this section, you will find a list of Office applications. You can enable the Office applications that you want to install (in this case, Word and Excel) and disable all of the others. Only Word and Excel
Do I need to uninstall first?
While you can manually uninstall any previously existing Office deployment, you don’t necessarily have to. The Office Customization Tool’s Update and Upgrade section includes an option to automatically uninstall any MSI versions of Office that might already exist. There are also options for uninstalling other Office components such as Visio, Project, SharePoint Designer, and InfoPath.
Can I save and reuse XML templates
Yes. When you generate an XML file, you can use that file on as many machines as you like, assuming that Office will be installed in the same way on each machine. If you need to change something later on, you can create a new XML file or you can use the Import button to import your existing XML file into the Office Customization Tool. You can then modify and then regenerate the XML file.

As an internationally bestselling tech author and a former 22-time Microsoft MVP, Brien Posey has written or contributed to dozens of books and created a variety of full-length video training courses on all sorts of IT and space-related topics. He’...