How to Add, Change, and Remove Mailbox Folder Permissions With PowerShell in Office 365

For IT administrators managing Office 365 and Exchange Server, having control over mailbox folder-level permissions is a crucial task. PowerShell, a powerful scripting language developed by Microsoft, offers a convenient and efficient way to control access to specific mailbox folders for users within an organization, including the calendar folder. In this article, I will detail how to add, change, and remove mailbox folder permissions using the PowerShell Add-MailboxFolderPermission and Set-MailboxFolderPermission cmdlets.
Understanding mailbox folder permissions
Before we dive into PowerShell commands, let me explain how mailbox folder permissions work in Office 365. Mailbox folder permissions refer to the rights granted to users to access specific folders and subfolders within another user’s mailbox. These permissions can range from simple read-only access to full control, depending on the level of access required.
Remember that calendar permissions are included here as the “Calendar” is simply another folder in a user’s mailbox.
The primary mailbox folder permission types
Here are the primary types of mailbox folder permissions:
- ReadItems: Allows the user to read items within the folder.
- FolderVisible: This enables the user to see the folder in the mailbox’s folder list.
- CreateItems: Permits the user to create items within the folder.
- EditOwnedItems: Grants the user the ability to edit items they’ve created within the folder.
- DeleteOwnedItems: Allows the user to delete items they’ve created within the folder.
- EditAllItems: Provides the user with the capability to edit all items within the folder.
- DeleteAllItems: Permits the user to delete all items within the folder.
- FolderContact: This enables the user to view the folder’s contents and see the associated contact information.
- FolderOwner: Provides the user with full access to the folder, including the ability to read, create, edit, and delete items.
Let me offer another way to look at the permission levels with roles, which can be assigned to users to grant them a specific combination of permissions.
| Role | Permissions |
| Author | CreateItems, DeleteOwnedItems, EditOwnedItems, FolderVisible, ReadItems |
| Contributor | CreateItems, FolderVisible |
| Editor | CreateItems, DeleteOwnedItems, EditOwnedItems, FolderVisible, ReadItems, DeleteAllItems, EditAllItems |
| NonEditingAuthor | CreateItems, DeleteOwnedItems, FolderVisible, ReadItems |
| Owner | CreateItems, DeleteOwnedItems, EditOwnedItems, FolderVisible, ReadItems, DeleteAllItems, EditAllItems, CreateSubfolders, FolderContact, FolderOwner |
| PublishingAuthor | CreateItems, DeleteOwnedItems, EditOwnedItems, FolderVisible, ReadItems, CreateSubfolders |
| PublishingEditor | CreateItems, CreateSubfolders, DeleteOwnedItems, EditOwnedItems, FolderVisible, ReadItems, DeleteAllItems, EditAllItems |
| Reviewer | FolderVisible, ReadItems |
Connecting to Exchange Online (PowerShell)
To manage individual permissions, we first need to connect to Exchange Online PowerShell. Ensure you have the necessary permissions to perform these tasks. Follow these steps to establish the connection.
Incidentally, I’ve had struggles with PowerShell and connecting to Exchange Online. Although ‘starting from scratch’ and installing the modules for the most recent version 3 (v3) module is rather painless, the past was rough. On almost every system, it was as of Microsoft spent more time documenting all the warnings and error messages IT Pros would get when trying to ‘Install-Module’ and ‘Import-Module’.
However, as I said, on a fresh system, you shouldn’t have any issues. First, open your favorite Terminal program and run this command to connect to your Office 365 Exchange Online tenant.
Connect-ExchangeOnline
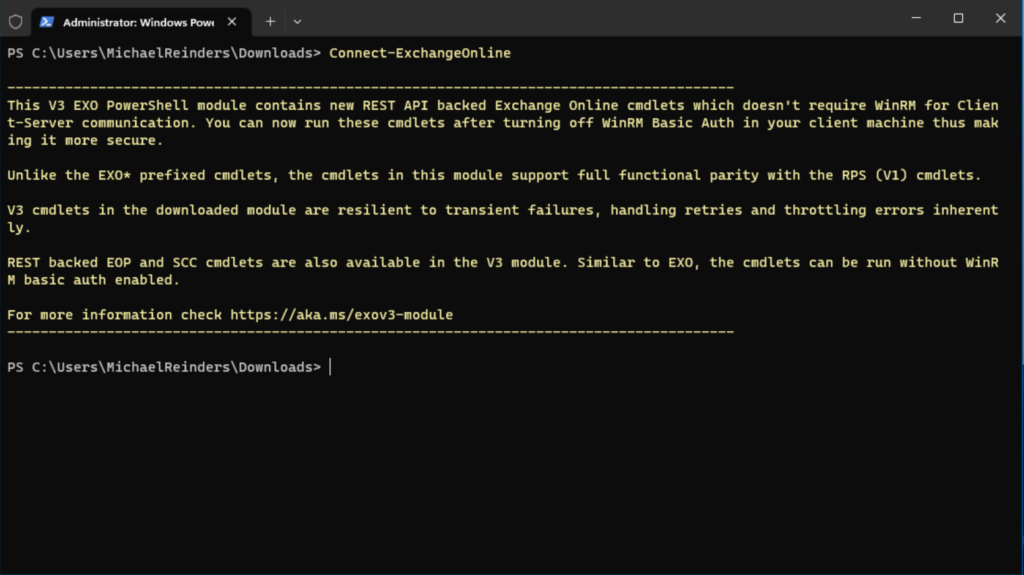
Are you using the new Exchange Online V3 module?
As an IT pro, you’ve probably seen updates from the ‘Microsoft 365 admin center – Message Center’ explaining that the older ‘REST API’ or v1 and v2 modules are going out of support. If you get an error message about the cmdlet not being recognized, you’ll first need to install or update the module for ExchangeOnlineManagement. You can check out the official Microsoft documentation for more information.
How to add mailbox folder permissions with PowerShell Add-MailboxFolderPermission
To add permissions to a specific mailbox folder, you can use the Add-MailboxFolderPermission cmdlet. The basic syntax is as follows:
Add-MailboxFolderPermission -Identity <MailboxIdentity> -User <UserOrGroupIdentity> -AccessRights <AccessRights>
- <MailboxIdentity>: The email address or alias of the mailbox containing the folder you want to modify.
- <UserorGroupIdentity>: The email address or alias of the user or group to whom you want to grant permissions.
- <AccessRights>: The level of access rights you want to grant to the user or group. This should be one or more of the previously mentioned permission types, separated by commas.
Let’s do an example: We want to grant Megan Bowen ‘FolderOwner’ access to Nestor Wilke’s Calendar folder. This will allow Megan ‘full access’ to Nestor’s Calendar. Let’s use the following command to do that:
Add-MailboxFolderPermission -Identity [email protected]:\Calendar -User "Megan Bowen" -AccessRights FolderOwner
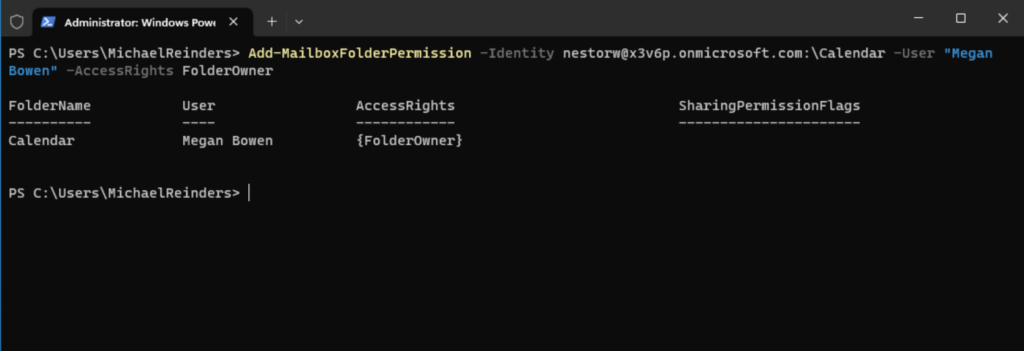
And thankfully, the output shows success. Megan Bowen now has FolderOwner access to Nestor’s Calendar. Nice and easy once you get the hang of the syntax!
You can use wildcard characters to specify multiple folders at once. For instance, to grant permissions on all folders in Miriam Graham’s mailbox to the group “Budget and Marketing Team” you can try the following command:
Add-MailboxFolderPermission -Identity [email protected]:\* -User [email protected] -AccessRights EditItems
Another parameter for these commands is the SharingPermissionFlags parameter. This assigns calendar delegate permissions. This parameter only applies to calendar folders and can only be used when the ‘AccessRights’ parameter value is ‘Editor’. Valid values are:
- None: Has no effect. This is the default value.
- Delegate: The user is made a calendar delegate, which includes receiving meeting invites and responses. If there are no other delegates, this value will create the meeting message rule. If there are existing delegates, the user is added to the meeting message rule without changing how delegate messages are sent.
- CanViewPrivateItems: The user can access private items on the calendar. You must use this value with the Delegate value.
You can specify multiple values separated by commas.
How can I change existing mailbox folder permissions?
To modify existing mailbox folder permissions, you can use the Get-MailboxFolderPermission cmdlet to check existing permissions and the Set-MailboxFolderPermission cmdlet to modify them. The basic syntax is as follows.
Get-MailboxFolderPermission -Identity [email protected]:\Calendar -user "Megan Bowen"
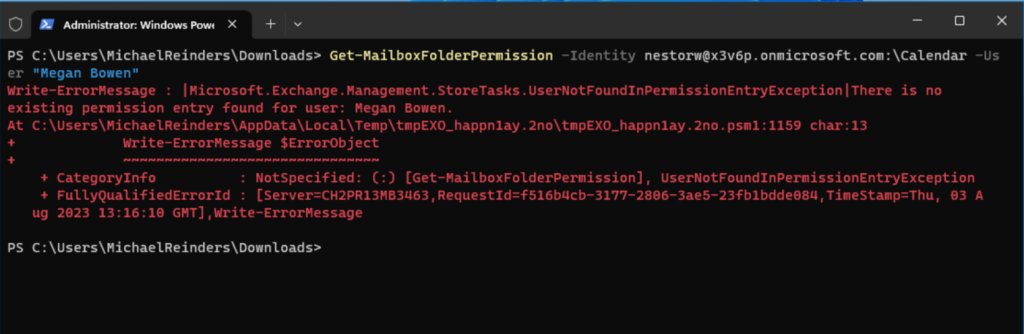
This error message makes sense – no permission entry currently exists for Megan in Nestor’s Calendar folder. And, if you’re slightly confused it’s because I’m performing these steps out of order per this article. Don’t worry, it all works!
Let’s go ahead and make some changes with the following command:
Set-MailboxFolderPermission -Identity <MailboxIdentity> -User <UserOrGroupIdentity> -AccessRights <AccessRights>
The parameters are the same as for the Add-MailboxFolderPermission cmdlet. Specify the new set of access rights you want to assign to the user or group.
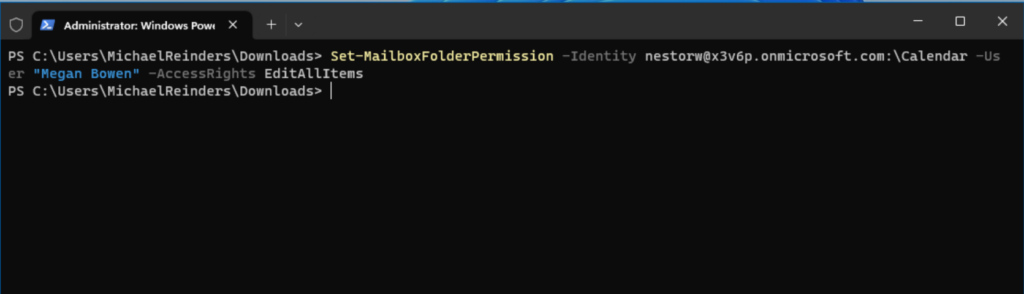
For example, if we want to change the permissions for Megan’s access to Nestor’s Calendar, we can run the following command.
Set-MailboxFolderPermission -Identity [email protected]:\Calendar -User "Megan Bowen" -AccessRights EditAllItems
This changed the prior access of ‘FolderOwner’ to ‘EditAllItems’.
Here’s how to remove mailbox folder permissions
And yes, to close out this pool of scenarios, we also need the ability to remove existing permissions from a user or users. Let’s use the Remove-MailboxFolderPermission cmdlet.
Remove-MailboxFolderPermission -Identity <MailboxIdentity> -User <UserOrGroupIdentity>
- <MailboxIdentity>: The email address or alias of the mailbox containing the folder from which you want to remove permissions.
- <UserOrGroupIdentity>: The email address or alias of the user or group whose permissions you want to remove.
Nice and simple. Let’s go ahead and remove Megan’s access to Nestor’s Calendar folder.
Remove-MailboxFolderPermission -Identity [email protected]:\Calendar -User "Megan Bowen"
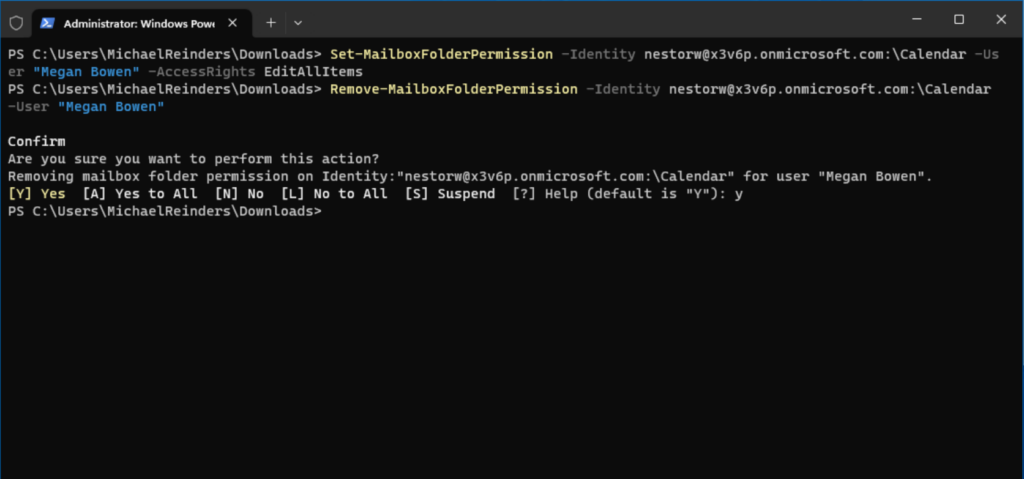
When removing, the cmdlet will prompt you to confirm. Go ahead and click ‘Y‘ to remove the permission.
Conclusion
PowerShell provides Office 365 administrators with a powerful toolset for managing mailbox folder permissions efficiently. By understanding the various access rights and utilizing the appropriate cmdlets, you can easily add, change, and remove mailbox folder permissions as needed. Remember to exercise caution while handling permissions, ensuring that users have the appropriate level of access to maintain a secure and well-organized Exchange environment.
Please feel free to leave a command or question below and thank you for reading!

Michael has been an IT Pro since 1998. He has worked predominantly in the Windows world including client and server operating systems, on-prem systems engineering (AD, DNS, etc.), and over the last ten years or so has embraced and immersed himself in...


