Install Azure Arc Agent on Windows Server
Manage hybrid IT environments using Azure Arc

In this guide I’ll show you how to install the Azure Arc agent on Windows Server using the Azure Portal onboarding flow and PowerShell scripts. You’ll also learn about the Azure Connected Machine Agent (CMA), tray icon visibility, proxy configurations, and advanced troubleshooting techniques.
For those managing hybrid environments with Linux, don’t miss my complementary article on Installing Azure Arc Agent on Linux to achieve a unified management strategy.
Azure Arc is revolutionizing hybrid infrastructure management, offering a unified solution to govern, monitor, and secure resources across on-premises, cloud, and edge environments, across all your different deployment types. With Azure Arc-enabled servers, IT professionals can treat Windows Server machines as Azure-native resources, benefiting from tools like Azure Monitor, Azure Policy, and centralized automation, all while reducing management complexity.
Why use Azure Arc for Windows Server?
Managing hybrid infrastructures with siloed tools often results in inefficiencies and increased complexity. Azure Arc solves this by centralizing server management within the Azure Resource Manager (ARM) deployment framework. Here are the key benefits of Azure Arc for Windows Server:
1. Centralized governance
- Use Azure Policy to enforce compliance across hybrid environments.
- Control access with Role-Based Access Control (RBAC) to ensure secure resource management.
2. Performance monitoring
- Use Azure Monitor to gain real-time insights into server performance.
- Configure alerts for critical metrics like high CPU utilization, memory usage, and disk activity.
- Integrate with Microsoft Copilot and the Microsoft Defender 365 security products and services.
3. Automation and scalability
- Deploy servers at scale using installation scripts or PowerShell cmdlets.
- Onboard servers seamlessly with the graphical wizard or interactive installer.
4. Cross-platform support
Azure Arc supports both Windows Server and Linux endpoints, making it ideal for diverse IT environments. For this guide, the focus is on Windows Server. Stay tuned for an upcoming guide on Linux configurations.
Prerequisites for onboarding Windows Server
Before onboarding a Windows Server machine to Azure Arc, ensure the following prerequisites are met.
Azure subscription
- Ensure you have an active Azure subscription. Create one for free if needed.
- Register the required resource providers:
- Microsoft.HybridCompute
- Microsoft.GuestConfiguration
- Microsoft.HybridConnectivity
Supported operating systems
Azure Arc supports Windows Server 2012 R2 or later, including Windows Server 2025.
Network and connectivity
- Ensure outbound connectivity to the following endpoints:
https://*.azure.com | https://*.microsoft.com | https://*.windows.net |
- If using a proxy server, specify the proxy server IP address and port number in the format:
http://<proxyURL>:<proxyport>
Most importantly, ponder whether to use the Azure public endpoint or (better) a private endpoint to communicate with the host off-Internet through a virtual private network (VPN) or ExpressRoute circuit.
Permissions
Use an account with Local Administrator privileges to install the Connected Machine Agent.
Updates and server metadata
- Install the latest cumulative updates to ensure compatibility.
- Validate the server’s metadata, including:
- Hostname
- Operating system version
- Assigned role (e.g., production, staging)
Step 1: Onboard Windows Server via Azure Portal
Microsoft simplifies onboarding with the Azure Arc Portal, which offers several options:
| Onboarding: | Method: |
| Add a Single Server | Use a custom-generated installation script |
| Add Multiple Servers | Automate onboarding with service principals |
| Add Windows Server with Installer | Use an interactive step-by-step installer |
| Add Servers from AWS | Onboard Amazon EC2 instances using an AWS connector |
| Add Servers from Update Management | Connect servers already managed by Azure Update Management |
Portal walkthrough for single server onboarding
- Log in to Azure Portal:
- Navigate to Azure Arc > Servers.
- Select Add.
- Select Add a Single Server and click Generate script.
- Review Prerequisites:
- Confirm that resource providers are registered.
- Verify the server meets all requirements.
- Provide Resource Details:
- Select the Azure subscription, resource group, and region.
- Specify the operating system as Windows.
- Note that SQL Server databases are fully supported workloads.
- Choose the connectivity method:
- For direct Internet access, select public endpoint. This is the “easy button” default.
- For private access, configure a private endpoint.
- For proxy configurations, enter the proxy server IP address and port number
- Add Tags:
- Use physical location tags (e.g., data center, branch) or custom tags.
- Download the Script:
- Click Download to save the onboarding script.
Step 2: Install the Azure Connected Machine Agent
The Azure Connected Machine Agent (CMA) enables communication between your server and Azure.
Execute the script
- Open an elevated PowerShell window on the target server.
- Navigate to the folder containing the downloaded script.
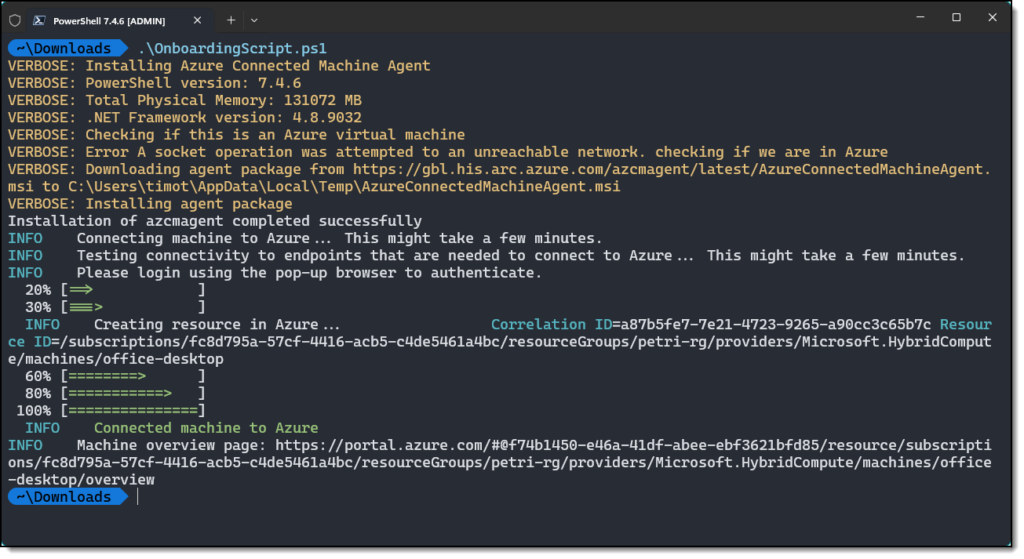
- Run the script shown below
- Sign in with your Azure credentials when prompted.
./OnboardingScript.ps1
The script performs the following tasks:
- Downloads the CMA installer from the Microsoft Download Center.
- Starts an authentication flow with your Azure sign-in credentials
- Installs the agent on the server.
- Registers the server with Azure Arc using metadata such as hostname, region, and role.
Confirm System Tray icon and service visibility
After installation, check for the Azure Arc system tray icon on your Windows Server. This icon indicates that the agent is running and connected.
To view the three Windows services installed by the Connected Machine Agent, run the following PowerShell command:
PS C:>Get-Service -Name himds, GCArcService, ExtensionService

Status Name DisplayName
------ ---- -----------
Running ExtensionService Guest Configuration Extension Service
Running GCArcService Guest Configuration Arc Service
Running himds Azure Hybrid Instance Metadata Service
Step 3: Verify the connection in Azure Portal
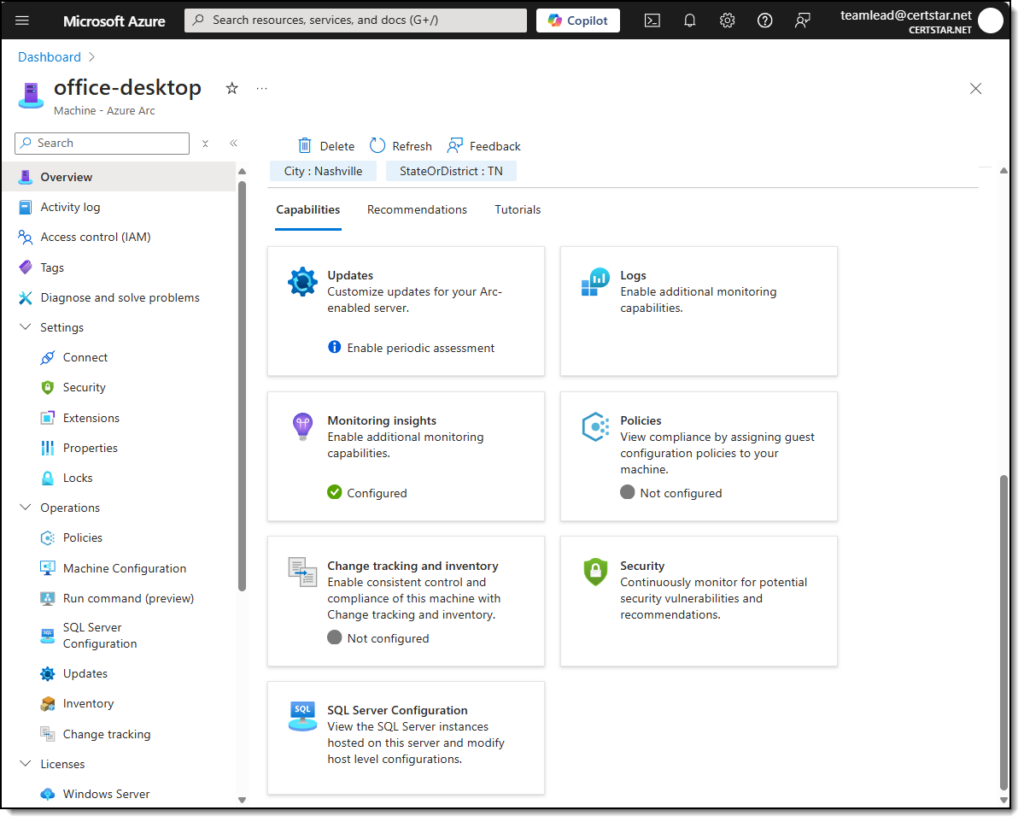
Once the script completes:
- Log in to the Azure Portal.
- Navigate to Machines – Azure Arc.
- Confirm the server is listed as Connected in the specified resource group.
Spend time browsing the detailed inventory Azure Arc provides for your Windows Server. As your server evolves (new roles, new hardware), those additional management capabilities light up transparently thanks to the Connected Machine Agent and the Azure Monitor agent.
Step 4: Automate with PowerShell cmdlets
For environments with many servers, automate onboarding using PowerShell.
Example PowerShell command
Use the Connect-AzConnectedMachine cmdlet to register servers:
Connect-AzConnectedMachine -ResourceGroupName ResourceGroup -Location RegionThis cmdlet:
- Downloads the Connected Machine Agent.
- Installs the agent.
- Registers the server with Azure Arc.
Step 5: Enable Azure Monitor for Operational Insights
Azure Monitor integrates seamlessly with Azure Arc to provide advanced telemetry.
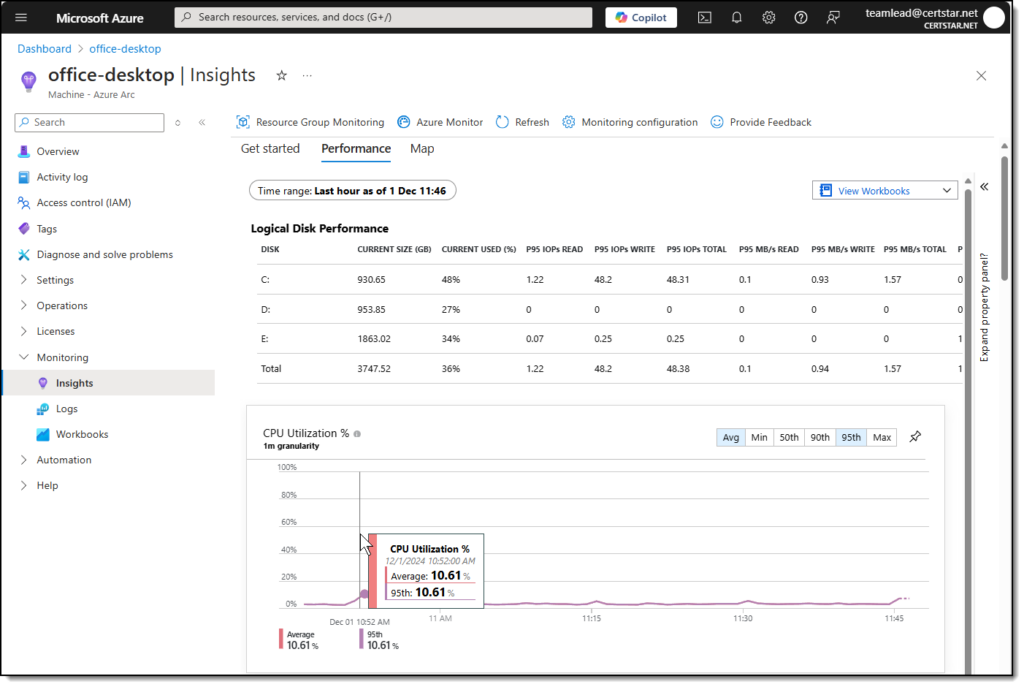
Enable Insights
- In the Azure Portal, navigate to Machines > Azure Arc.
- Select the onboarded server and open Insights.
- Link the server to a Log Analytics Workspace.
- Configure alerts for key performance metrics:
- CPU utilization
- Disk I/O
- Memory usage
With Azure Monitor, IT teams can:
- Create unified dashboards for hybrid environments.
- Proactively address performance issues with anomaly alerts.
Troubleshooting common issues
Agent connectivity problems
- Verify outbound Internet connectivity.
- Confirm proxy settings and port configurations.
Node shows as disconnected
- Restart the agent service:
net stop himds && net start himds
- Re-run the onboarding script for reauthentication.
Compliance violations
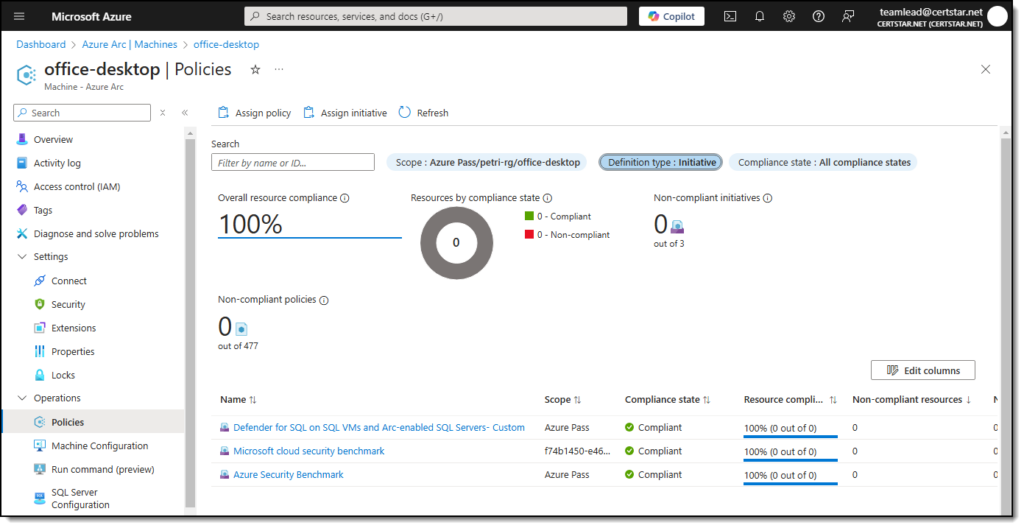
Ensuring compliance in Azure Arc-enabled servers is crucial for maintaining governance across hybrid environments. Azure Policy allows you to monitor, enforce, and remediate compliance requirements at scale. Using predefined or custom initiatives, you can assess compliance status, as shown in Figure 1, where all applied policies are fully compliant.
Azure Policy integrates seamlessly with Arc, providing visibility into non-compliant resources and enabling automated remediation for continuous compliance across your environment. This approach ensures your servers remain secure and aligned with organizational standards.
Why Azure Arc is essential for hybrid IT
Azure Arc provides a comprehensive solution for hybrid IT management, offering:
- Unified Governance:
- Centralize policy enforcement across diverse environments.
- Operational Excellence:
- Use Azure Monitor to optimize performance and reduce downtime.
- Scalability:
- Automate onboarding with scripts or the Azure Arc setup wizard.
With support for both Windows Server and Linux, Azure Arc empowers organizations to streamline operations and focus on innovation.
Control your environment with Azure Arc
Take control of your hybrid environment today. Onboard your Windows Server machine to Azure Arc by following this guide. For more advanced scenarios and insights, explore my article Azure Arc: Monitoring and Securing Hybrid Environments. Stay tuned for our next article focusing on transforming Linux endpoints across hybrid cloud & multi cloud environments into Arc-enabled servers.
Tim Warner is a seasoned IT professional and educator with extensive experience in Microsoft Azure, PowerShell, and cross-platform solutions. As a contributor to Petri, Tim breaks down complex technical concepts into accessible, practical insights fo...


