Get-AdUser: How to Audit Active Directory Users with PowerShell
- Blog
- PowerShell
- Post
PowerShell is an essential tool for IT admins, and it makes it easy to audit Active Directory user accounts with the Get-AdUser command. In this guide, we’re going to detail how to get started with the popular Active Directory cdmdlet.
Introduction to the Get-AdUser PowerShell cmdlet
The Get-AdUser cmdlet is one of the most popular Active Directory PowerShell cmdlets. It allows you to get a specified user object, or lets you perform customizable searches to get multiple user objects.
The Identity parameter is used to specify what Active Directory user to get. You have several options on how to identify the user:
- You can use their distinguished name (DN), GUID, security identifier (SID), or Security Account Manager (SAM) account name.
- You can also set the parameter to a user object variable such as
$UserAor pass a user object through the pipeline to the Identity parameter.
You can use the Filter or LDAPFilter parameters to search for and get more than one user, The Filter parameter uses the PowerShell Expression Language (PSL) to query Active Directory.
PowerShell Expression Language syntax gives admins rich type-conversion support for value types accepted by the Filter parameter. If you already have Lightweight Directory Access Protocol (LDAP) query strings, use the LDAPFilter parameter instead.
If there are no parameters explicitly set, Get-AdUser displays a default set of user object properties. To retrieve additional properties, use the Properties parameter. We’ll get into some of the parameters you can use later in this article.
How to use Get-AdUser and prerequisites
Before you can use Get-AdUser and other Active Directory-related PowerShell commands, you need to make sure the Active Directory module is installed and loaded on your workstation. Based on what version of Windows you’re running, there are varying methods you can follow to install the cmdlet.
For the sake of conciseness, I’ll go through the two most prevalent methods you’ll likely go through as an administrator or IT Pro managing your on-premises Active Directory.
First, you can use the following PowerShell command to install the Remote Server Administration Tools (RSAT) tool directly from Windows Update.
Add-WindowsCapability –online –Name "Rsat.ActiveDirectory.DS-LDS.Tools~~~~0.0.1.0"
The second method is to use the Settings application to install the RSAT tool directly. Click Start -> Settings -> Apps -> Optional Features -> Add a feature -> and put a checkmark in the RSAT: Active Directory Domain Services and Lightweight Directory Services Tools option.
Click the Install button.
How to find an AD user account using the -Identity parameter
All right, let’s start using the cmdlet and show you how I can help you become more proficient (and fast!) to get the information you need. I’m working in my (Windows Server 2022 Active Directory) Hyper-V lab environment, and I’m logged into a Windows 10 21H1 client virtual machine (VM). I searched in the Start Menu for ‘Active Directory Module for Windows PowerShell’ and opened it via ‘Run as administrator.’
First, let me find a domain user based on the sAMAccountName attribute
Get-ADUser breinders
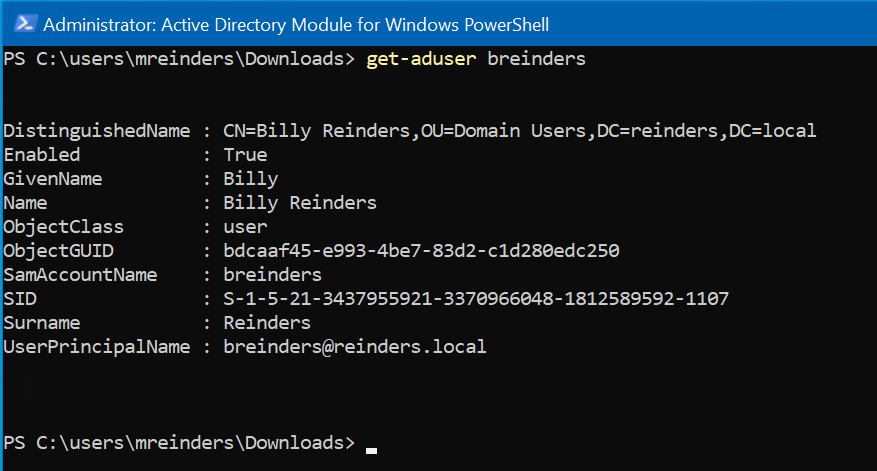
There you go. We can now use the objectGUID (or GUID) attribute to find a user. Let’s try:
Get-ADUser bdcaaf45-e993-4be7-83d2-c1d280edc250
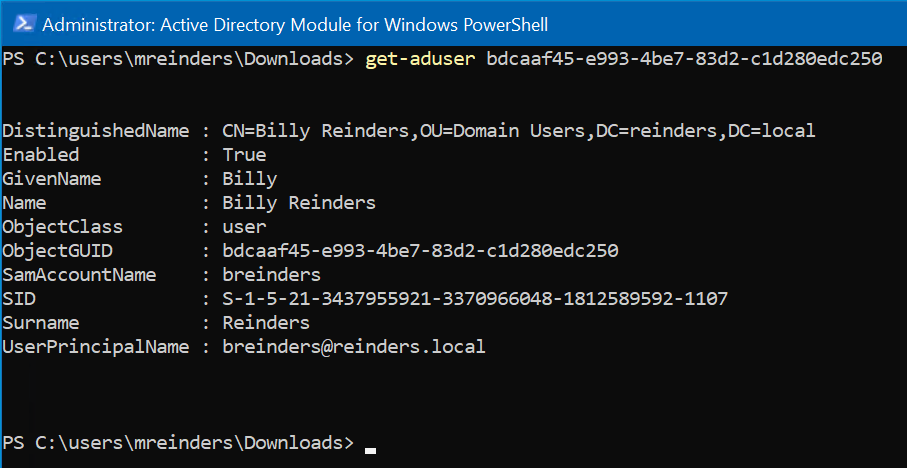
Ah, same user account. Excellent. We can also search for a user based on their Security Identifier, or SID.
Get-ADUser S-1-5-21-3437955921-3370966048-1812589592-1107
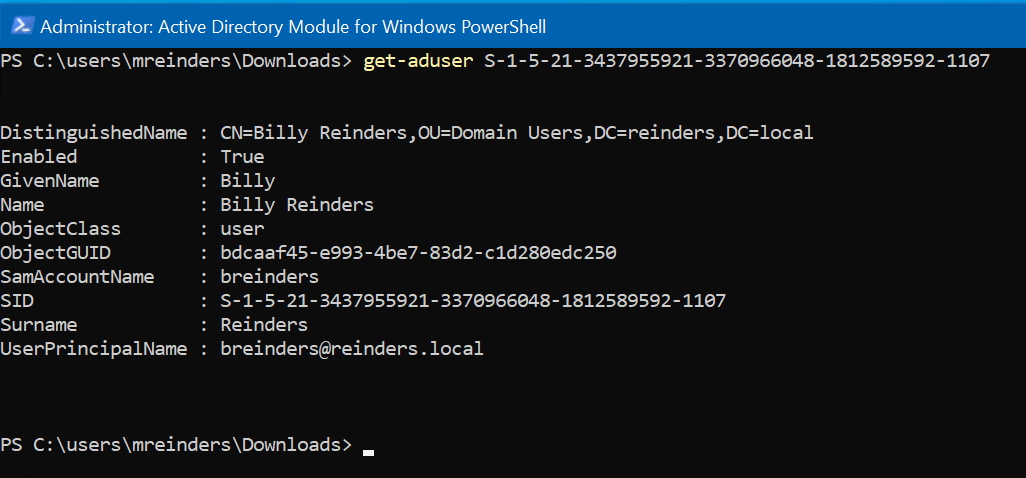
Yes, a little repetitive, but you get the point. You can also use the user’s Surname, Name, UserPrincipalName, and others.
Using the Get-AdUser filter
In larger environments, I would not recommend typing ‘Get-AdUser’ by itself as it will start retrieving ALL the user objects in your attached AD domain. Not only will this start flooding your console with data, but it could also put a noticeable strain on whichever domain controller your workstation is using.
If only we could filter out the entire user base and search for specific users based on some properties. Well, that’s exactly what the ‘-filter’ parameter is for!
The ‘-filter’ parameter specifies a query string that retrieves AD objects. This string uses the PowerShell Expression Language (PEL) syntax. The PEL syntax provides rich type-conversion support for value types received by the Filter parameter. The syntax uses an in-order representation, which means that the operator is placed between the operand and the value. Let’s go through some examples to give you a better idea.
First, let’s discover all the accounts that are ‘Enabled’.
Get-ADUser -filter {Enabled -eq "true"} | ft

We’re using that lovely PEL syntax to find all accounts with the ‘Enabled’ field equaling True. We’re also piping the output utilizing the Format-Table PowerShell cmdlet for an easier-to-read display format.
Next, let’s display all the users with an email address.
Get-ADUser -Filter {mail -ne "null"} -Properties Name,GivenName,mail| ft Name,GivenName,mail

First, notice we’re using the ‘-filter’ parameter to only include user accounts that don’t have a ‘null’ email address. Or, more simply, all the accounts with an email address. I know, sometimes it’s hard trying to think like a computer.
Second, we’re focusing on the three properties Name, GivenName, and mail (email address). We use Format-Table and list out those properties. Piece of cake!
You may also want to audit your accounts from a security perspective. You can also use the ‘-filter’ parameter to find all accounts with the ‘passwordneverexpires’ attribute. That is generally not advised.
Get-AdUser where name like?
Another cool feature is using various parameters with -filter to find only specific users matching the various properties of an AD user object. Although my lab environment is exceedingly small and only has about ten user accounts, it can still demonstrate the power and flexibility of being able to find the accounts very quickly you’re looking for. Here, let’s find all the users with ‘Reinders’ in their names.
Get-ADUser -Filter {name -like "*Reinders*"} -Properties * | ft Name,EmailAddress
We’re using the ‘Name’ parameter and finding all the accounts that have ‘Reinders’ anywhere in the name. It could be their first name, their last name, and even a middle name if it’s entered. If you ONLY wanted to find users with Reinders as the last name, change the -like field to be “*Reinders”. (Notice, there is no asterisk (*) at the end of the field).
Limiting Get-AdUser search scope by Organizational Unit
If you have a relatively large domain/enterprise, you may run into longer query times when running these commands, or unnecessary performance impacts on your domain controllers. Let’s talk about limiting the scope of these searches to a specific Organizational Unit (OU).
We can use the ‘-SearchBase’ parameter and specify an OU (or multiple OUs) using the following syntax.
Get-ADUser -SearchBase 'OU="Test Users",DC=reinders,DC=local' -filter * -Properties Name,EmailAddress | ft Name,EmailAddress

Here, we are limiting our scope to all users in the “Test Users” OU, then outputting their name and email address in table format.
Using Get-AdUser with alternate credentials
By default, the Get-AdUser cmdlet is run in the context of the currently logged-on user. If you wish to run the command with alternate credentials, you can use a variable, store the alternate credentials in that variable, then run the command using the ‘-Credential’ switch.
$cred = Get-Credential Get-ADUser -Credential $cred -Filter {name -like "*Reinders*"} -Properties * | ft Name,EmailAddress
Again, nice and straightforward!
Working with the Get-AdUser Properties parameter
I’ve shown a few examples of the ‘-Properties’ parameter, but let’s take a step back and explain it a bit.
The ‘-Properties’ parameter specifies the properties of the output object to retrieve from the server. By default, if you don’t use it, there are ten properties that are returned and displayed. Things like DistinguishedName, if the account is ‘Enabled’ or ‘Disabled’, the user’s GivenName, Name, GUID, and other more system-like attributes. But there are quite a few available. Use this parameter to retrieve properties that are not included in the default set.
Specify properties for this parameter as a comma-separated list of names. To display all the attributes that are set on the object, specify * (asterisk).
To access these other properties, you simply specify it; use the name of the property. For properties that are not default or extended properties, you must specify the Lightweight Directory Access Protocol (LDAP) display name of the attribute.
Let’s go through a few examples.
Get-ADUser -filter * -Properties Name,PasswordLastSet | ft Name,PasswordLastSet
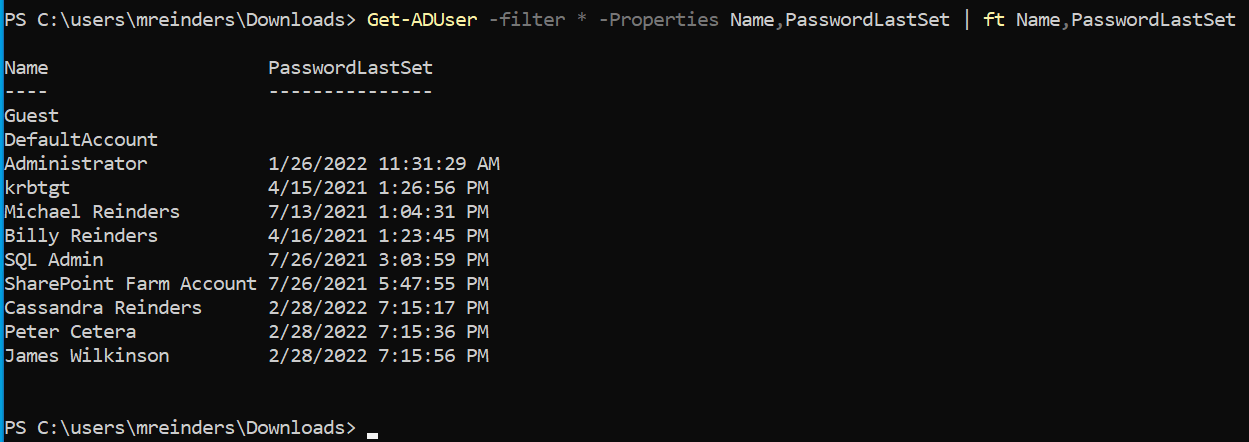
The above example shows all the users in the domain with their Name and the date/time of when their password was last set/reset.
Get-ADUser -filter * -Properties Name,whencreated | ft Name,WhenCreated
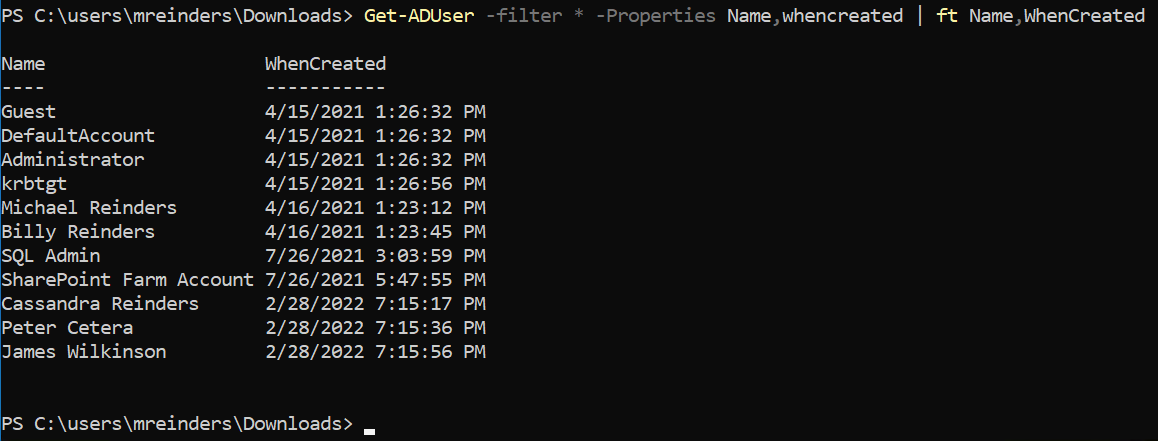
This shows when the account was created in Active Directory. Let’s finish this off with a query to bring the Name, Department, and Manager for each account.
Get-ADUser -filter * -Properties Name,Department,Manager | ft Name,Department,Manager

One final example and great use of the Export-Csv command. If you would need to get a listing of all the users in a domain and include all the properties, go ahead and run this command to export it all to a convenient CSV file.
Get-ADUser -filter * -properties * | Export-CSV c:\temp\Users.csv
Summary
I hope you gained some knowledge about how to use the Get-AdUser PowerShell command. This really scratches the surface, however, this is one aspect I like about the power of PowerShell: Learning about the core properties of a cmdlet and extrapolating it out to your organization.
Oftentimes, it is amazingly easy to think of many use cases you can utilize this command to solve an issue, create some documentation for other engineers, and assist with overall troubleshooting processes. It can come in very handy. And of course, using some of these commands to generate a PowerShell script… always boosts efficiency!
Feel free to leave any questions or comments below.
Related Article:
Table of contents
- Introduction to the Get-AdUser PowerShell cmdlet
- How to use Get-AdUser and prerequisites
- How to find an AD user account using the -Identity parameter
- Using the Get-AdUser filter
- Limiting Get-AdUser search scope by Organizational Unit
- Using Get-AdUser with alternate credentials
- Working with the Get-AdUser Properties parameter
- Summary


