I need to enable Secure Boot in Windows 8 and Windows Server 2012! Help!
Now that most new PC hardware is shipping with Unified Extensible Firmware Interface (UEFI) instead of the more familiar BIOS, you can take advantage of Secure Boot support in Windows, which is part of the UEFI framework. While UEFI is standard for most new hardware, Secure Boot isn’t always enabled by default.
Protection Against Root Kits
When Secure Boot is enabled on a PC, code loaded during the boot sequence, such as the Windows Boot Manager and NT kernel, is checked against signatures in the firmware to ensure that it hasn’t been replaced or modified. This is especially important considering that anti-malware software doesn’t run until later in the boot process, so there needs to be another security mechanism in place to protect against root kits that modify code that loads before Windows starts. Early Launch Antimalware (ELAM) then defends Windows by starting malware protection before any third-party drivers are initialized.
System Requirements
UEFI Specifications Version 2.3.1, Errata C or higher is required on UEFI Class 2 and Class 3 hardware. If Secure Boot is supported on your hardware, there will be an option to enable and disable it in the PC’s start-up options. To access these options, it’s usually necessary to hold down F2 or F12 as the computer boots before Windows starts.
How to Confirm That You Have UEFI
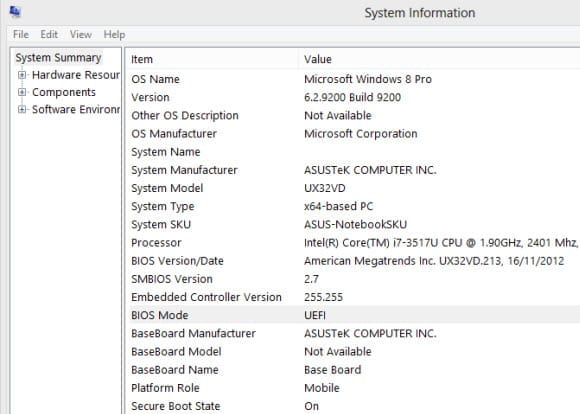
Not all computers have UEFI. To determine whether your PC has UEFI, run MSINFO32.
- Log on to Windows 8 or Server 2012 (or later) with a standard user account.
- Press the Windows Key to go to the Start screen.
- Type MSINFO32 and click the MSINFO32 icon in the search results.
- On the System Summary tab, check the left pane for BIOS Mode to see if you have UEFI.
You can also check to see if Secure Boot is enabled in the same Window. Look for the Secure Boot State entry further down in the System Summary.
How to Confirm Secure Boot Is Enabled Using PowerShell
You can check if Secure Boot is enabled using PowerShell by doing the following.
- In Windows 8 or Server 2012 (or later), press the Windows Key to go to the Start screen.
- Type PowerShell, right-click Windows PowerShell in the search results and then click Run as administrator in the pop-up bar at the bottom of the screen.
- Enter an administrator username and password, and click Yes.
- In the PowerShell console, type Confirm-SecureBootUEFI and press ENTER.
The command will return a true or false status in the PowerShell console.


