How do I enable Bitlocker drive encryption in Server 2012?
BitLocker can be useful on servers, especially in remote branch offices where there’s often a lack of physical security. Bitlocker drive encryption in Windows Server 2012 works a little differently compared to how it works in Windows 8 in that BitLocker must be installed as a feature before it can be configured. In this article, I’ll describe how to install BitLocker on Windows Server 2012 and how to configure encryption for your server’s hard drives.
Install BitLocker in Windows Server 2012
- Log on to Windows Server 2012 as a local administrator.
- Right-click on the PowerShell icon on the desktop Taskbar and select Run as Administrator from the menu.
- Type Add-WindowsFeature BitLocker -IncludeAllSubFeature -IncludeManagementTools –Restart in the PowerShell window and press Enter.
- The server should automatically restart. If not, restart the server manually.
Enable BitLocker on a fixed data drive
Once the server has restarted, open PowerShell again as an administrator. In this example, I’m going to turn on BitLocker drive encryption for the fixed data drive (D:) on my server.
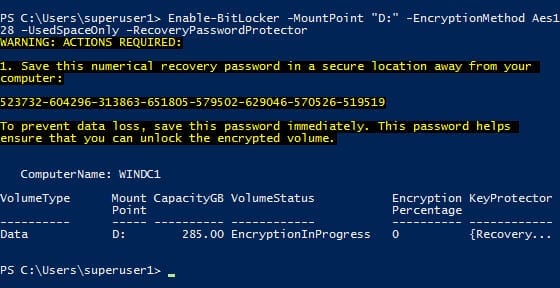
- Type the following command in the PowerShell window: Enable-BitLocker -MountPoint “D:” -EncryptionMethod Aes128 –UsedSpaceOnly –RecoveryPasswordProtector
- PowerShell will display a 48-digit recovery password in the window. You should make a note of this immediately and store it for safe keeping.
There are three different types of encryption you can specify: AES128, AES256 or HARDWARE for drives that are Encrypted Drive Hardware compatible. Click here for more information on Encrypted Drive Hardware disks. The –UsedSpaceOnly parameter is new to Windows Server 2012 and Windows 8. It stops BitLocker from encrypting free space, making the initial encryption process much faster.
The –RecoveryPasswordProtector parameter tells BitLocker to generate a 48-bit recovery key automatically, and it will be required to unlock the volume. If your server has a Trusted Platform Module (TPM) chip, specifying the –TPMandPinProtector parameter to utilize the chip for storing the recovery key and to require a PIN to unlock the drive is more secure than using a recovery password.
Finally, it’s worth noting that BitLocker encryption is not supported on virtual machines (VMs). However, you can enable BitLocker drive encryption on the virtual machine management host and encrypt volumes that contain VM configuration files and virtual hard disk (VHD) files.
Check the encryption status of a volume
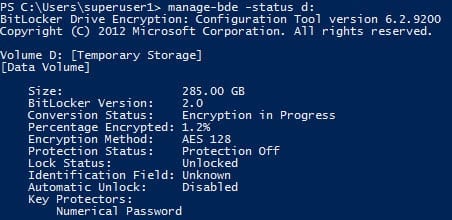
Notice that PowerShell states that protection is off on the volume where we’ve just enabled encryption. It will take some time for BitLocker to encrypt the used space. The volume is only fully protected when all the data is encrypted. To check the status of BitLocker encryption on a volume, run the following command: manage-bde –status d:
Unlocking encrypted volumes
With the current configuration, someone would manually need to enter the recovery password each time the server is started to unlock the encrypted volume. You can unlock the volume by double-clicking the drive’s icon in File Explorer and then entering the recovery key as prompted or by using the following two PowerShell commands:
$SecureString = ConvertTo-SecureString “554367-697686-438647-043637-043450-470294-553267-713141” -AsPlainText -Force
Unlock-BitLocker -MountPoint “D:” -Password $SecureString
Alternatively, you can turn on auto unlock using the following PowerShell command:
Enable-BitLockerAutoUnlock -MountPoint “D:”
Note that auto unlock only works on fixed data drives, and only if the operating system drive is also encrypted using BitLocker.
Disabling BitLocker
To disable BitLocker on a volume, run the following PowerShell command: Disable-BitLocker –MountPoint “D:”
Decryption may also take some time depending on the amount of data on the volume. Again, you can use the manage-bde command to check the status of the volume.


