Create Custom MMC Consoles for Managing Windows Server
In today’s Ask the Admin, I’ll show you how to create a custom management console to get quick access to all the tools you use on a regular basis in one console.
If you manage a large number of PCs or servers, you might want to consider creating your own custom Microsoft management console (MMC) so that you’ve got all the tools you need at your fingertips. The instructions below can be used in Windows 10 or Windows Server 2012 R2.
- In Windows Server 2012 R2, switch to the Start screen and type mmc. In Windows 10, type mmc in the search box on the taskbar.
- Select MMC in the search results pane.
- In the MMC window, press CTRL+M to add a snap-in to the console.
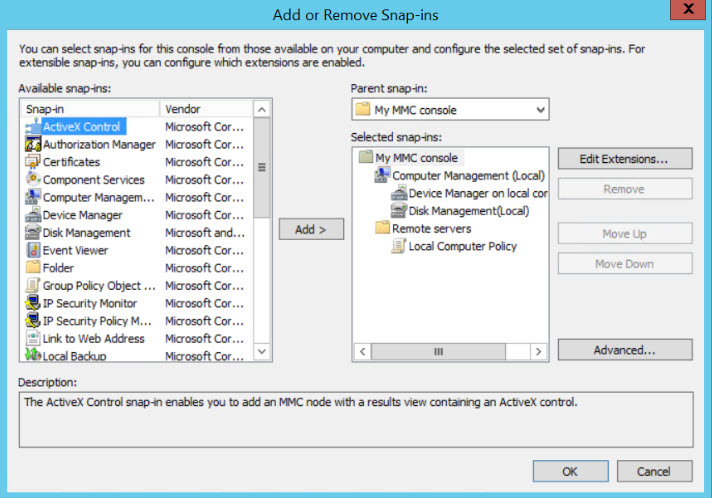
- In the Add or Remove Snap-ins dialog, click Advanced.
- In the Advanced dialog, check Allow changing the parent snap-in and then click OK.

- In the Add or Remove Snap-ins dialog, scroll through the list of available snap-ins and double click Computer Management. In the Computer Management dialog, select Local computer under This snap-in will always manage, and then click Finish.
- In the right of Add or Remove Snap-ins, click the Parent snap-in dropdown menu and select Computer Management from the list.
- In the Add or Remove Snap-ins dialog, scroll through the list of available snap-ins and double click Device Manager. In the Device Manager dialog, select Local computer under This snap-in will always manage, and then click Finish.
What’s important to note here is how Device Manager appears as a child object of Computer Management, and not Console Root. If you want to add another root object, in the right of Add or Remove Snap-ins, click the Parent snap-in dropdown menu and select Console Root from the list. If you have a lot of snap-ins or groups of snap-ins that you’d like to organize in a console, note that there’s also a snap-in called Folder that be added and used to organize snap-ins.

- Once you’re done adding snap-ins to the console, click OK in the Add or Remove Snap-ins dialog.
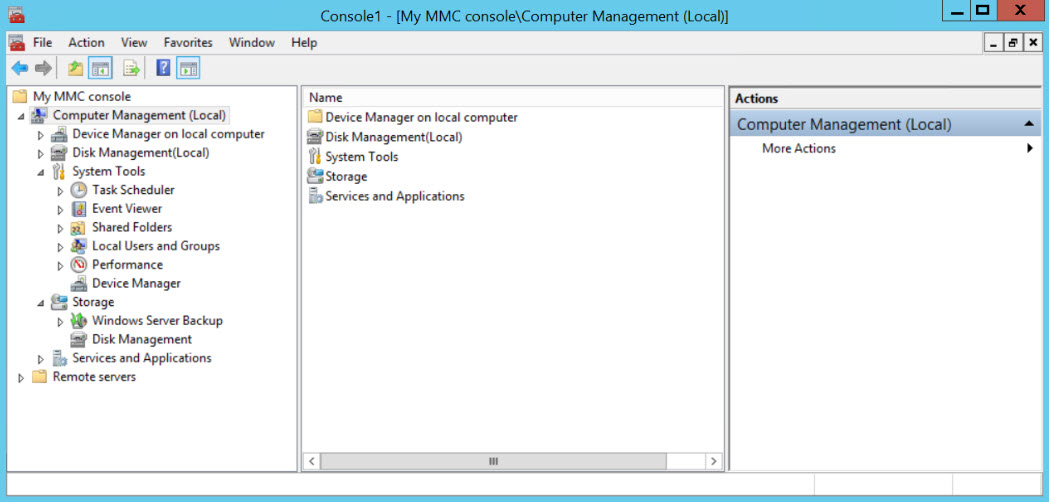
- In the main console window, right click Console Root, select Rename from the menu and give it a name appropriate for your customized console. You can repeat this process for Folder snap-ins.
- Press CTRL+S to save the MMC. In the Save As dialog, choose a location, give the MMC file a name and click Save. The default save location is the Administrative Tools folder.
Further customization options allow you to restrict user access to the console and change the default icon:
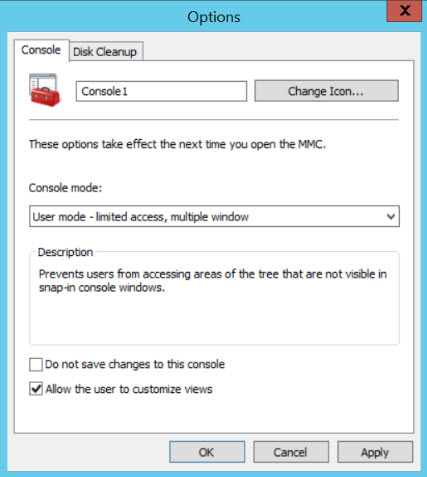
- In the console window, click File > Options.
- To change the console icon, click Change Icon in the Options dialog and select one of the available icons, or click Browse to select a .dll file that contains the icon you’d like to use. Click OK when you’re done.

- In the Options dialog, you can choose a Console mode using the dropdown menu. Author is the default mode and allows full access to modify the console. But you can also choose from three different User modes. When you select a mode in the Console mode dropdown menu, a description of what the mode allows the user to do is given.
- When you’re done with all customizations in the Options dialog, click OK.
In this article, I showed you how to create your own custom Microsoft management console (MMC) for convenient access to the tools you use every day.


