Command Line WMI: Formatting Data
In the last few articles, we’ve been learning how to take advantage of Windows Management Instrumentation, or WMI. Specifically, in part one we we looked at basic syntax and querying for the local computer, discovering ways to gather WMI information using the command line tool WMIC. In part two, we learned how to query remote machines and work with WMIC right from the command line.
Now, in part three, we’ll take a closer look at some advanced ways of formatting data.
If you’ve been following along, you’ve seen me use expressions like this to format the output:
wmic:root\cli>cpu list brief /format:list Caption=Intel64 Family 6 Model 30 Stepping 5 DeviceID=CPU0 Manufacturer=GenuineIntel MaxClockSpeed=1600 Name=Intel(R) Core(TM) i7 CPU Q 720 @ 1.60GHz SocketDesignation=CPU 1
Otherwise, WMIC would have displayed everything as one long line. But where did I discover /format? This option is a switch parameter for GET and LIST. Run a command like this, using any alias:
wmic:root\cli>os list /?
You’ll see a list of switch parameters. Each of these has its own help.
wmic:root\cli>os list /format /? Keyword/XSL filename to process XML results. USAGE: /FORMAT: NOTE: : ((| : )[,]). where :((=)[:]). NOTE: is a or an . Keywords: CSV HFORM HTABLE LIST MOF RAWXML TABLE VALUE XML htable-sortby htable-sortby.xsl texttablewsys texttablewsys.xsl wmiclimofformat wmiclimofformat.xsl wmiclitableformat wmiclitableformat.xsl wmiclitableformatnosys wmiclitableformatnosys.xsl wmiclivalueformat wmiclivalueformat.xsl
You’ve already seen me use a list and table as the default. What about creating a CSV file?
wmic:root\cli>logicaldisk where drivetype=3 get Name,Size,Freespace,SystemName /format:csv Node,FreeSpace,Name,Size,SystemName SERENITY,64002703360,C:,487439986688,SERENITY SERENITY,5952987136,E:,120031539200,SERENITY SERENITY,276582162432,G:,1000202035200,SERENITY
Actually, this didn’t create the file, only formatted the output. But not a problem based on what I covered in the last article.
wmic:root\cli>/output:"c:\work\disks.csv" logicaldisk where drivetype=3 get Name,Size,Freespace,SystemName /format:csv
Unfortunately, this ends up inserting a blank line at the beginning of the file, which could be problematic depending on how you need to use it. But it takes not much more effort to save all information from a list of computers to a CSV file.
wmic:root\cli>/node:@computers.txt /output:"c:\work\diskreport.csv" logicaldisk where drivetype=3 get /format:csv
How about creating an XML document? Looking at help, you’ll see two XML related options. I would suggest a command like this:
wmic:root\cli>/node:quark /output:"c:\work\quarksvc.xml" service list brief /format:rawxml
Or how about creating a quick and dirty HTML report?
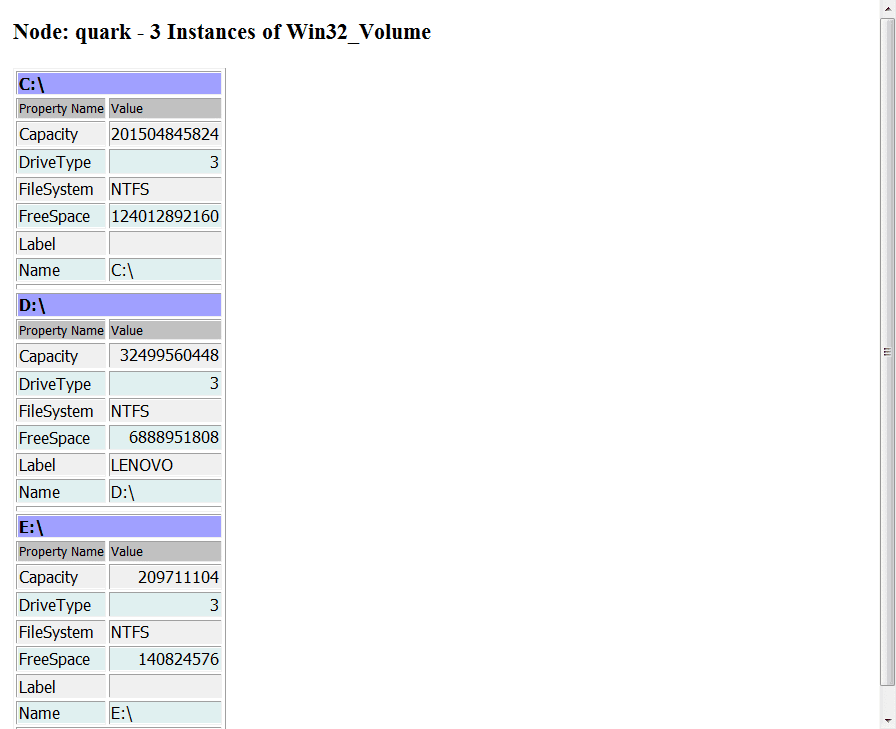
wmic:root\cli>/output:"c:\work\volume.html" volume list brief /format:hform
This will create an HTML page like Figure 1:
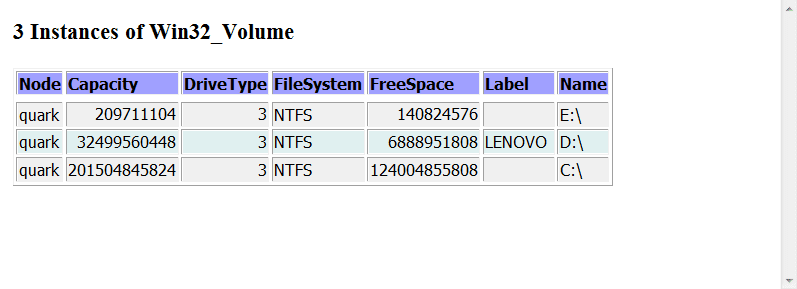
wmic:root\cli>/output:"c:\work\volume2.html" volume list brief /format:htable
I’ll wrap this up by creating a single HTML report that contains WMI information from 3 different classes. Because I’m in the interactive mode, the context will retain values for Output and and Append so I only need to enter them once.
wmic:root\cli>/Output:"c:\work\report.html" OS get /format:hform wmic:root\cli>/Append:"c:\work\report.html" computersystem get /format:hform wmic:root\cli>service list brief /format:htable
Running this from the command prompt, I would be a bit more explicit and specify output and append parameters. In fact, here’s a batch file that demonstrates how you might want to use WMIC.
@echo off
if %1$==$ (
rem use the localcomputername if nothing is specified
set computer=%computername%
) else (
rem use the computername passed as a parameter
set computer=%1
)
echo Creating report for %computer%
set htmlfile=%computer%-report.html
rem redirect wmic output to NULL since we don't really need to see it
wmic /node:%computer% /Output:"%htmlfile%" OS get /format:hform >NULL
wmic /node:%computer% /Append:"%htmlfile%" computersystem get /format:hform >NULL
wmic /node:%computer% /Append:"%htmlfile%" service list brief /format:htable >NULL
echo See %htmlfile%
set computer=
set htmlfile=
The batch file takes a computer name as a parameter but defaults to the local host. It creates an HTML report with the 3 WMI classes.
C:\>c:\scripts\wmicreport.bat quark Creating report for quark See quark-report.html
Overview
In some respects, using WMIC to create these types of reports is even easier than using PowerShell. The bottom line is, don’t think you need scripting or even PowerShell to work with WMI. This command line tool might appear a bit daunting at first, but with patience and some trial and error you’ll quickly discover many ways to use it.


