How to Add Windows Server 2022 as a Domain Controller

There is an updated version of this article here: How to Add a Domain Controller to an Existing Domain
Windows Server 2022 doesn’t include any significant changes to Active Directory (AD). But you will want to use it going forwards for your new domain controllers because of the improved security it provides over earlier versions of Windows Server.
There are two ways for system administrators to promote Windows Server 2022 to domain controller (DC). The first is using Server Manager, which has been the standard way to add, or ‘promote’ as is more commonly referred to, Windows Server 2022 as a DC. The second way, and easier way in my opinion, is to use PowerShell.
Whichever method you choose, adding Windows Server 2022 as a DC involves two main steps:
- Installing the Active Directory Domain Services (AD DS) server role binaries.
- Promoting the server to a domain controller.
But it’s also noting that there are some prerequisites that you should meet before promote windows server 2022 to domain controller. For instance, the server should be assigned a static IP address. And it’s also worth making sure that the server name is something relevant, like DC1, so that it can easily be identified.
Install Active Directory Domain Services on Windows Server 2022 with PowerShell
Before we install AD DS, let’s make sure we meet the basic prerequisites for a DC in Windows Server 2022.
Windows Server 2022 prerequisites
We’ll start by renaming the server.
- Log in to Windows Server 2022 as an administrator.
- Open the Start menu and click the Windows PowerShell
- In the PowerShell window, run the command below and press ENTER. Replace ‘DC1’ with the name that you would like to use for your domain controller.
Rename-Computer -NewName DC1
- Restart the server.
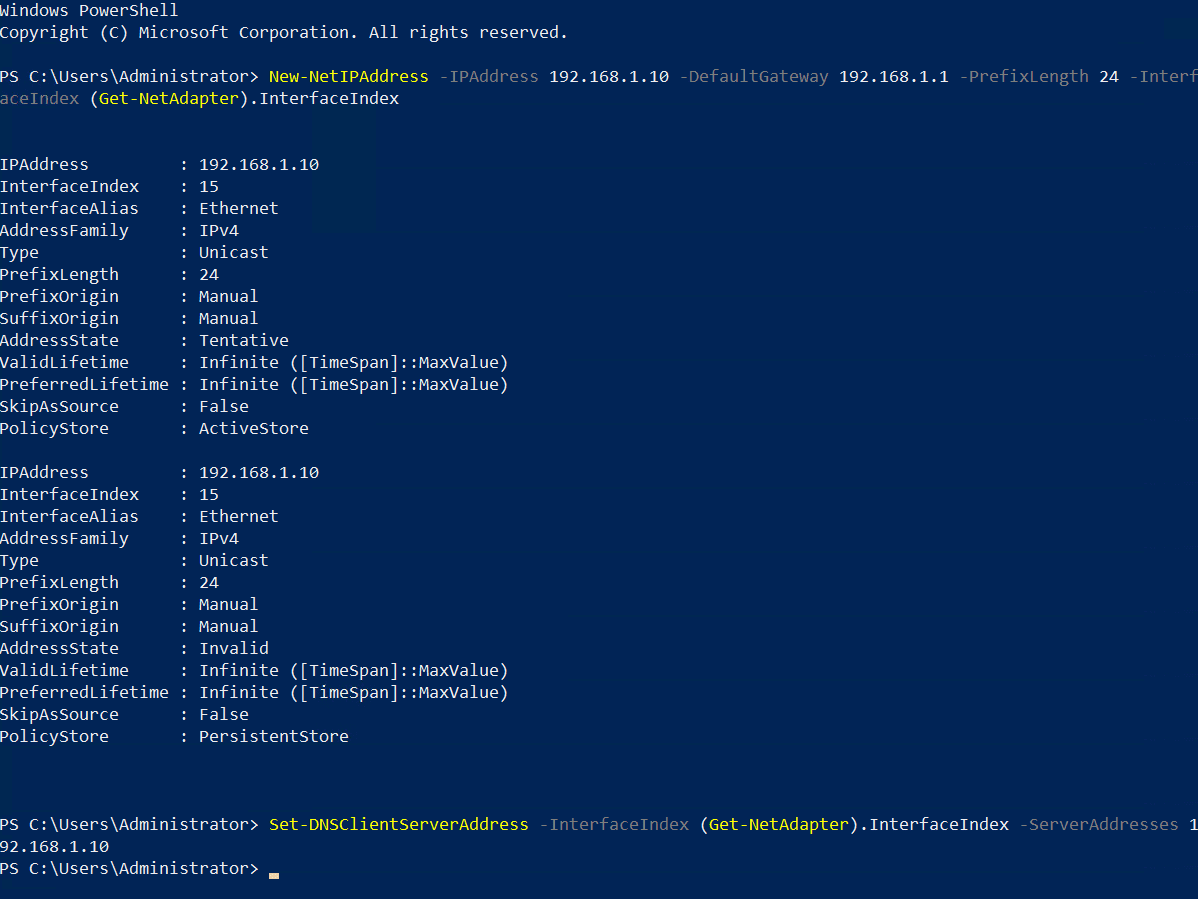
Once the server has rebooted, we can configure the network adapter with a static IP address. On my network, I will assign a static IP address of 192.168.1.10/24 and the default gateway is 192.168.1.1.
- Log in to Windows Server 2022 as an administrator.
- Open the Start menu and click the Windows PowerShell
- In the PowerShell window, run the New-NetIPAddress command below and press ENTER. Replace the values for IPAddress, DefaultGateway, and PrefixLength to those provided by your network administrator.
New-NetIPAddress –IPAddress 192.168.1.10 -DefaultGateway 192.168.1.1 -PrefixLength 24 -InterfaceIndex (Get-NetAdapter).InterfaceIndex
- Now configure the adapter’s DNS settings. We’ll set the preferred DNS server to be our domain controller’s IP address because the domain controller will also perform the function of DNS server for the domain. So, replace 192.168.1.10 with the same IP address you configured for the adapter. Run Set-DNSClientServerAddress as shown, and press ENTER.
Set-DNSClientServerAddress –InterfaceIndex (Get-NetAdapter).InterfaceIndex –ServerAddresses 192.168.1.10
Install the Active Directory Domain Services role
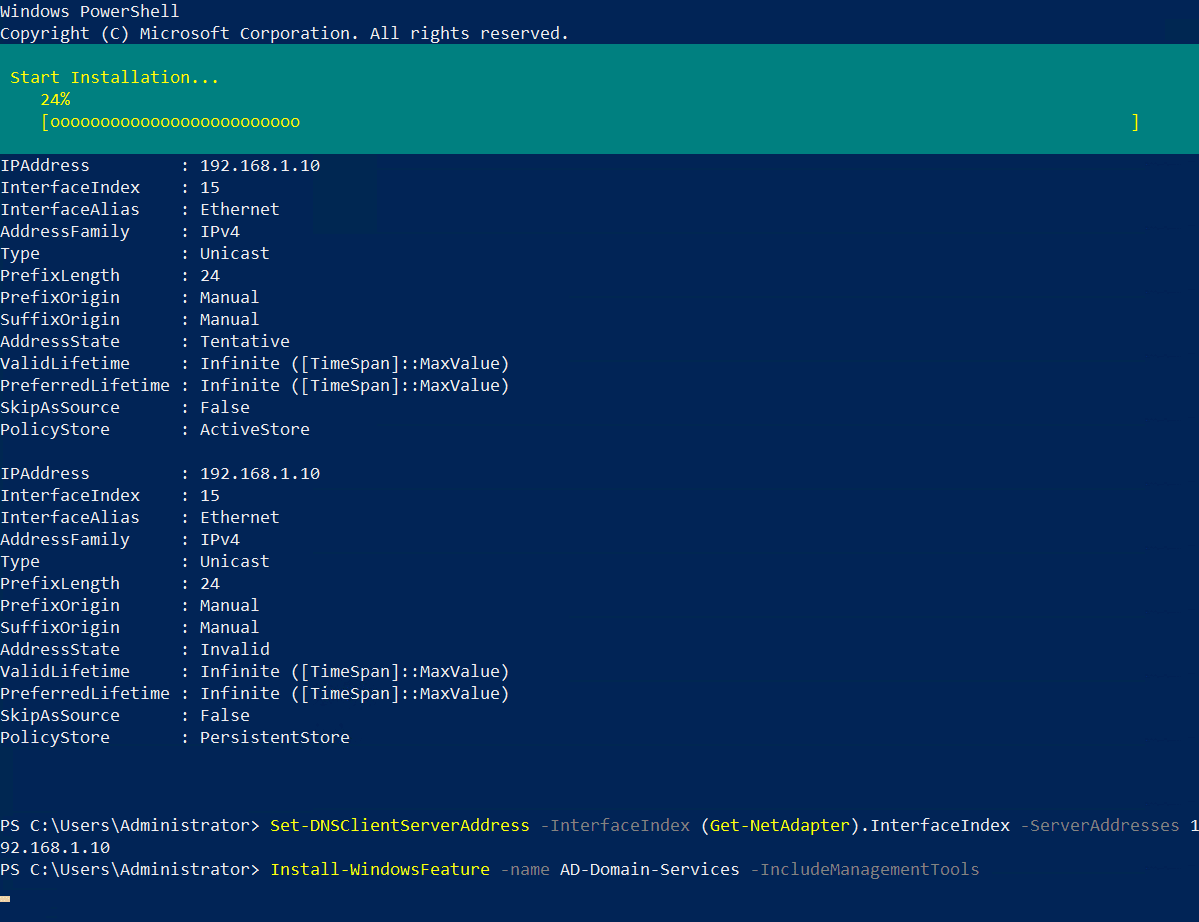
The next step is to install the AD DS server role. It’s easy to do using the Install-WindowsFeature cmdlet as shown below.
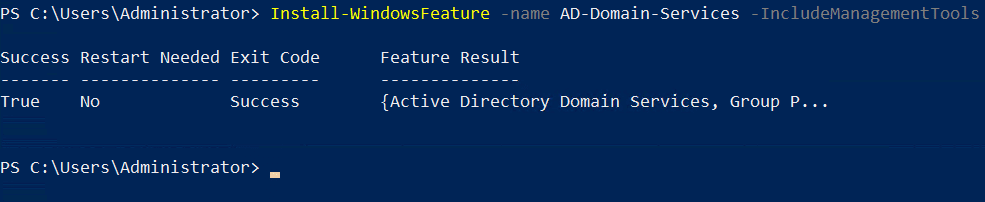
Install-WindowsFeature -name AD-Domain-Services -IncludeManagementTools
Once the AD DS server role is installed, you’ll get a message in the PowerShell window. The Success column should read True.
Install Active Directory Domain Services on Windows Server 2022 with Server Manager
If you’d prefer to install AD DS the hard way, here is a step-by-step guide using Server Manager.
Windows Server 2022 prerequisites
Let’s deal with the server’s name and IP address first.
- Log in to Windows Server 2022 with a local administrator account.
- Open Server Manager from the Start menu.
- In Server Manager, click Local Server in the left pane.
- In the Properties section on the right, click your server’s computer name to the right of the Computer name
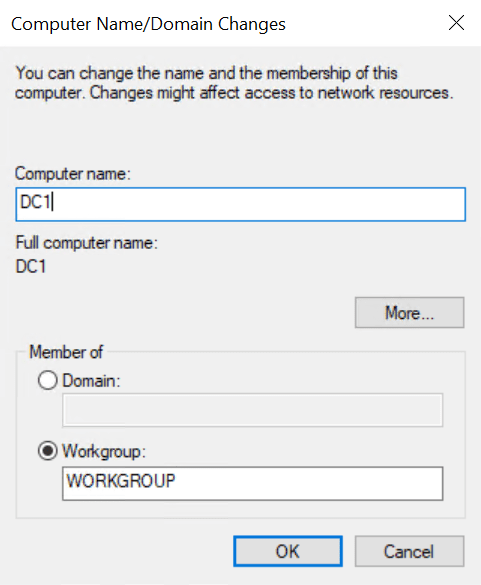
- In the System Properties dialog, click the Change button on the Computer Name tab.
- In the Computer Name/Domain Changes dialog, type a name for your server in the Computer name field and click OK.

- You’ll be prompted to restart the server. Click OK and then click Close in the System Properties dialog.
- Click Restart Now in the popup dialog.
Now let’s set a static IP address.
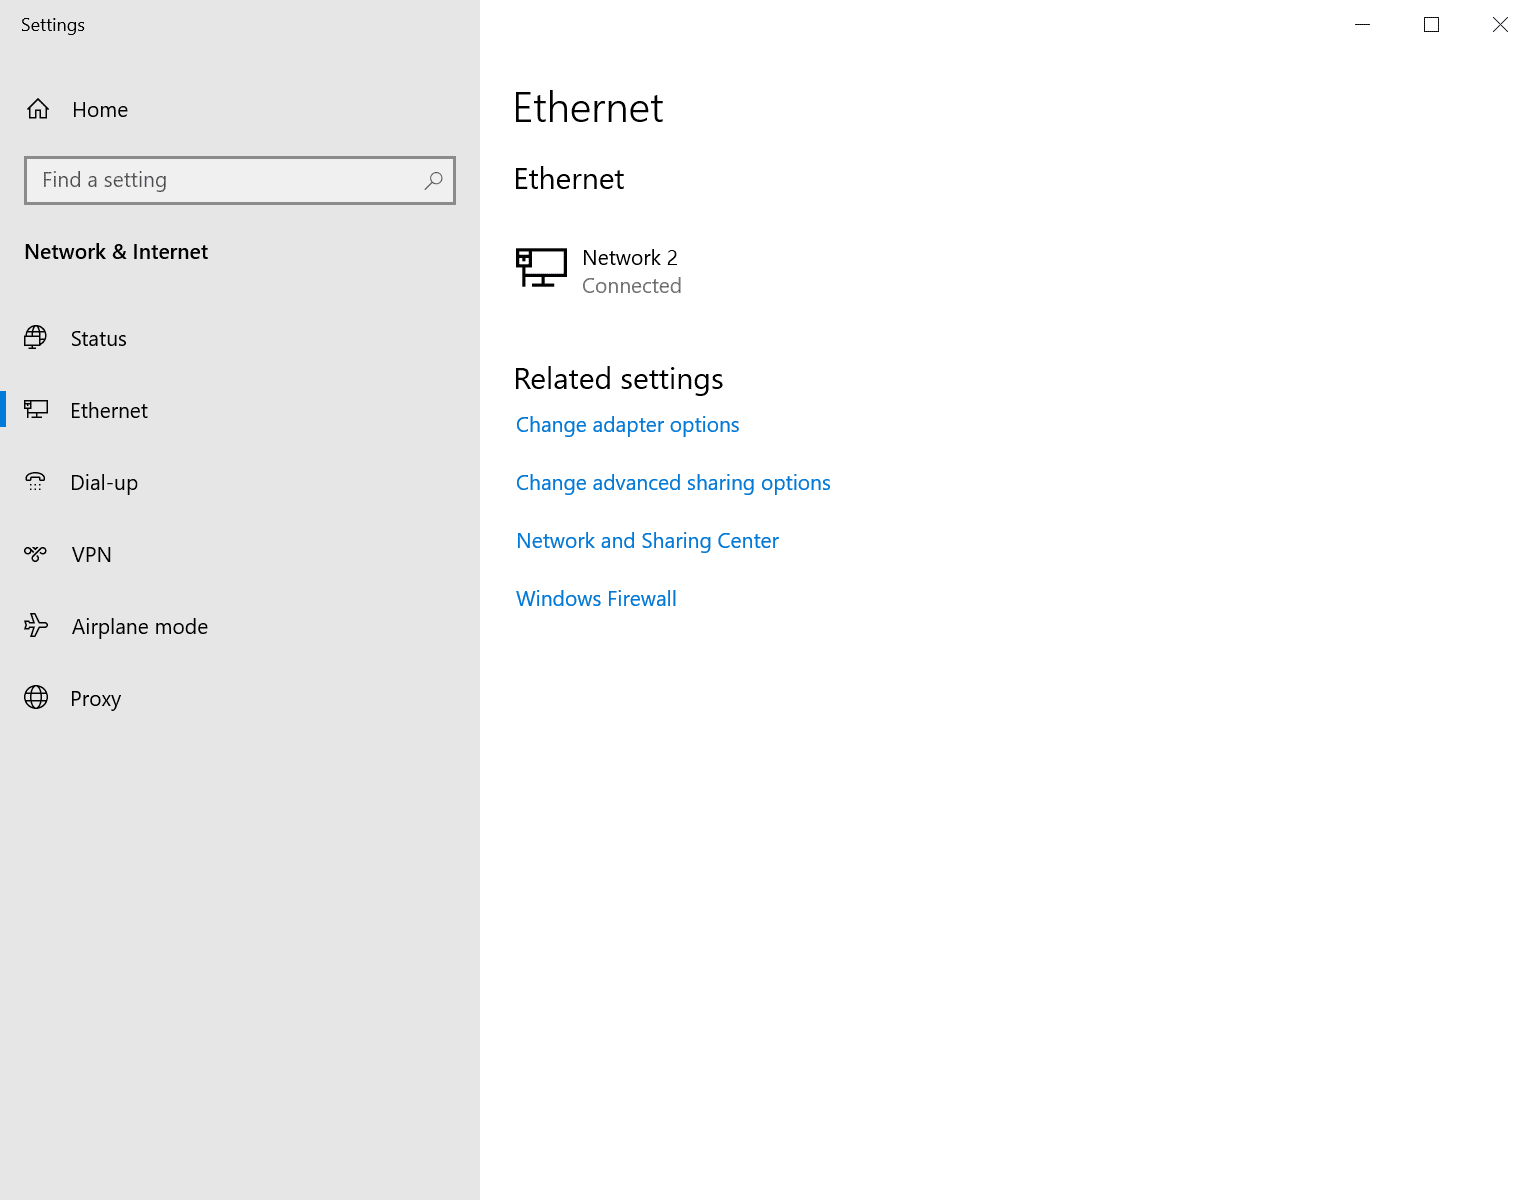
- Right click the network icon in the system tray in the bottom right of the taskbar and click Open Network & Internet settings.
- In the left pane of the Settings app, click Ethernet under Network & Internet.
- In the right pane under Related settings, click Change adapter options.
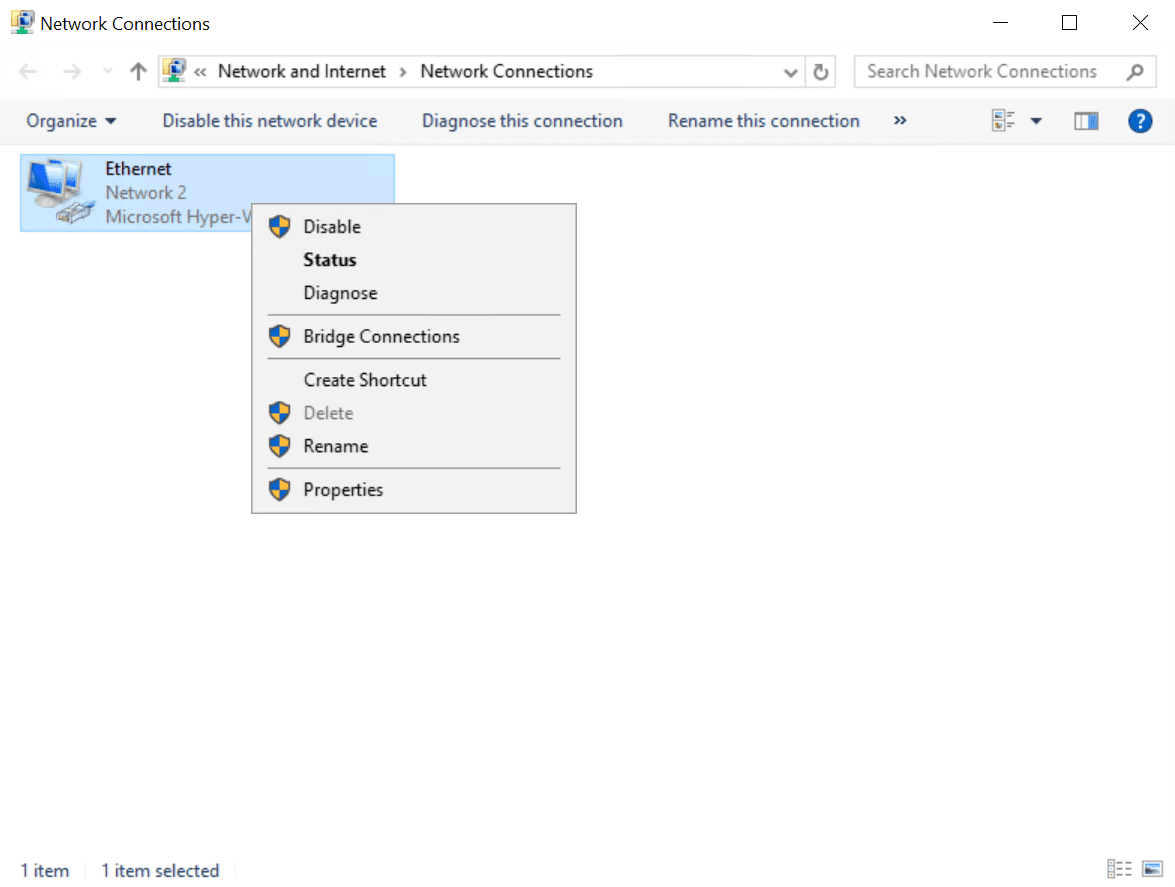
- In the Network Connections window, right click your server’s network adapter and select Properties from the menu.
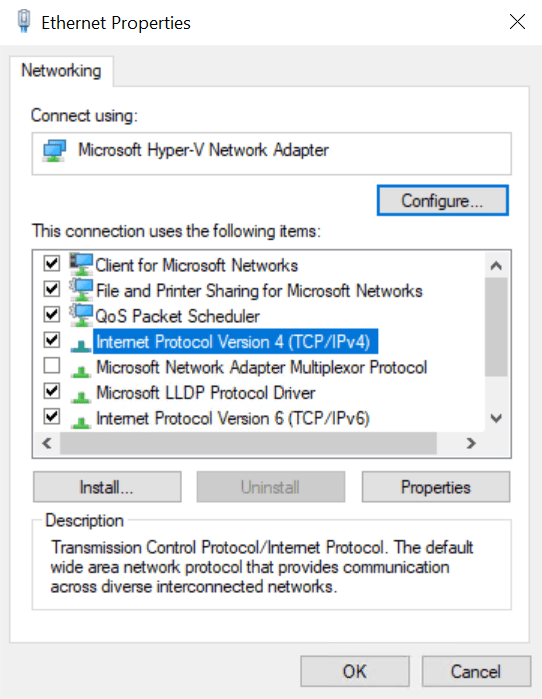
- In the Ethernet Properties dialog, click Internet Protocol Version 4 (TCP/IPv4), and then click Properties.
- In the Internet Protocol Version 4 (TCP/IPv4) Properties dialog, check Use the following IP address. You’ll need to fill out the following three fields: IP address, Subnet mask, Default gateway.
On my network, I will assign a static IP address of 192.168.1.10, subnet mask of 255.255.255.0, and the default gateway is 192.168.1.1.
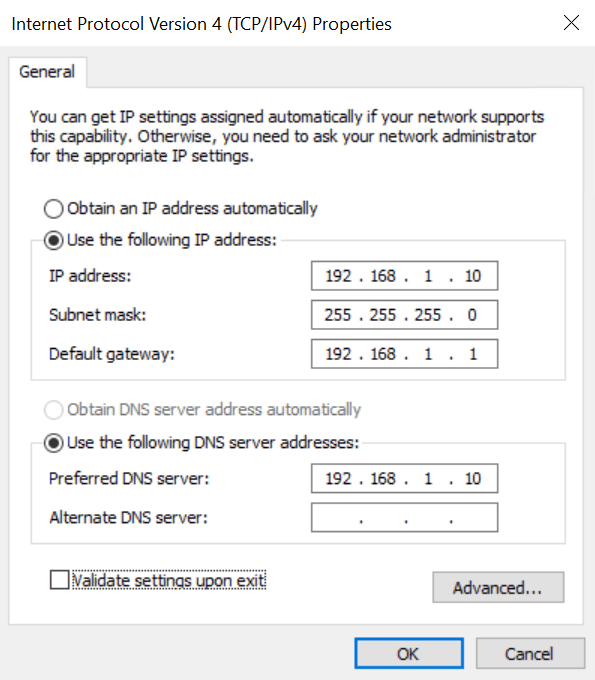
- Check Use the following DNS server addresses. Set Preferred DNS server to the same IP address that you assign Windows Server. So, in my example, I will use 192.168.1.10. Click OK when you’re done.
The first DC in your domain will also be a DNS server. The Active Directory Domain Services Configuration Wizard will automatically configure a DNS server for you.
- Close the Ethernet Properties dialog, Network Connections window, and the Settings app.
Install the Active Directory Domain Services role
Now let’s install the AD DS server role.
- Log in to Windows Server 2022 with a local administrator account.
- Server Manager should open by default. If it doesn’t, click the Start menu and find Server Manager in the list of installed apps and click it.
- In Server Manager, click the Manage menu in the top-right corner and select Add Roles and Features from the menu.

- In the Add Roles and Features Wizard, click Next on the Before You Begin screen.
- On the Installation Type screen, make sure that Role-based or feature-based installation is selected and click Next.
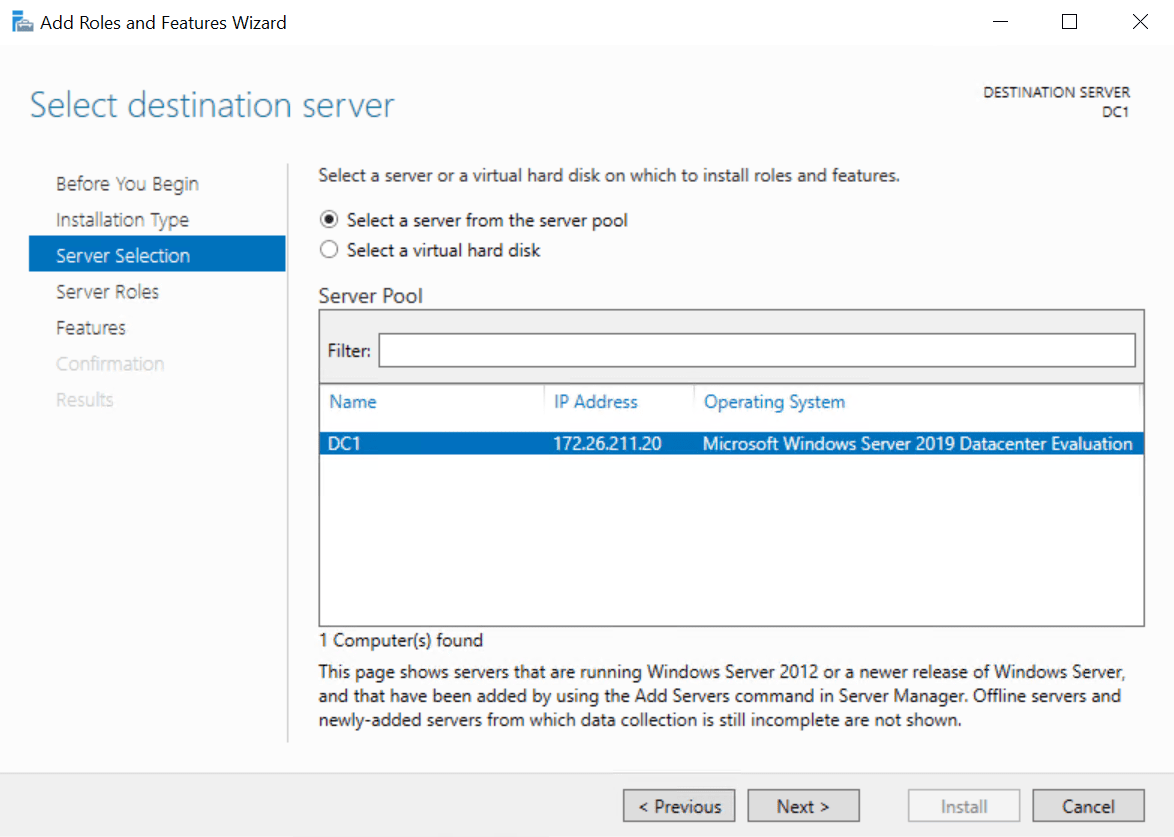
- On the Server Selection screen, make sure that your Windows Server is selected in the list and click Next.
- On the Server Roles screen, check Active Directory Domain Services in the list of roles.
- In the Add Roles and Features Wizard popup dialog, make sure that Include management tools (if applicable) is checked and then click Add Features.
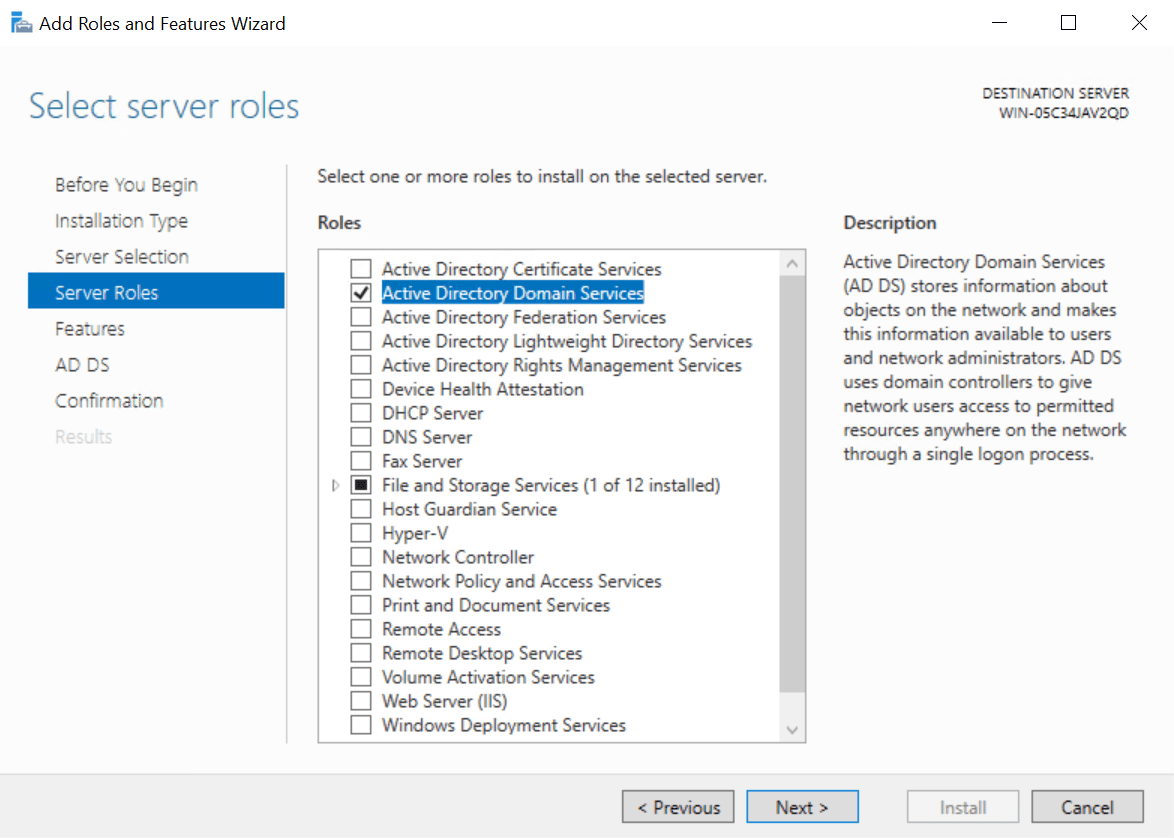
- Click Next on the Server Roles screen to continue.
- Click Next on the Features screen.
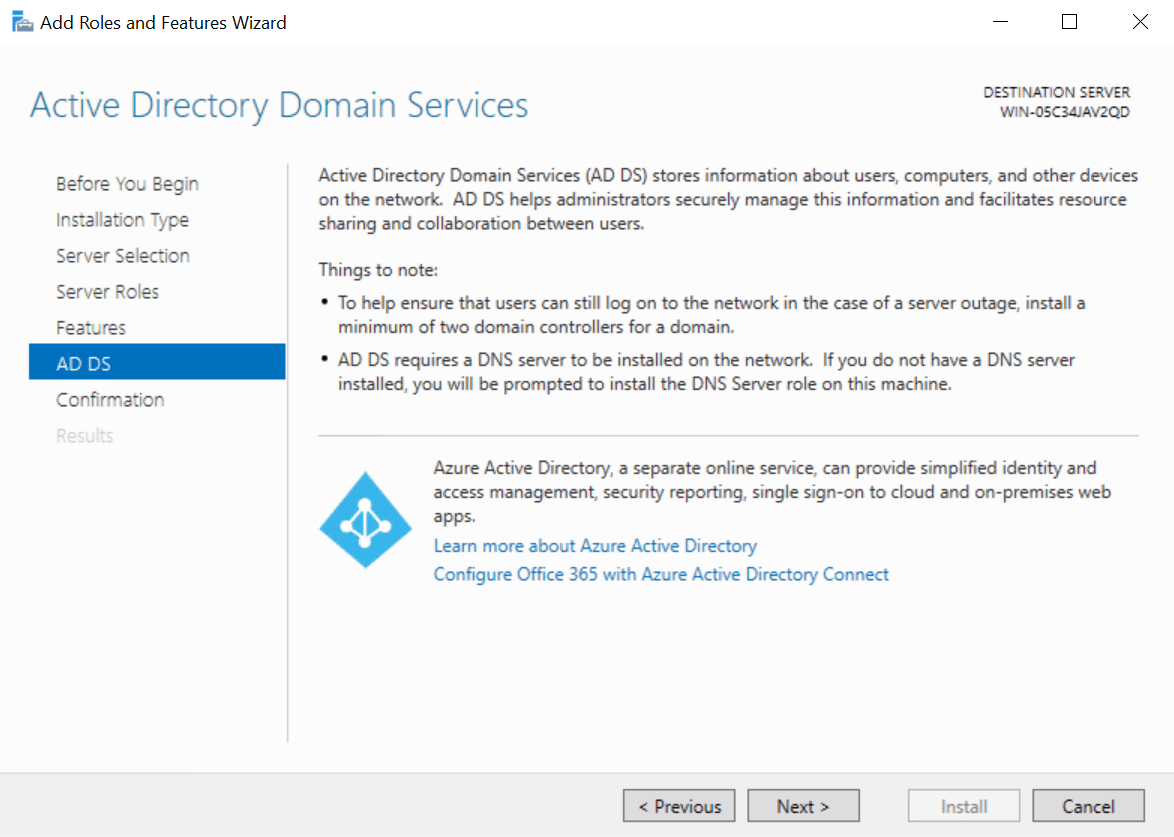
- Read the information on the AD DS screen and click Next.
- Now click Install on the Confirmation screen.
- When the installation is complete, click Close in the Add Roles and Features Wizard.
Configure (promote) Windows Server 2022 as a domain controller with PowerShell
In this example, we will add Windows Server 2022 as a domain controller in a new forest and domain. Before you continue, you should decide on a Fully Qualified Domain Name (FQDN) for your domain. I’m going to use ad.contoso.com in this example. Where ‘ad’ is the name of my new domain and contoso.com is the top-level domain (TLD). You should make sure that you own the public TLD. In this example, I should own the contoso.com domain name. AD in the FQDN defines my internal DNS namespace for Active Directory.
To configure Windows Server 2022 as a domain controller, run Install-ADDSForest as shown in the example below. Replace ad.contoso.com with your chosen FQDN. DomainNetBIOSName is usually set to the part of your FQDN that identifies your internal AD DNS namespace. So, the part that comes to the left of the first period. In this case, ‘ad’.
Install-ADDSForest -DomainName ad.contoso.com -DomainNetBIOSName AD -InstallDNS
You should note that Install-ADDSForest is only used when you are installing the first domain controller in a new AD forest. Install-ADDSDomain and Install-ADDSDomainController are used respectively to create a new domain in an existing forest and install a new DC in an existing AD domain.
DomainName and DomainNetBIOSName are the only two compulsory parameters for the Install-ADDSForest cmdlet. If you want to explore what other options you can configure, run the command line below:
Get-Help Install-ADDSForest
When you run the Install-ADDSForest cmdlet, you’ll be prompted to enter a password for Directory Services Restore Mode (DSRM). Or Safe Mode password as it’s sometimes referred to. Enter a password and confirm it when prompted.
You’ll then see a message:
The target server will be configured as a domain controller and restarted when this operation is complete.
Do you want to continue with this operation?
Type y in the PowerShell window and press ENTER to confirm that you want to configure the server as a domain controller.
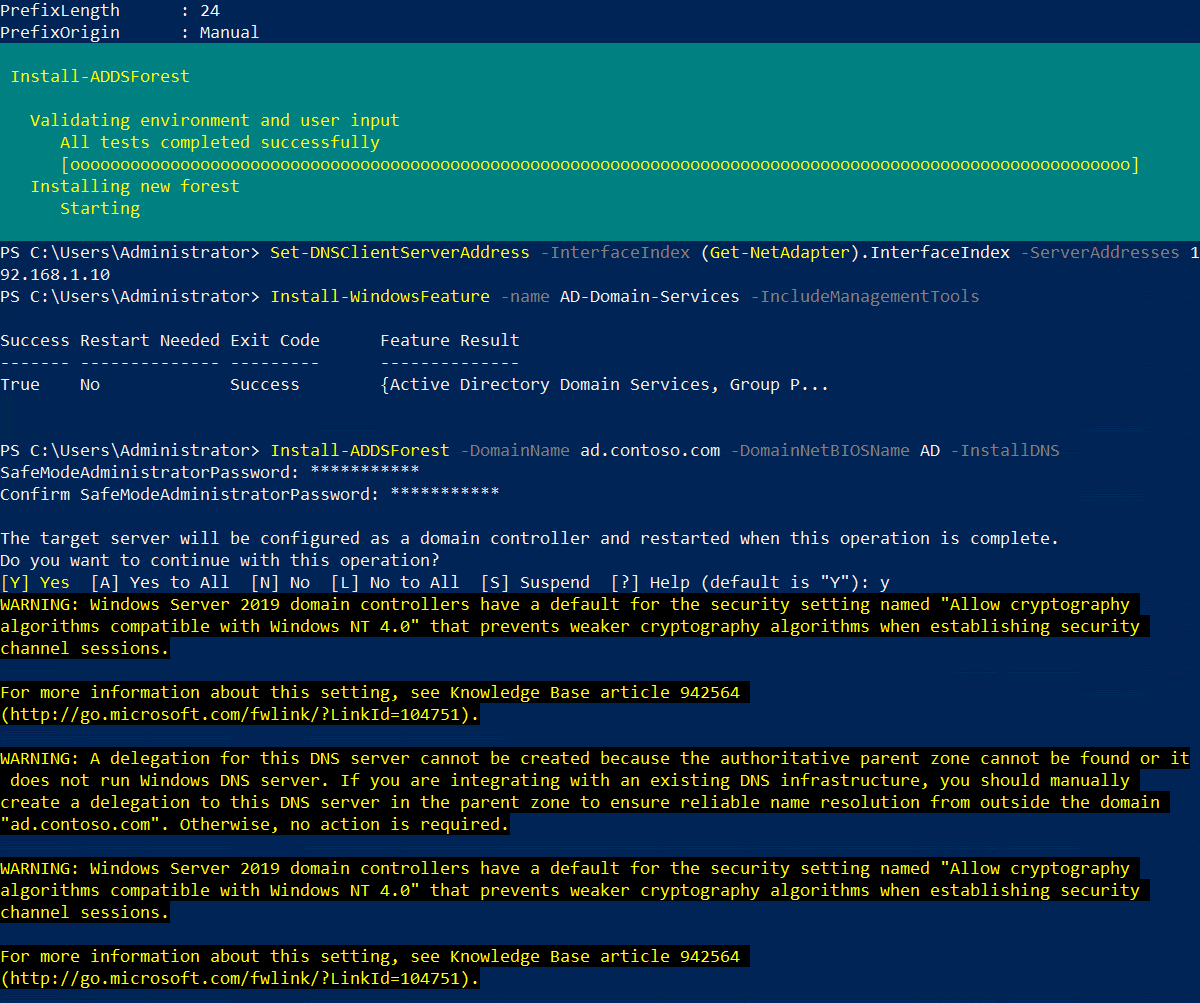
As AD is configured, you’ll see some yellow warnings appear in the PowerShell window. They are normal and you can safely ignore them. The server will automatically reboot. Once Windows Server has rebooted, you will need to log in with the domain administrator account. The domain administrator account is assigned the same password as the built-in administrator account.
On the sign-in page, type administrator in the User name field. Type the password for the administrator account, which is the same as the password for the previous built-in administrator account, and press ENTER.
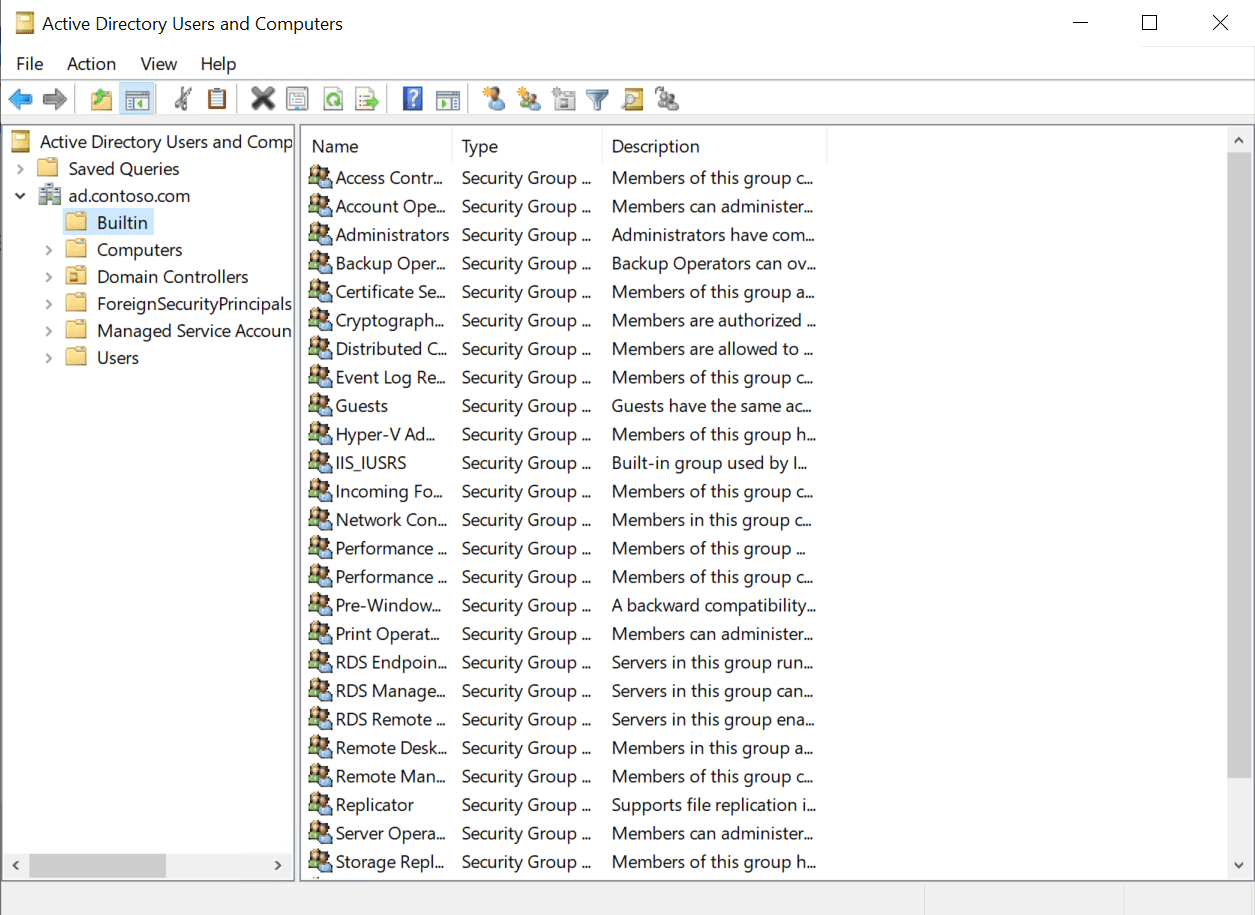
And that is it! You are now logged in to your AD domain’s first domain controller. You can access Server Manager from the Start menu. In Server Manager, click the Tools menu and then select Active Directory Users and Computers to start managing your domain.
Configure (promote) Windows Server 2022 as a domain controller with Server Manager
Now that the AD DS role is installed in Windows Server 2022, you can configure your first AD domain controller. Let’s go back to Server Manager and start the configuration.
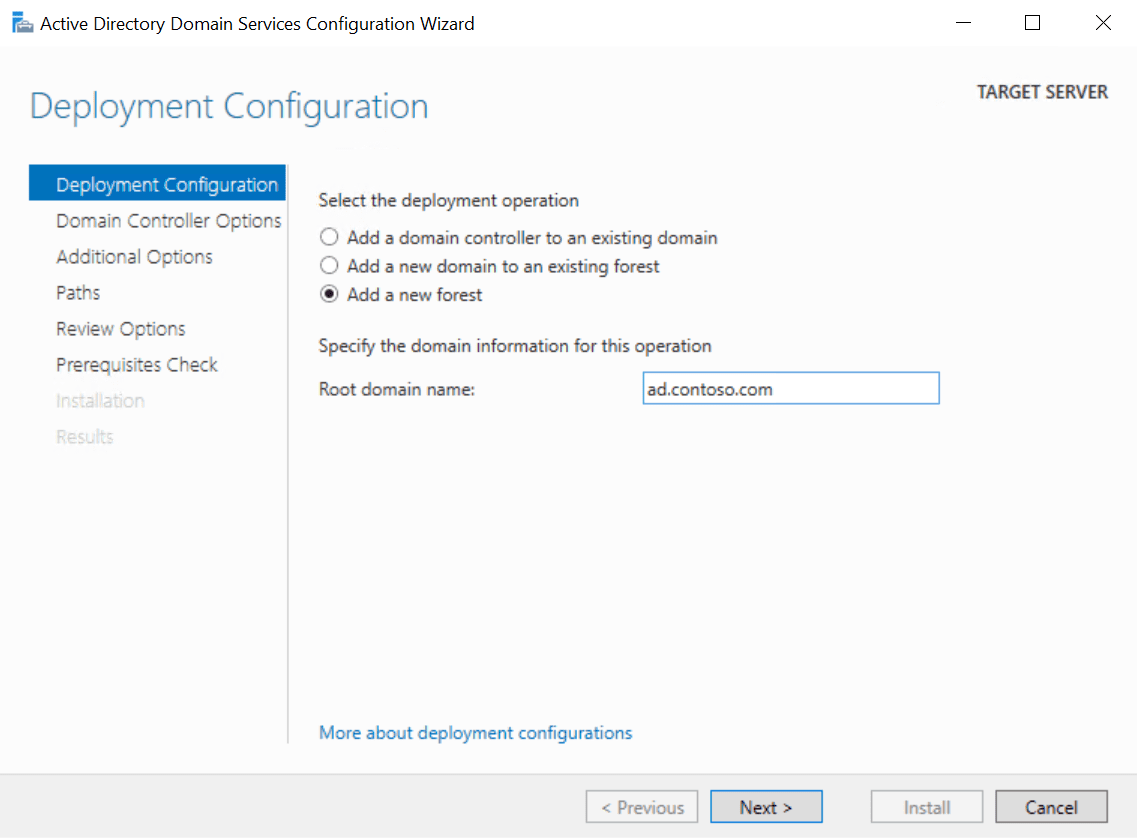
- Back in Server Manager, you should see a yellow exclamation mark by the notifications flag in the top-right corner. Click it and then click Promote this server to a domain controller.

- In the Active Directory Domain Services Configuration Wizard dialog, check Add a new forest under Select the deployment operation.
- In the Root domain name box, type the Fully Qualified Domain Name (FQDN) for your new AD forest. I’m going to use contoso.com for my AD domain name. Click Next to continue.
You should make sure that you own the public top-level domain name (TLD). In this example, I should own the contoso.com domain name. AD in the FQDN defines my internal DNS namespace for Active Directory.
- On the Domain Controller Options screen, type and confirm a Directory Services Restore Mode (DSRM) password. You will need this if you want to restore AD from backup. Click Next to continue.
- On the DNS Options screen, you can safely ignore the delegation warning and click Next.
- On the Additional Options screen, click Next to accept the assigned NetBIOS name.
- Click Next again on the Paths screen to accept the default database, log files, and SYSVOL folder locations.

- Now click Next on the Review Options screen.
The wizard will run some prerequisite checks to make sure AD can be installed on the server. Hopefully your server will pass the checks and you can continue installing AD. It’s normal to get a few warnings as you can see in the image below. You will not be able to proceed with the install if the server fails the prerequisite checks.

- Now click Install to configure AD on the server. The server will automatically reboot to complete the install process.
Once Windows Server has rebooted, you will need to log in with the domain administrator account. The domain administrator account is assigned the same password as the built-in administrator account.
- On the sign-in page, type administrator in the User name Type the password for the administrator account, which is the same as the password for the previous built-in administrator account, and press ENTER.

And that is it! You are now logged in to your AD domain’s first domain controller.
FAQs
What are the system requirements to promote Windows Server 2022 to domain controller?
To promote Windows Server 2022 to domain controller, you need a minimum of 2GHz processor, 2GB RAM (16GB recommended), 32GB disk space, and a network adapter capable of at least 1Gbps. The server must also be running Windows Server 2022 Standard or Datacenter edition.
Can I promote Windows Server 2022 to domain controller in an existing forest with older Windows Server versions?
Yes, you can promote Windows Server 2022 to domain controller in an existing forest that contains older versions, but the forest functional level must be at least Windows Server 2016 to ensure compatibility and proper functionality.
What backup considerations should I make before promoting Windows Server 2022 to domain controller?
Before you promote Windows Server 2022 to domain controller, ensure you have a full system backup of any existing domain controllers, export and document current DNS settings, and create a system state backup to enable recovery if needed.
What security measures should be implemented after promoting Windows Server 2022 to domain controller?
After promoting Windows Server 2022 to domain controller, implement LDAPS encryption, configure Windows Defender, enable audit logging, set up password policies, and configure Windows Firewall with specific rules for domain controller traffic.
What common issues might occur when trying to promote Windows Server 2022 to domain controller?
Common issues when promoting Windows Server 2022 to domain controller include DNS configuration errors, network connectivity problems, insufficient permissions, schema compatibility issues, and problems with existing domain controller replication.
Related Article:
Russell Smith, the Editorial Director at Petri IT Knowledgebase, has over two decades of hands-on experience in IT, in both small business settings and government IT infrastructure projects. Russell started writing for Windows IT Pro Magazine in t...