Windows 10 Tip: Configure Windows Update for Business using Group Policy
In today’s Ask the Admin, I’ll show you how to configure Windows Update for Business in the Windows 10 November update (build 1511).
Along with the visual and performance improvements in the Windows 10 November update are features designed to encourage businesses to adopt Microsoft’s new operating system. While still a work in progress, as is the rest of Windows 10, Windows Update for Business is a set of options that give businesses more control over when updates are installed.
Before the latest update, Windows 10 (build 10240) Professional and Enterprise edition owners could defer non-security updates for a few months using the Defer upgrades checkbox under Advanced options in the Windows Update section of the Settings app, or using Group Policy. Now a new Group Policy setting has been added to give businesses more flexibility.
While none of this is much of problem for organizations that use System Center Configuration Manager (SCCM) or Windows Server Update Services (WSUS) for distributing updates, smaller businesses that connect directory to Microsoft’s update servers need more control over updates.
Update Terminology
Windows Update for Business isn’t a product, but set of controls built-in to Windows 10. Additionally, there are three branches to which devices can be subscribed:
- Current Branch (CB)
- Current Branch for Business (CBB)
- Long Term Servicing Branch
If you don’t make any changes to your Windows 10 device, you are by default subscribed to the Current Branch. If you check the Defer upgrades box in Windows Update settings, you are then part of the Current Branch for Business. It’s important to note that none of the branches prevent critical security updates from installing, they are only designed to stop updates that include fixes and new functionality.
Configure Windows Update for Business using Group Policy
Before you get started, if you’re not familiar with Group Policy, take a look at How to Create and Link a Group Policy Object in Active Directory on the Petri IT Knowledgebase for a primer on working with Active Directory Group Policy Objects (GPOs). If you don’t have Active Directory but do have Windows 10 Professional or Enterprise editions, you can set the Windows Update configuration in local policy, which can be accessed using the Microsoft Management Console (MMC):
- Log in to Windows 10.
- Type mmc into the search bar, right click mmc in the results and select Run as administrator from the menu.
- Enter a local administrator account name and password, or give consent to elevate privileges, if prompted.
- In the console window, click CTRL+M to add a snap-in.
- In the Add or Remove Snap-ins window, select Group Policy Object Editor under Available snap-ins and then click Add.
- In the Select Group Policy Object dialog, leave Local Computer as the selected GPO and click Finish.
- Click OK in the Add or Remove Snap-ins window.

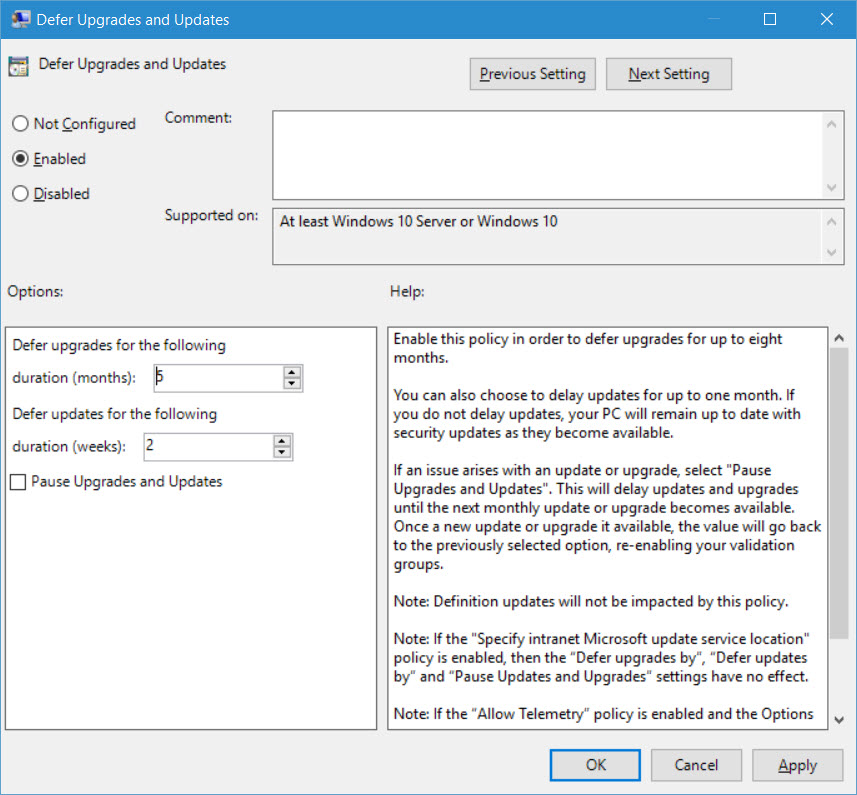
The GPO options for deferring upgrades and updates are as follows:
- Upgrades up to 8 months (monthly increments)
- Updates up to 4 weeks (weekly increments)
- Pause Upgrades and Updates until the next release

If the GPO is enabled but both the Defer Upgrades and Defer Updates settings are set to 0, computers within scope will be part of the Current Branch for Business.
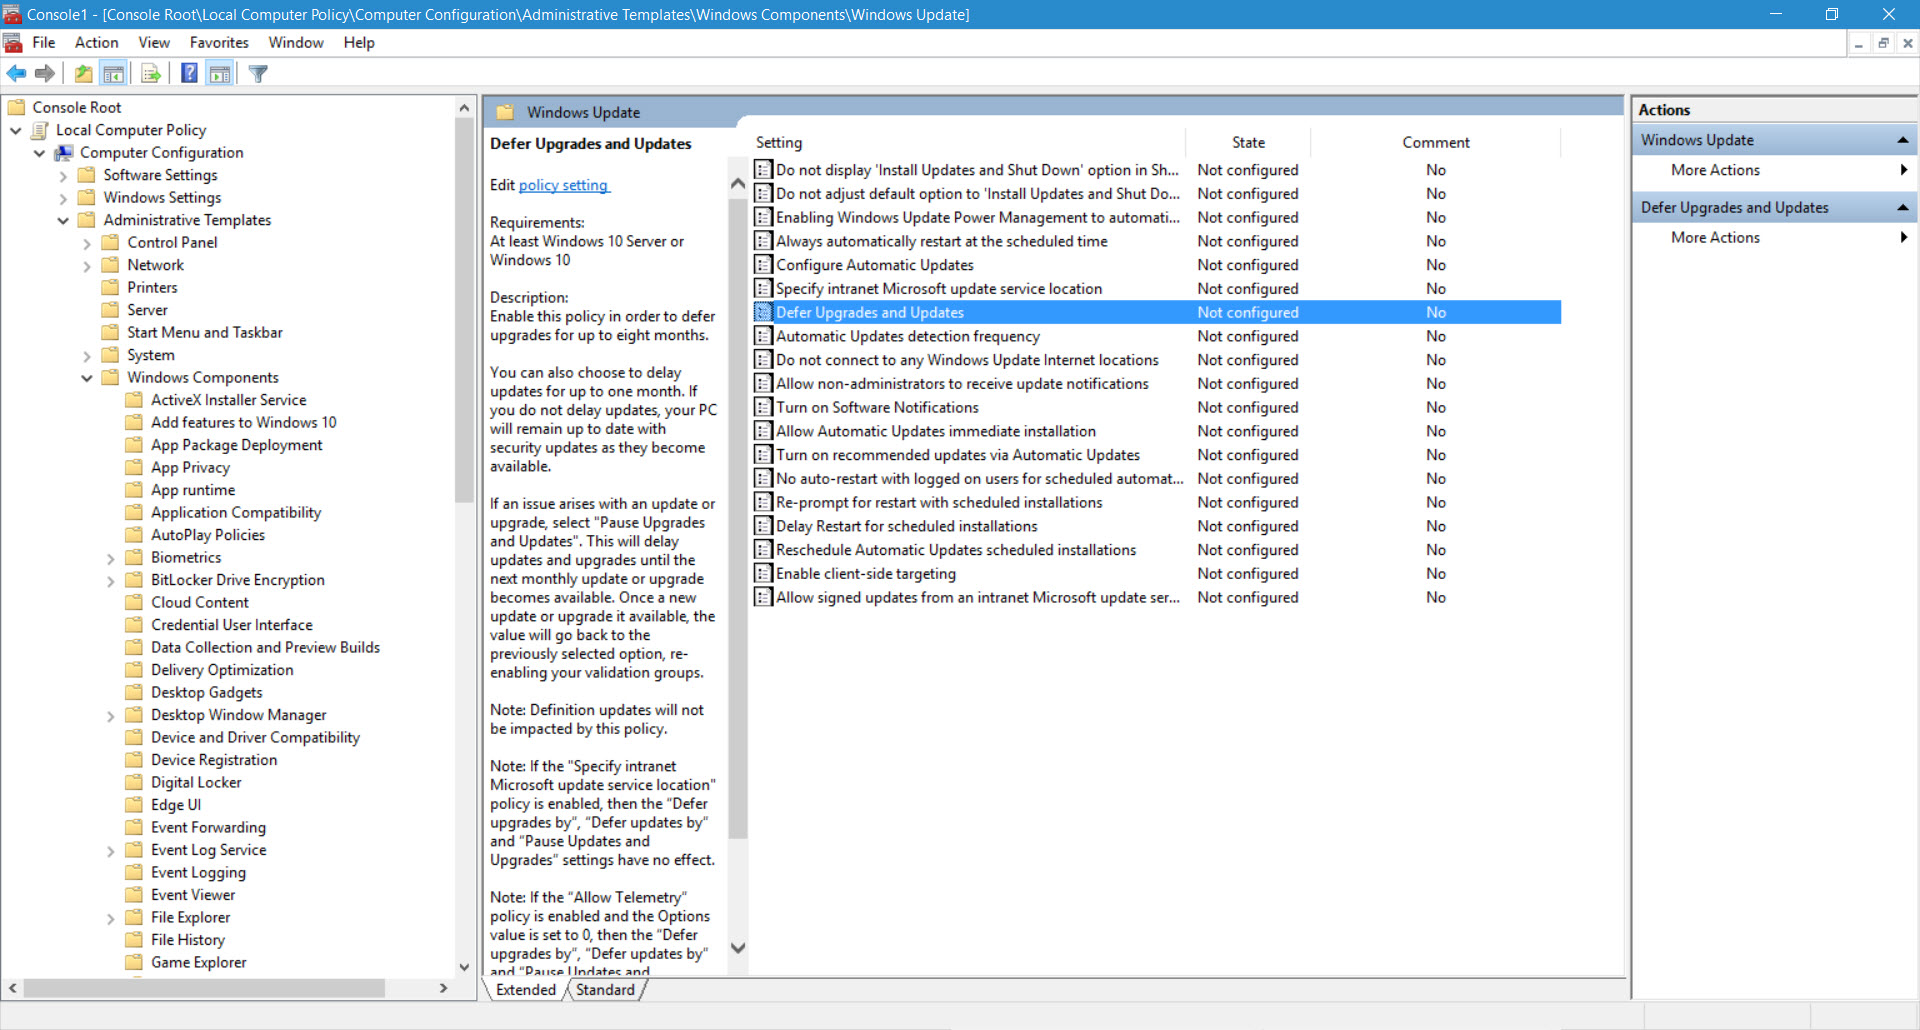
- In the Group Policy Object Editor, expand Computer Configuration > Administrative Templates > Windows Components > Windows Update in the left of the console.
- In the right pane, double click Defer Upgrades and Updates.
- In the Defer Upgrades and Updates dialog box, change the GPO status to Enabled.
- Set the number of months by which to delay upgrades.
- Set the number of weeks by which to delay updates.
- Click OK.
The new Windows Update settings will be deployed to computers that fall in scope of the GPO or local policy object when Group Policy is refreshed.


