Windows 10: Disk Optimization
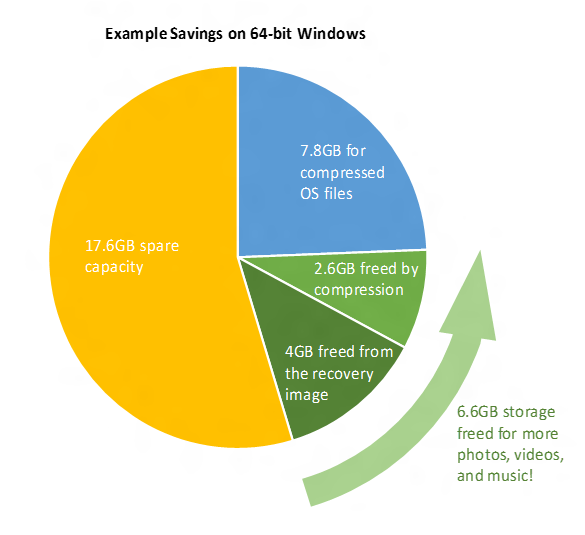
As solid-state disks (SSDs) become more ubiquitous, the amount of available disk space is being squeezed ever tighter due to the high cost of SSDs compared to traditional mechanical drives. To help address this problem, Microsoft has redesigned the Reset and Refresh features in Windows 10 so that they no longer require dedicated recovery images, and system files are compressed if a number of conditions are met.

Reset and Refresh without a Recovery Image
Introduced in Windows 8, Reset enables you to wipe Windows and restore a device to factory defaults, while a Refresh reinstalls Windows but preserves your personal files, settings and Windows Store apps. When performing a Reset or Refresh in Windows 10, instead of using a recovery image that would otherwise consume 4GB of disk space, the operating system is reinstalled using files in the WinSxS folder, which is a component store that contains all the files required by the OS.
Because components are updated in WinSxS when the OS is patched using Windows Update, a Reset or Refresh operation in Windows 10 restores the OS to a more or less fully-patched state; with the exception of updates made to components in the last 30 days, to avoid reintroducing any problems caused by recent changes to the OS.
In Windows 10, the recimg command line tool has been deprecated, but in Windows 8 it’s possible to additionally preserve desktop applications by creating a custom recovery image, which you can read about in How to Perform a PC Refresh in Windows 8 and Create a Custom Refresh Image on the Petri IT Knowledgebase.
Reducing OS footprint by compressing system files
Windows 10 deploys an efficient compression algorithm that enables the OS to reclaim 1.5GB of storage on 32-bit systems, and up to 2.6GB in 64-bit Windows. This system is called Compact OS, and depending on a number of variables, such as processor speed, available RAM, and disk type and size, Windows automatically enables compression of system files during the upgrade process. It’s worth noting that if Compact OS is enabled, Windows Universal Apps are also compressed to save space.
To establish if Compact OS is enabled on your system, open a command prompt and type compact /CompactOS:query and press ENTER.

If enabled, you’ll see a message ‘The system is in the Compact state’ returned in the console window. If you want to manually enable or disable Compact OS, you’ll need to open a command prompt with administrator privileges, and run compact /CompactOS:always or compact /CompactOS:never to enable or disable Compact OS respectively.
Compact OS can also be enabled by adding the /compact switch when using the Deployment Image Servicing and Management (DISM) command line tool that’s used for preparing Windows 10 images:
DISM.EXE /Apply-Image /ImageFile:INSTALL.WIM /Index:1 /ApplyDir:C:\ /Compact:ON


