Using the Microsoft OneDrive for Business Library
As you begin working with Office 365, it quickly becomes evident that Microsoft OneDrive works extremely well for document sharing. On that point, I’ve written another article for Petri that will get you up to speed on how to upload and share documents using Microsoft OneDrive for Business. The more I’ve used OneDrive, the more I’ve also realized that there’s more to document libraries and document sharing than meets the eye, so I’ve decided to share some tips and tricks on how to get the most out of the Library functionality in OneDrive.
In this article, I’ll walk you through the Library functionality in Microsoft OneDrive, and how you can use some of the more advanced options to enhance your OneDrive experience.

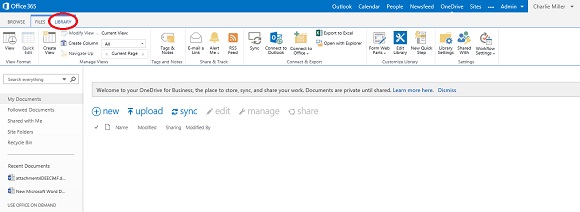
This document assumes you have already signed into your Office 365 business account and that you’ve already clicked on OneDrive at the top of your screen. Once you’re logged in to OneDrive, the Library tab can be accessed in the upper left-hand side of the screen.
Also, we not be coving the power user and administrator options on the tool bar, as these are the Customize Library and Settings Options on the right sight of the Library ribbon bar.
Accessing the Microsoft OneDrive library from Office 365. (Image: Theresa Miller)
If your organization has any past or present experience with SharePoint 2010 or SharePoint 2013, then the Library bar within OneDrive will look very familiar. Once in the library there are many options and features that can enhance the OneDrive Business experience, so let’s touch on a few of them.
Viewing the Microsoft OneDrive Library ribbon bar from within Office 365. (Image: Theresa Miller)
Using OneDrive Library Custom Views
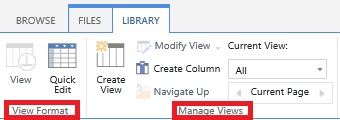
On the left side of the OneDrive ribbon bar there are tabs called “View Format” and “Manage Views.” It is here that custom views can be created and applied to your document library or list within OneDrive. A custom view allows your data to be arranged in a way that best suits your organizational needs and team requirements. In this section of the ribbon bar, “Create View” is what you’d use to create that custom view. From there are many options to choose from, so I’ll describe what each of those views can do.
View Format and Manage Views tabs on the OneDrive for Business ribbon bar. (Image: Theresa Miller)
- Standard View: The standard view is a great option for document libraries or lists and can be created for personal or public use. Data columns can be moved around to your liking and can be sorted alphabetically, by date and more. Your custom view can even exclude information that doesn’t need to be seen.
- Calendar View: This works wonderfully for adjusting the view of a team calendar and can also be personal or available publicly. You have the ability to view certain time periods, such as weekly and sort the information chronologically or in whatever way is required.
- Access View: This view only works with Microsoft Access and can be used to create forms based upon lists and table information within the Access database.
- Datasheet View: This view is available publicly and privately and works very nice with Microsoft Excel data. Because this view allows bulk editing and quick customization, it also allows spreadsheet column order to be manipulated and sorted to your organizational needs.
- Gantt View: With public and private options this is great for organizing data Microsoft Project related information. This view can provide a graphical overview of a team’s progress over time.
- Custom View with SharePoint Designer: This is a great option for administrators that are looking to create a custom view. This would be done only when the out of box product cannot meet the needs of the user.
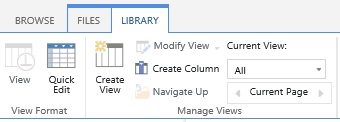
The View, Quick Edit, and Create View tabs on the OneDrive for Business ribbon bar. (Image: Theresa Miller)
Other notable items in the Views section of the Ribbon Bar is that a view can be modified with the “Quick Edit” if the change is minor. The “Create Column” button will allow a new column to be added to the view that you are working in and any views that have been created can be applied to the data on your screen by choosing the new view in the dropdown under “Current View.” There is a lot of flexibility with how you can change and alter OneDrive Views.
OneDrive Ribbon Bar: Tags and Notes, Share & Track
The middle section of the OneDrive Ribbon has some fun options. The options provide you with the ability to find and share information with ease. These options can simplify your ability to find information that is useful to you, share this information through email, configure Alerts about new or modified information in OneDrive, and more.
The Tags and Notes and Share & Track tabs on the OneDrive for Business ribbon bar. (Image: Theresa Miller)
- Tags and Notes: Tagging information creates quick access back to information you like or need to get back to easily through OneDrive. This information can be private or public and can be created while working in OneDrive or by copying, and pasting links into the “Tags & Notes” option on the Ribbon Bar in OneDrive.
- Email a Link: Need to share OneDrive information with a colleague through email? Use “Email a Link” to execute this action.
- Alert Me: This is a great option that can notify you via email when something new is added or if an item is edited or removed. These alerts are customizable to your needs, including how often they are sent.
- RSS Feed: If you prefer to access information from a OneDrive data library through an Internet Explorer RSS Feed, this option can be utilized. For more information on RSS Feeds, see the following article from Microsoft.
- Sync: This option will synchronize your OneDrive website to a local application on your PC called SharePoint Workspace. This allows a user to their OneDrive information locally on your PC.
OneDrive Ribbon Bar: Connect & Export
Some users prefer to work within their Office Suite so having the ability to use their OneDrive documents and lists in this form provides the flexibility and known interface desired. The “Connect & Export” section of the Ribbon Bar will provide this to OneDrive business users.
The Connect & Export tab on the OneDrive for Business ribbon bar. (Image: Theresa Miller)
- Connect to Outlook: Many organizations using Office 365 still use the PC installed version of Outlook. In this case, OneDrive libraries can be connected to Outlook. This creates a one stop location for the user through Outlook.
- Connect to Office: By using this option on the Ribbon Bar, the OneDrive Site becomes available to your locally installed Office applications such as Word, Excel, PowerPoint. This creates a simplified document saving experience.
- Export to Excel: This option works great for task lists created in OneDrive. Task lists that are exported to Excel can be printed and shared with your work teams.
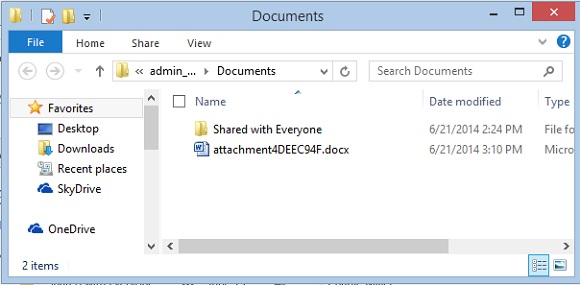
- Open with Explorer: This allows a OneDrive user to be able to view their documents in the form of a list of files on the screen. This is similar to what we are used to when browsing for files on our PC as demonstrated below.
A documents dialog showing the OneDrive file location. (Image: Theresa Miller)
That wraps things up! You’re now the expert on the Library ribbon bar in OneDrive and understand the possibilities for this tool within your organization.


