Restructuring Office 365 Sensitivity Labels
Time to Review How Sensitivity Labels Are Used
In Scoping Sensitivity Labels, I discuss the evolution of sensitivity labels and the ability to scope a label so that it deals with files and messages, container management, or both. Given this new capability, I questioned if it is a good idea to have multi-purpose labels and advance the case that it is easier to manage labels when a tenant has one set of labels used for information protection and another dedicated to container management.
If you haven’t used sensitivity labels before, you don’t need to do anything as your deployment plan for labels can consider both aspects and design appropriate sets of labels for information protection and container management. But life is imperfect, and many tenants have sensitivity labels in use today that are applied to both files/email and containers. If you’re in this situation, you might want to restructure how labels are used.
Lots of Labels
My tenant is a classic example. We’ve used sensitivity labels since their introduction in 2018 and had used the predecessor Azure Information Protection labels beforehand. When Microsoft made it possible to use labels to manage containers (now generally available for all tenants), we added the necessary settings to some labels originally designed for document marking and protection and used those to manage containers. The result is that many “crossover” labels exist, many with the same container controls (like disabling guest users), which then cause confusions to container owners asked to select the most appropriate label for their team, group, or site.
Limiting the Label Set for Containers
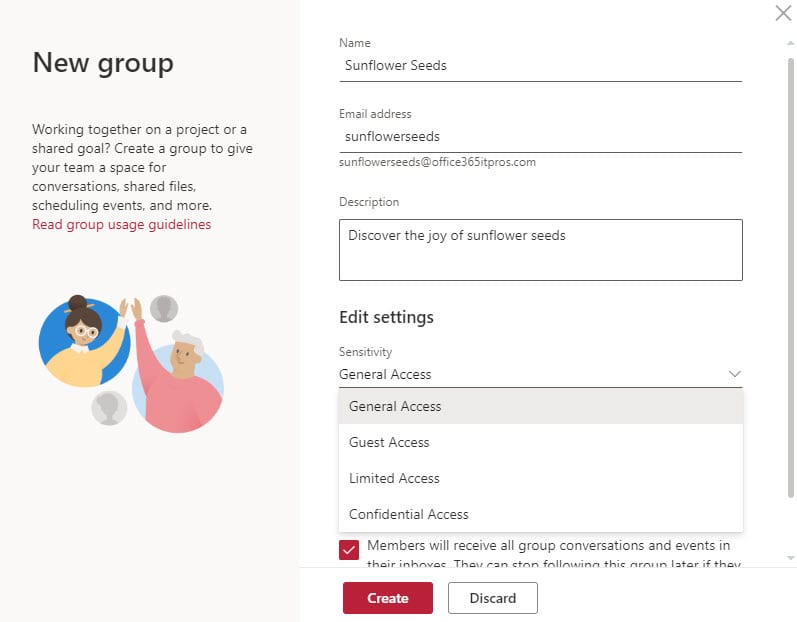
Given the limited number of permutations available for container settings, a tenant can probably get by with four container management labels. These might be:
- General Access: No restrictions.
- Guest Access: Private containers with guest members permitted.
- Limited Access: Private containers with no guests.
- Confidential Access: Private containers with no guests. Access to unmanaged devices is not allowed.
Limiting the choice of labels that can be applied to a new container is easier for the owner to deal with than a long list of potential classifications (Figure 1).
Label Restructuring Process
What’s the best way to restructure sensitivity labels. Well, here’s the approach I used.
- Created a set of labels explicitly for container management.
- Published the labels to make them available. It’s best to use a separate label publishing policy for this purpose.
- Unpublish the labels that you want to continue using for information protection that have container management settings. You must do this because you cannot remove the container management settings from a published label.
- Remove the container management settings from the labels and then republish them to make the labels available to users. The labels will now only be applicable to documents and email.
- Map the new container management labels to the labels that you removed the container management settings from.
- Update the containers with the new label as per the mapping. You can do this manually only a few containers need to be updated. It’s boring work, so if you have more than a few to process, I’d do the job with PowerShell.
Updating Labels with PowerShell
The steps needed to remap labels to containers in a PowerShell script are simple.
- Use the Get-UnifiedGroup cmdlet to find the set of groups assigned sensitivity labels.
- Compare the existing label that’s assigned to each group and select the most appropriate label from the set created for container management (a big Switch statement works well here).
- Use the Set-UnifiedGroup cmdlet to apply the new label. The update will then synchronize to Teams and SharePoint Online.
An example script is available from GitHub. The core code to compare the existing label for a group and select and apply a new label is:
ForEach ($Group in $GroupsWithLabels) {
     Switch ($Group.SensitivityLabel.Guid) {
      "2fe7f66d-096a-469e-835f-595532b63560" { $NewLabel = "e42fd42e-7240-4df0-9d8f-d14658bcf7ce" } # Public = General Access
      "27451a5b-5823-4853-bcd4-2204d03ab477" { $NewLabel = "d6cfd185-f31c-4508-ae40-229ff18a9919" } # Internal = Limited Access
      "d179cfc9-43d4-41b6-9ddb-3e1aaf3224c8" { $NewLabel = "d6cfd185-f31c-4508-ae40-229ff18a9919" } # Employee Confidental = Limited Access
      "f3b23fed-2839-4270-9b35-1d634c84b2e9" { $NewLabel = "d6cfd185-f31c-4508-ae40-229ff18a9919" } # Market Sensitive = Limited Access
      "f5b1ba01-59f5-4ba0-b73b-f60e348cdc6e" { $NewLabel = "d6cfd185-f31c-4508-ae40-229ff18a9919" } # Financial Data = Limited Access
      "1b070e6f-4b3c-4534-95c4-08335a5ca610" { $NewLabel = "c99e52c6-f5ff-4050-9313-ca6a3a35710f" } # Confidental = Confidential Access
      "81955691-b8e8-4a81-b7b4-ab32b130bff5" { $NewLabel = "c99e52c6-f5ff-4050-9313-ca6a3a35710f" } # Secret = Confidential Access
      "9ec4cb17-1374-4016-a356-25a7de5e411d" { $NewLabel = "c99e52c6-f5ff-4050-9313-ca6a3a35710f" } # Ultra-Confidentoal = Confidential Access
      "c9001382-2af9-4e06-808b-2080c1a9861f" { $NewLabel = "c99e52c6-f5ff-4050-9313-ca6a3a35710f" } # Sensitive Stuff = Confidential Access
      "e42fd42e-7240-4df0-9d8f-d14658bcf7ce" { $NewLabel = $Null }                                  # Group already assigned General Access
      "c29e68f9-bc4f-413b-a741-6db8e38ad1c6" { $NewLabel = $Null }                                  # Group already assigned Guest Access
      "d6cfd185-f31c-4508-ae40-229ff18a9919" { $NewLabel = $Null }                                  # Group already assigned Limited Access
      "c99e52c6-f5ff-4050-9313-ca6a3a35710f" { $NewLabel = $Null }                                  # Group already assigned Confidential Access
      "default"                              { $NewLabel = "c29e68f9-bc4f-413b-a741-6db8e38ad1c6" } # Anything else = Guest Access
     } #End Switch
    If ($NewLabel -ne $Null) { # We can update with a new sensitivity label
       Write-Host "Updating group:" $Group.DisplayName "Old label:" ($TenantLabels[$Group.SensitivityLabel.Guid]) "New label:" ($TenantLabels[$NewLabel])
       Set-UnifiedGroup -Identity $Group.ExternalDirectoryObjectId -SensitivityLabel $NewLabel }
Sensitivity labels are applied using GUIDs as identifiers. Humans do better with display names, so the script creates a hash table of labels using the Get-Label cmdlet. Whenever the script needs to output a label’s display name, all you need to do is do a lookup using the label GUID, which is what’s happening in references like $TenantLabels[$NewLabel].
The Need for Change
To reemphasize a point made above, you don’t need to do anything unless you decide that separating labels used for container management from those used for information protection is a good idea – and labels are already in use. Anyone else can treat this discussion as an exercise in technology musing, albeit a procedure that I executed to clean up my own tenant. But you never know when something like this might be needed… which is the sole justification I have for writing this article.


