How to Resize Windows Virtual Machine Disks
Overview
Last week at the office, Annalisa, one of our helpdesk technicians, asked me to assist her with a problem which at first I thought had a very simple solution, but in fact turned out to be more complicated. The file server for one of our clients was rapidly running out of free space on its main data drive, and there were no files that could be deleted or moved, so expanding the drive seemed the best option. Adding a second drive might be easier, but the client’s shared folder structure didn’t lend itself to being split – they were used to everything being under one root folder.
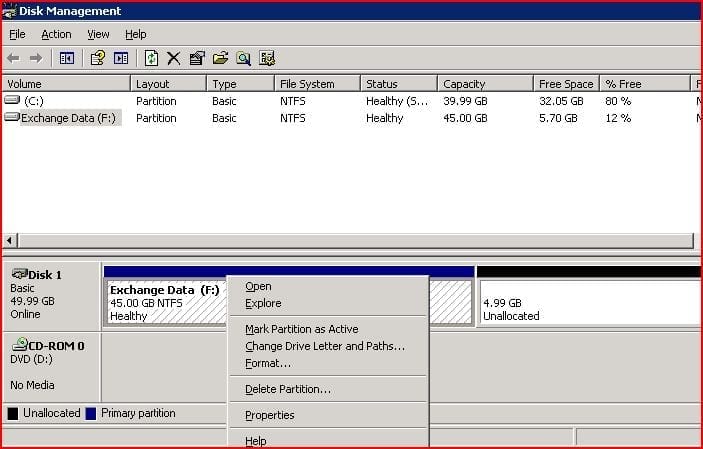
The reason I thought this should be a simple job was because this client has a vSphere based virtual infrastructure, with a pair of ESXi hosts and a large SAN that all their virtual machines run on. It would just be a case of increasing the size of the server’s virtual disk, then expanding that disk within Windows to use the extra space; it wouldn’t even need a reboot to make more free space available. All completely true, as Annalisa pointed out, if it was a Windows 2008 Server (or Vista/Win7) VM, but this was in fact a Windows 2003 Server (the same applies for WinXP and other older Windows versions). Although the Disk Management console showed that the space was available, it didn’t provide any option to use it other than creating a new partition:
In fact, like most things, it’s not too hard to do when you know how, but a third party utility is required for the drive resizing – here we will use the gPartEd LiveCD, which is an open source Linux utility so you can download it for free. This guide will cover the procedure for resizing the drives on ESXi and Hyper-V virtual machines specifically, although the gPartEd section can also be used on any Windows installation, provided that you can resize the underlying disk/volume. One of the advantages of virtualization is that operations like this on the virtual “hardware” are usually much simpler than with the physical equivalent, but most RAID controllers on physical machines will allow you to expand a RAID5 volume if you add an additional disk.
Expanding a Virtual Disk
The first part of the process is to expand your virtual disk, so that there will be some free space for you to extend the Windows data drive into. Since ESXi and Hyper-V are the most popular virtualization platforms currently, we’ll cover these in more detail, but if you’re using a different system you should be able to find out how to do it easily enough.
Microsoft Hyper-V Virtual Disks
Daniel Petri has already comprehensively covered this procedure with his article, Expanding Virtual Hard Disks in Hyper-V, so please refer to that.
VMware ESXi Virtual Disks
There is a VMware Knowledge Base article here, which covers the basic procedure for all the different VMware products, but it’s rather brief so we’ll go through the steps using the vSphere Client:
First of all, make sure that there are no snapshots of the VM (right-click the VM and select “Snapshot Manager” to check). If there are, you will need to “Delete All” to commit them – bear in mind that the process is much quicker if the VM is shut down when you do this. If you are running ESXi 4.1 or later, and the VM has VM Tools installed, then you can expand the virtual disk without having to shutdown first, otherwise you will get an error message. It goes without saying of course (but I will say it anyway!) that you should make sure you have an up to date backup of the VM before you attempt this process. There should be little risk of any problems but if something does go wrong, you could potentially lose an entire drive of data.
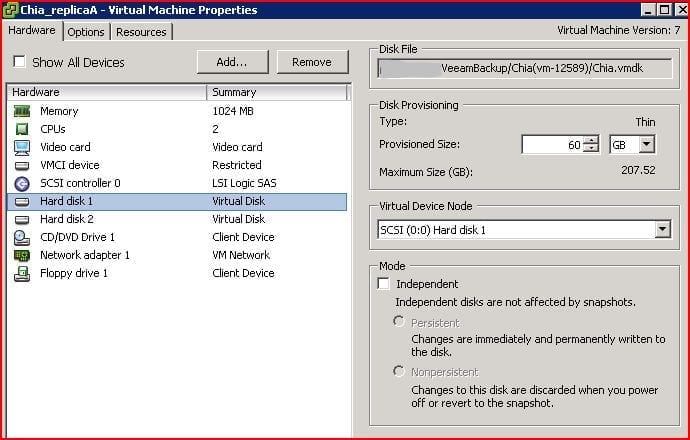
When you are ready, right-click on the VM in the lefthand pane and select “Edit Settings.” You should then see a window like this:
Now your first challenge if your VM has more than one disk listed, is to ensure you choose the correct disk. Usually it should be pretty obvious as your system (C:) drive will be on “Hard disk 1”. You can also often differentiate the disks by checking their size, but if you are still not sure, then checking the disk properties within Windows will show you the SCSI ID which you can match up to the “Virtual Device Node” on this page. Bear in mind that it is best to get it right the first time, as shrinking a virtual disk is actually much more time consuming than expanding one. When you are confident that you have identified the disk you want, click to select it in the left pane, then increase its size in the “Provisioned Size” box on the right. The “Maximum Size” figure below shows you how much free space is on the datastore, so in theory how large you can make your virtual disk, however it’s never a good idea to fully allocate all your datastore storage. The amount of space to leave free depends on a number of factors, in particular, the number of thin provisioned disks you have. Try to leave a suitable buffer or else you may find all your thin provisioned VMs freezing because the datastore has run out of space.
Once you have changed the size, click “Ok” to close the “Virtual Machine Properties” window and you will see a task executing in the bottom pane of the vSphere Client. It should show as “Successful” after a few seconds; if it says “Error” you will need to look at the details to see what the problem was. Assuming the task was successful, the next step in the process depends on your Windows version.
Expanding a Drive in Windows 2008/Vista/7
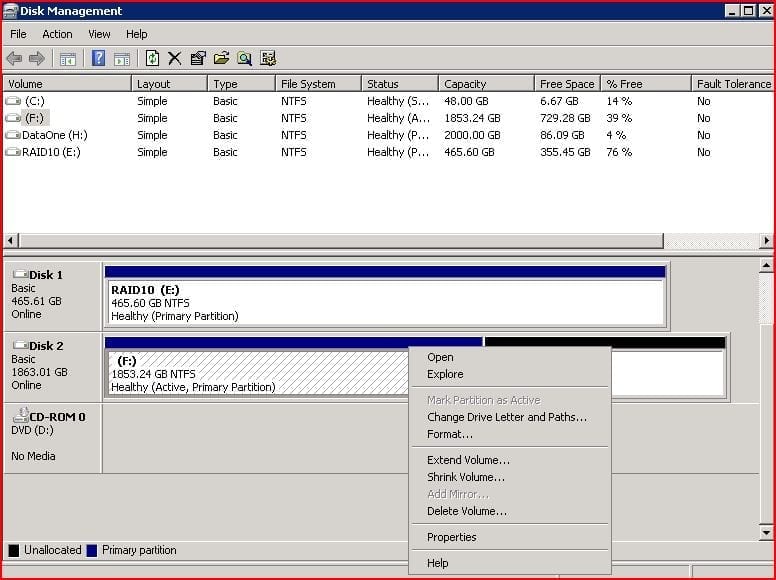
In these more recent versions of Windows, the procedure to expand the drive is simple and can be completed entirely within the Disk Management console. The easiest way to open this is to click on the Start button and in the “Search” box type “diskmgmt.msc” and press enter:
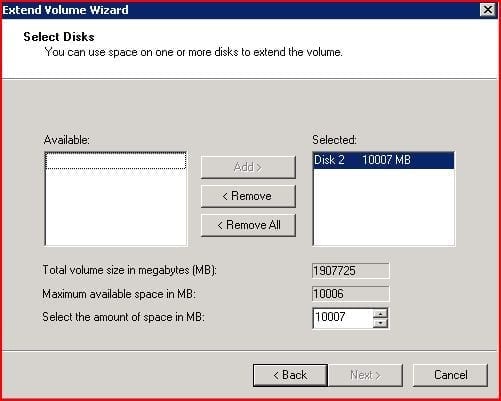
When it is opened, the Disk Management console queries the current disk status and shows you a summary in the top pane, along with a graphical representation in the pane below. In the image above, Disk 2 is a 2TB drive that contains the F: drive (highlighted in blue to show it is a Primary partition) and 10GB of unallocated space (highlighted in black). Extending the F: drive to use that extra 10GB of space is as simple as just right-clicking on it in the bottom pane, and then selecting “Extend Volume….” from the menu to launch a wizard. Click “Next” on the welcome page, and the next page allows you to select how much of the free space to add:
The wizard automatically selects the maximum available space to add, so unless you wish to split it between a couple of drives on your system, you can usually just leave it at that and click “Next.” If (like in this example) the “Next” button is greyed out, there is something preventing the operation being completed, usually that you have tried to allocate more space than is available; just use the buttons or type the correct amount in the bottom box.
Once you click “Next,” the wizard will then commit the changes and expand the volume accordingly. You will be returned to the Disk Management console, and should see that your drive now occupies all the available space, and the free space on it has increased proportionately.
Expanding a Drive in Windows 2003/XP
As we have seen in the first illustration, Windows 2003 and XP will detect that the disk has expanded, but the Disk Management console does not give you any option to extend the drive partition. It is therefore necessary to use a third party tool to do this, and the one I prefer is the gPartEd LiveCD distribution, because it is free and easy to use. It’s always a good idea to make a full backup first, but with Windows XP you should take extra care, as it doesn’t always handle drive size changes well, especially on the system (C:) drive – read the GPartEd notes first.
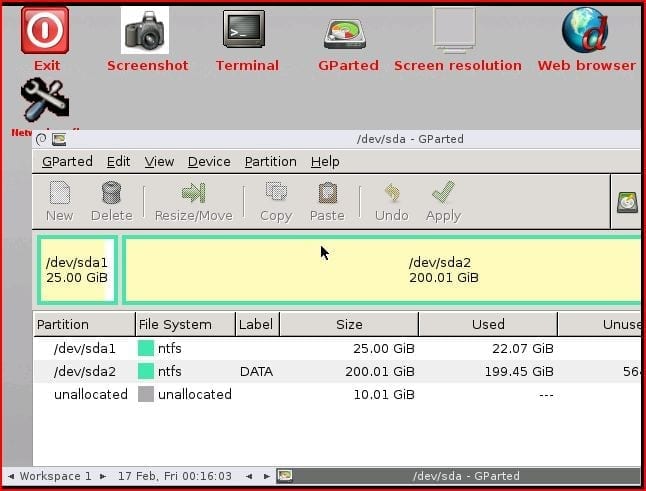
When you are ready and have the GPartEd ISO downloaded, shut down your virtual machine and edit the virtual disk size as described above. Then mount the ISO on the VM so it will boot from it when powered on. Choose the default menu option to boot into GPartEd, and follow the instructions to select your keyboard layout and language. Then select [0] to let it configure the X windows gui automatically. You should then see a screen like this one:
The first thing I suggest you do is to increase the screen resolution to make it easier to work with, so click the “Screen Resolution” icon and select something suitable for your display. Then click “Apply”. Once that is done, you can then maximize the GParted window by clicking the middle one of the three little square icons in the top right corner of the window. You should then be able to see the entire window with all the icons and the full disk map displayed:
Now make sure you are looking at the correct drive, as GParted shows Linux style drive names such as the /dev/sda shown above, but looking at the disk size and partition labels should enable you to confirm which you want. If you need to change it, then click the button to the top right and select from the drop down menu. You can then see from the color coded partition map below the drive partitions on the disk, and there should be an area of “unallocated” grey space at the end; this is what we will use to expand our drive.
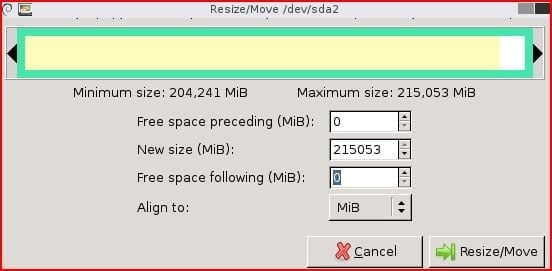
To expand the drive, first click to select the partition which represents it, and then click the “Resize/Move” button above. The window which appears can be a little confusing, as there are three number boxes which you can edit:
Usually the only box you need to edit is the “New Size (MiB)” one in the middle. Increase it to the maximum possible value as I have done above, in order to utilize all the free space you added to the disk earlier. It’s only when the partition you are trying to expand is not the last one on the disk that you might need to increase the “Free space preceding” value, to move the next partition over in order to make an empty space at the end of the partition you wish to expand. When you are ready, click the “Resize/Move” button to apply the change; you will see the operation is queued in a list in the bottom pane of the GParted window, but it will not be started until you click the “Apply” button, so you can queue a sequence of operations up, e.g. to move one partition and then expand another.
Depending on the operations involved, you then have to wait for it to complete. Moving partitions can take a long time but resizing only takes a few minutes; then you will see the new partition layout. The “unused” space on the drive partition should now have increased, so if you are happy with the result then “Quit” the GParted application and double-click the “Exit” icon to shut down the VM. Remember to dismount the ISO and then power on your VM again; it should boot into Windows and will prompt to run a chkdsk on the altered drive. Let it complete that and then the desktop should appear.
Shrinking a Virtual Disk
There are a few reasons why you might wish to shrink a virtual disk, one being to free up space in order to expand another disk. To a certain extent, the process for shrinking is similar to that for expanding, but it does require an area of free space at the end of the drive which can be removed. Therefore, to maximize the effectiveness of any shrink operation, it’s always a good idea to run a full defragment on the drive first to organize the data and use up any interim empty space.
Having said that, in VMware, you can’t just reduce the size of a virtual disk in the “Edit Settings” window; instead, the easiest option is to simply clone it to a new virtual disk. You can do this by taking advantage of the “thin provisioning” feature, which tells the OS that the drive is still the full size, but only utilizes as much space on the underlying storage as there is file data. When you run the clone drive wizard, you can select the thin provisioned option for the new drive format, and then when it is complete you can detach the original virtual disk from the VM and attach the clone instead. Once you are happy that the VM runs fine with the new clone disk, you can delete the old one from the datastore to free up the space, and if you check the new disk in the datastore browser, you will see it is smaller than the original.
Conclusion
As you can see, virtualization and improved file systems in the latest releases of Windows make managing your storage much simpler than before. However, you may be required to work with older versions of Windows. This procedure is more complicated, but if you follow this guide, it shouldn’t be difficult. It’s always a good idea though to make sure you anticipate any drive space shortages in plenty of time, before the free space reaches zero, as this can cause many applications to simply fail, resulting in unplanned downtime.


