How to Fix the “Remote Desktop Connection – An Internal Error Has Occurred” Error

The “Remote Desktop Connection: an internal error has occurred RDP” message can show up on a Windows PC when the Remote Desktop Protocol (RDP) client is unable to make a connection with an RDP server. The error is due to one or more configuration issues related to RDP and security.
In this guide, we’ll help you troubleshoot this issue with a step-by-step tutorial. Throughout the different steps, we’ll be taking a look at the most important RDP settings you can check on your Windows PC.
As an IT pro, and especially as a server engineer for almost the last twenty years, I take ‘RDP’ing into a server for granted ALL the time. That is, using Remote Desktop Connection (or similar front-end software tools) to remotely log in to another server or computer, be it at my workplace, in Azure, etc.
Not surprisingly, there is a hell of a lot of technical environment variables that have to be just right in place in order for that Windows login screen to appear, showing you logging into that server. Oftentimes, especially when setting up a new server or a new Remote Desktop Host, you can run into errors trying to make that connection.
How to fix the “Remote Desktop Connection: An internal error has occurred RDP” error
Let’s go through the most common RDP settings and configuration snafus that can cause the “Remote Desktop Connection: an internal error has occurred” message to appear. Then, we’ll show you how to solve them!
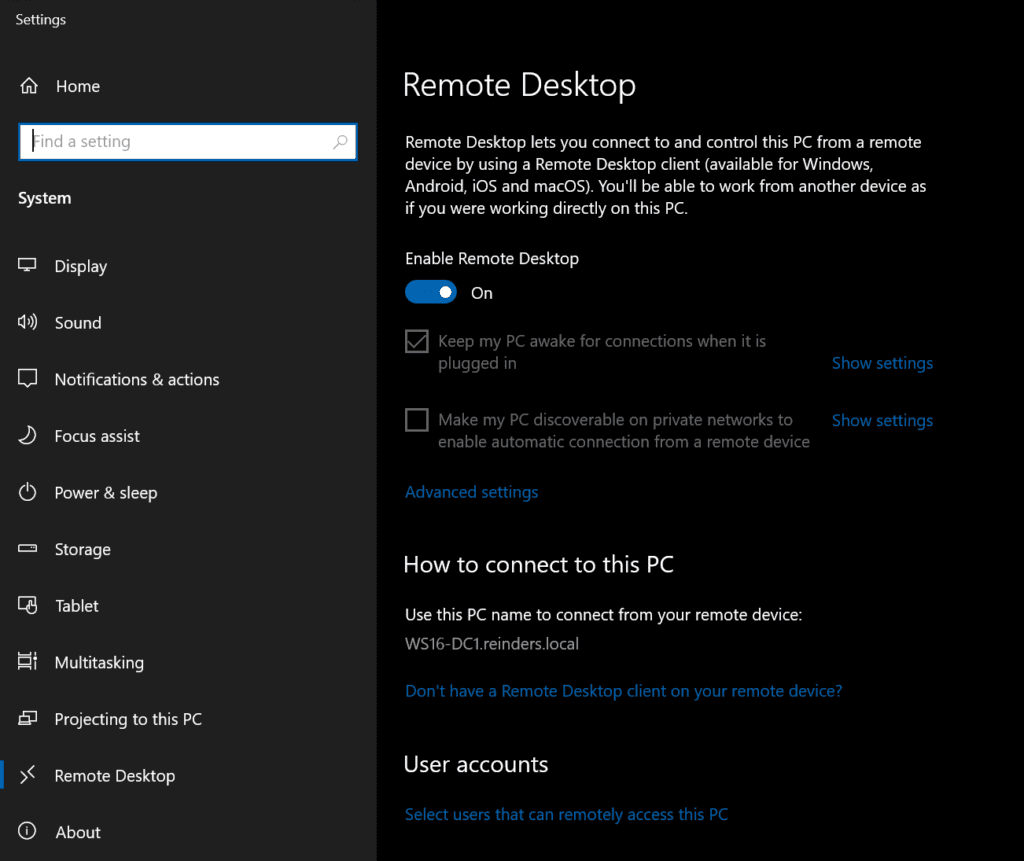
1. Allow remote connections
This is perhaps the most fundamental setting you will need to verify – checking your remote settings. You need to verify if ‘RDP is enabled’. Again, this can be discovered by clicking Start -> Settings -> Remote Desktop and verifying that ‘Enable Remote Desktop‘ is on.
2. Change Remote Desktop connection settings
There are some basic settings related to RDP that are crucial, at the lowest layer of the TCP/IP stack. The default TCP port that Remote Desktop Host (RDH) listens on is ‘3389.’
To run a simple test from your client machine, run the Test-NetConnection command from a PowerShell prompt to test connecting to the server’s name or IP address on port 3389. I will test the connection to one of my Windows Server 2022 domain controllers (DCs).
Test-NetConnection WS16-DC1 –port 3389
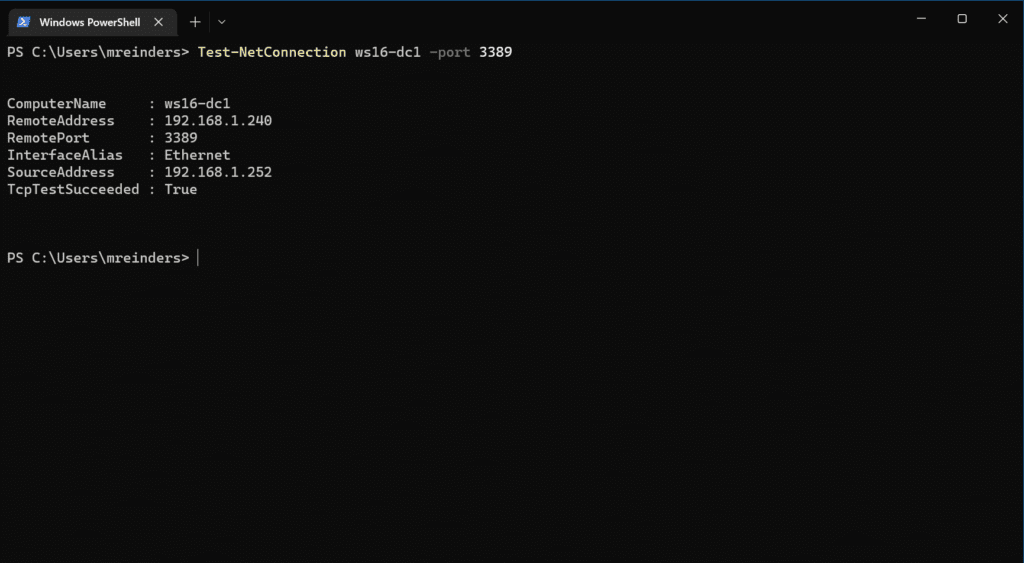
Well, that worked. And already, this is showing that quite a few blocks are in their right place. It doesn’t guarantee an RDP attempt will work, but it does confirm that at least something is listening on port 3389. There’s about a 99.9% chance it’s the server’s remote desktop service.
We can check more “basics” on the server side by going to Start -> Settings -> Remote Desktop. Here, I can click Advanced Settings and see a few more settings. I highly recommend keeping the ‘Require computers to use Network Level Authentication to connect (recommend)‘ checked. Definitely a wise and secure setting.
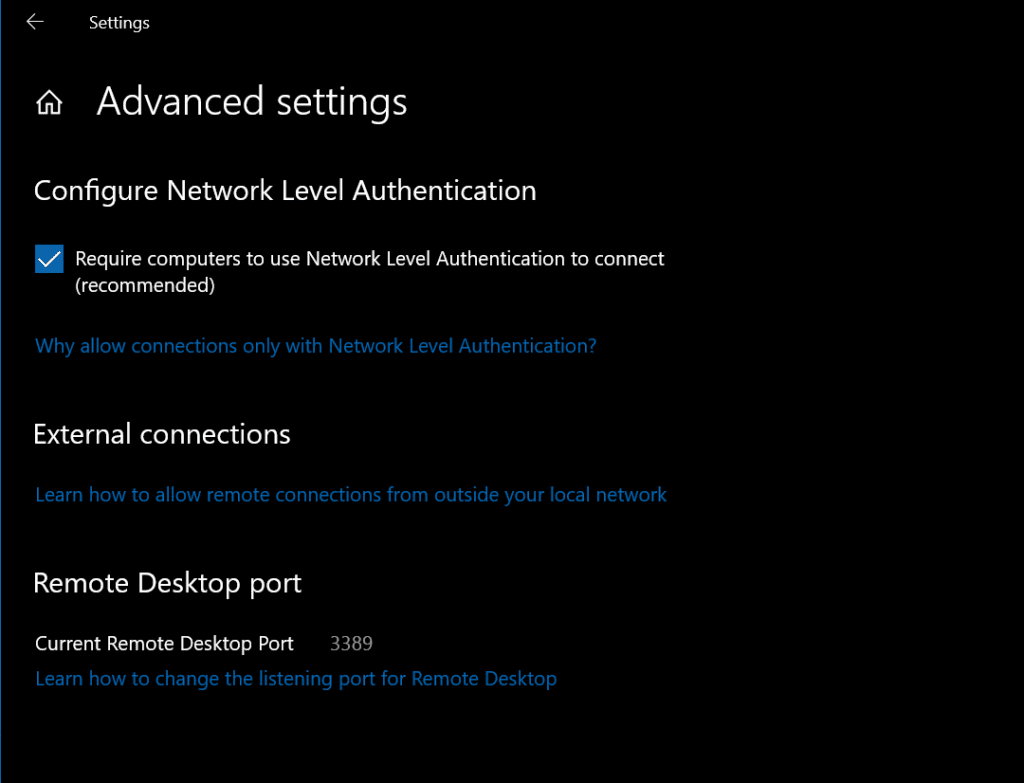
Notice the ‘Current Remote Desktop Port‘ is set to 3389. That checks. And yes, you still need to use the Registry if you want to change the TCP port that the Remote Desktop service listens on.
3. Allow the Windows Firewall to connect to RDP
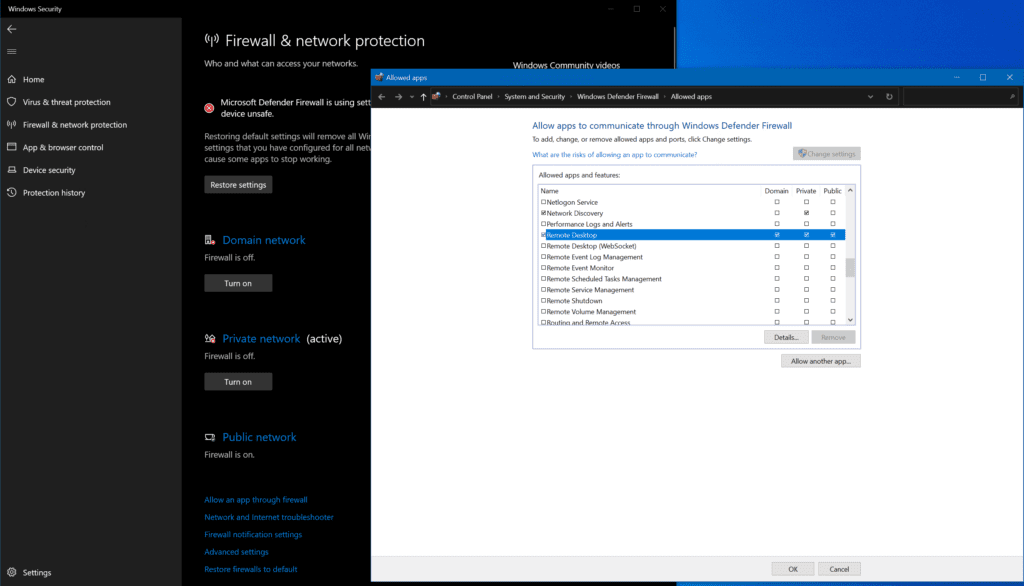
One of the reasons the ‘Test-NetConnection’ from item #2 may fail is that the Windows Defender Firewall may be blocking TCP traffic. We need to make sure the inbound rules on the server allow for Remote Desktop Protocol traffic (port 3389).
- On the server, click the Start menu, and search for ‘firewall‘ to open ‘Firewall & network protection.’
- At the bottom, scroll down and click on ‘Allow an app through firewall.’
- In the ‘Allow apps to communicate through Windows Defender Firewall‘ screen, scroll down and make sure ‘Remote Desktop‘ has a checkmark in the specific network type you are using (should be Domain).
4. Leave and re-join a domain
You do have the option of disjoining your client PC from the Active Directory domain, rebooting, and then re-joining it. This doesn’t necessarily solve a lot of problems in this area, but, like rebooting, it can clear up innocuous issues.
I won’t go through the steps here, but you can use the Remove-Computer cmdlet in PowerShell to accomplish this task.
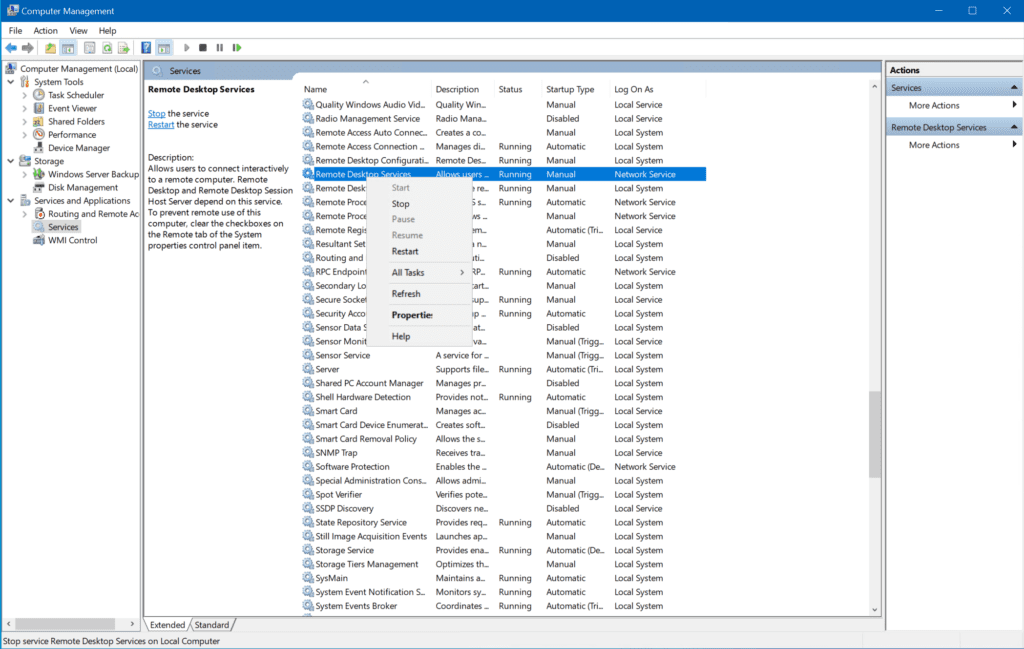
5. Restart the Remote Desktop Services service
There are times when you just need to “reboot” in a way. There are several methods you can use to restart the Remote Desktop Services service: the Services MMC snap-in, PowerShell, etc. I’ll show you the Computer Management way.
- Right-click the Start button and click on Computer Management.
- Expand Services and Applications, and click on Services.
- Find the Remote Desktop Services service and Restart it.
You may not be able to restart the service if you are logged into it remotely, of course. You may need to log in interactively to the Console session of the server (KVM).
6. Change the startup status of the Remote Desktop Protocol service
Yes, there are many steps you need to take to troubleshoot why you can’t access your server! 😉 Here’s another: The Remote Desktop Services (TermService) service might not be running. It also may not be set to automatic, meaning it doesn’t start when the server boots up.
Here’s a simple way for you to confirm all is good. Let’s use the PowerShell get-service command here:
get-service TermService | fl
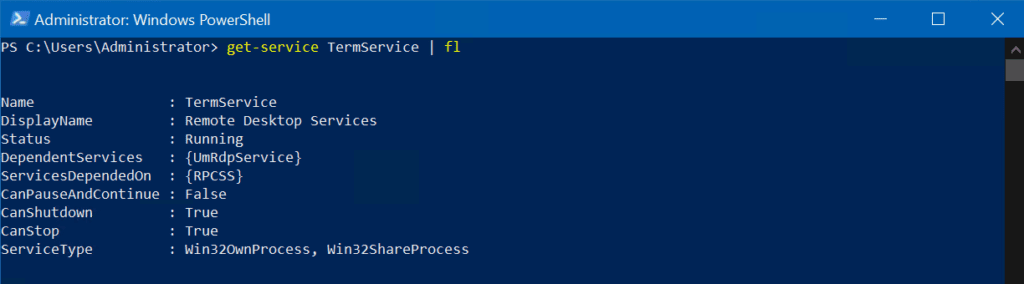
Here, we can see that the status of the Remote Desktop Services service is set to ‘Running’. That’s a good thing. 🙂 Next, let’s check the Startup type with another PowerShell command:
get-service TermService | select -property name,starttype
We can see it is set to ‘Manual’. Let’s change the startup type to Automatic with the set-service command:
Set-Service TermService -StartupType Automatic
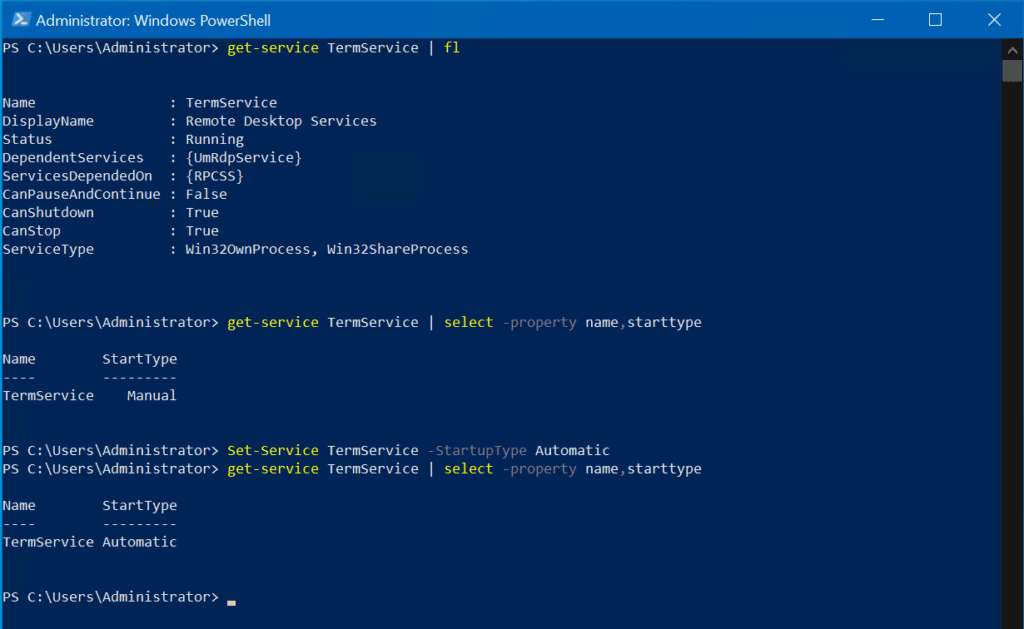
Done!
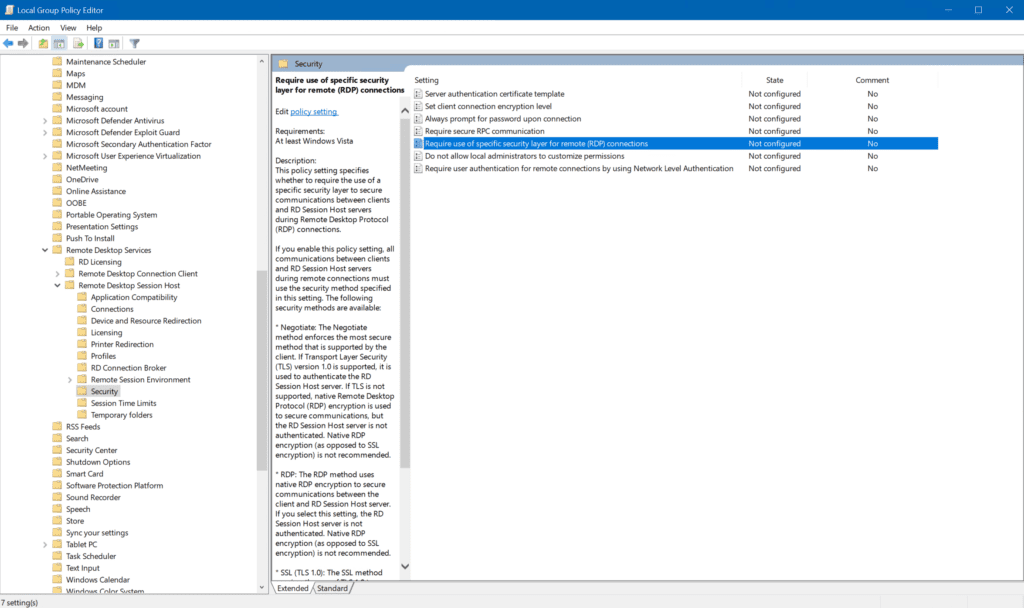
7. Change Remote Desktop Protorocl security in Group Policy Editor
There are some cases where the security settings for the Remote Desktop Protocol are not behaving correctly. In that case, we can edit the group policy on the server.
You can open the local Group Policy Editor to do some trial and error in this realm.
- Press ‘Windows key + R‘ and type in ‘gpedit.msc’.
- Navigate to this location: Computer Configuration -> Administrative Templates -> Windows Components -> Remote Desktop Services -> Remote Desktop Session Host -> Security.
- If the “Require use of specific security layer for remote (RDP) connections” parameter is set to Not Configured, select Enabled, and in Security Layer, choose RDP.
- Close all programs, reboot your server and attempt to reconnect your RDP connection.
8. Change the local security policy
Another potential security issue can be looked into and resolved using the local security policy. Let’s follow through with these steps to gain more insight:
- Press Windows key + ‘R’ to open the Run dialog.
- Type in ‘secpol.msc’ to open the local security policy utility.
- Click on ‘Local Policies‘ and select the ‘Security Option‘ on the left side.
- Scroll down and double-click on the ‘System cryptography: Use FIPS compliant algorithms for encryption, having, and signing.’
- Select ‘Enabled‘ and click OK.
- Exit your programs and reboot the server.
- Attempt to connect via the Remote Desktop Protocol again.
9. Change the MTU value
There is another somewhat obscure troubleshooting step that could assist in this troubleshooting. This involves changing the Maximum Transmission Unit (MTU) value on the client network interface. See the steps below.
Open an administrative command prompt/PowerShell window and type in this command where you replace “Ethernet” with the display name of the network interface you want to adjust.
netsh interface ipv4 set subinterface "Ethernet" mtu=1458
The default MTU size is 1500 bytes. This setting will resolve some less common connection issues.
Another method you can use to make this change is to download TCP Optimizer from here, a free program that can help you optimize your Internet connection.
10. Disable Network Level authentication
We’ve already discussed Network Level Authentication (NLA) briefly, but we can use this as another troubleshooting step. In some situations, the chance of success of an RDP connection is the use of a specific security layer. We can temporarily disable the requirement of connecting clients using NLA on the server.
However, this is only a troubleshooting step. In this day and age, you do not want to leave your server in this mode. Let’s check some advanced system settings related to the Remote Desktop Protocol.
Click Start -> Settings -> System -> Remote Desktop -> Advanced Settings.
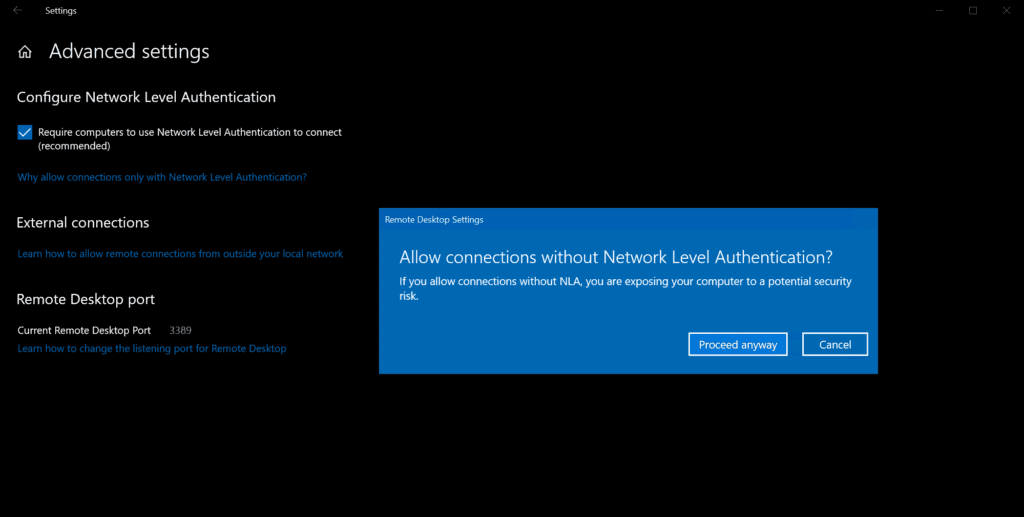
If you uncheck the box, you will see a warning, but again, this is only for troubleshooting. If you prefer, you can also use PowerShell to disable Network Level Authentication.
Try again to connect with your client. If the RDP connection does work now, you will need to do some research on why the client is not utilizing NLA when making that connection to your server. This Microsoft documentation may be able to assist you.
11. Disable VPN connections
There are a few settings related to Virtual Private Networks (VPNs) or Proxy settings that may be interfering with the traffic between your client and server in negotiating that RDP connection. There are easy-to-find options in the Settings app to verify the current config and make potential changes.
Click Start -> Settings -> Network & Internet. First, click the ‘VPN‘ category on the left.
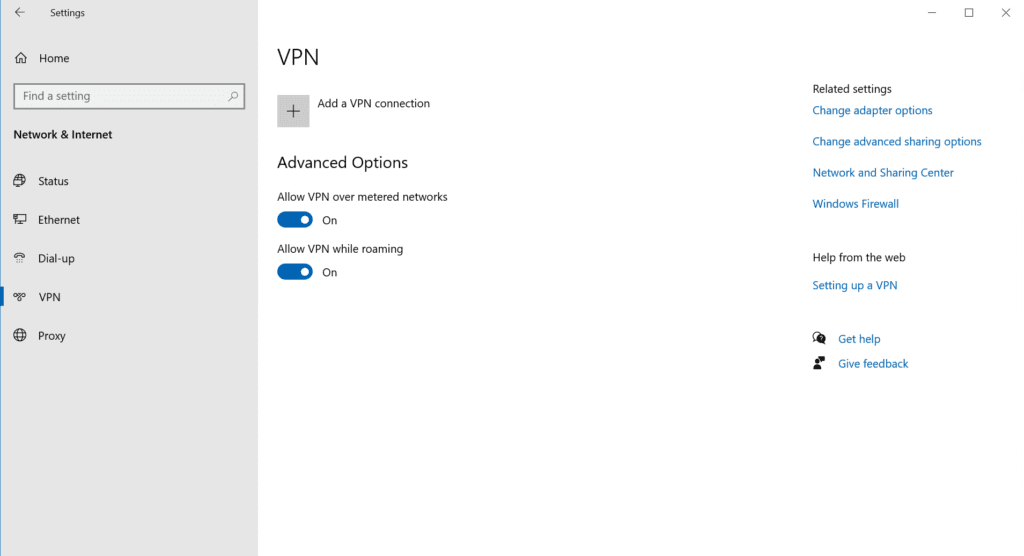
If by chance you have any ‘Windows’ VPNs in use, disconnect them and try your RDP connection again.
Next, click the ‘Proxy‘ category on the left.
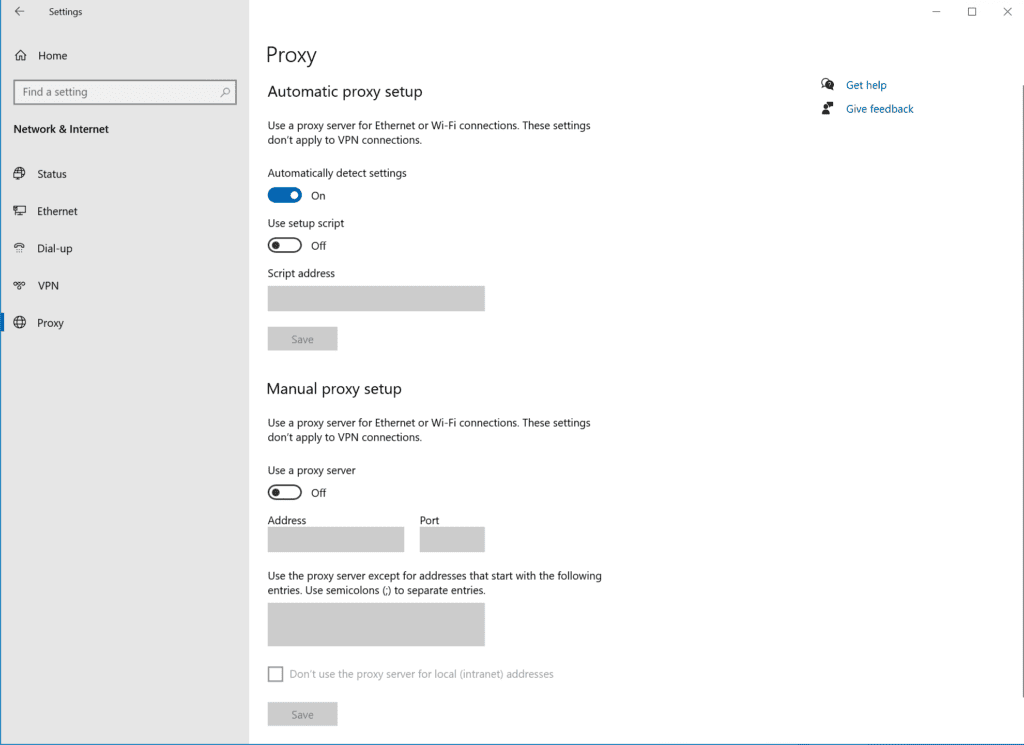
The most common setup you’ll have is either the ‘Automatically detect settings‘ being set to on, or under ‘Manual proxy setup‘, the ‘Use a proxy server‘ set to on with an IP address or server name.
Basically, disable one of these settings for a moment, and try your RDP connection again. If it now does work, you can speak to your network administration team to inform them of the scenario you’re hitting. There may be some network traces they can run to identify where exactly (on the network) misconfiguration may be causing you grief.
There is a more drastic set of steps you can perform to be more thorough in identifying the root cause of potential VPN software connections. Follow these steps to find out if other system configurations are causing a blockage:
- Press the Windows key + ‘R’.
- Type ‘msconfig‘ and press Enter.
- Select the boot option from the system configuration window and then check the ‘safe boot‘ option.
- Click apply and then press OK.
- Restart your PC into safe mode.
- See if this resolves your issue.
If it does, you’ll need to work on finding the root piece of software or configuration setting that is interfering with the RDP connection.
12. Disable static IP on your PC
There is a relatively small chance that your client’s PC is using a static IP Address. There exists a scenario where the server you’re trying to RDP to has network-layer restrictions on what network IP addresses or subnet ranges it allows those connections from. In case your client’s static IP Address is NOT in that list, your connection will fail.
A troubleshooting step you can employ is to change from static to DHCP. It is very likely an IP address from your DHCP server will play more nicely with our post topic here. 🙂
Click Start -> open Settings -> Network & Internet -> Ethernet. Click on the Ethernet connection (or whatever the display name is).
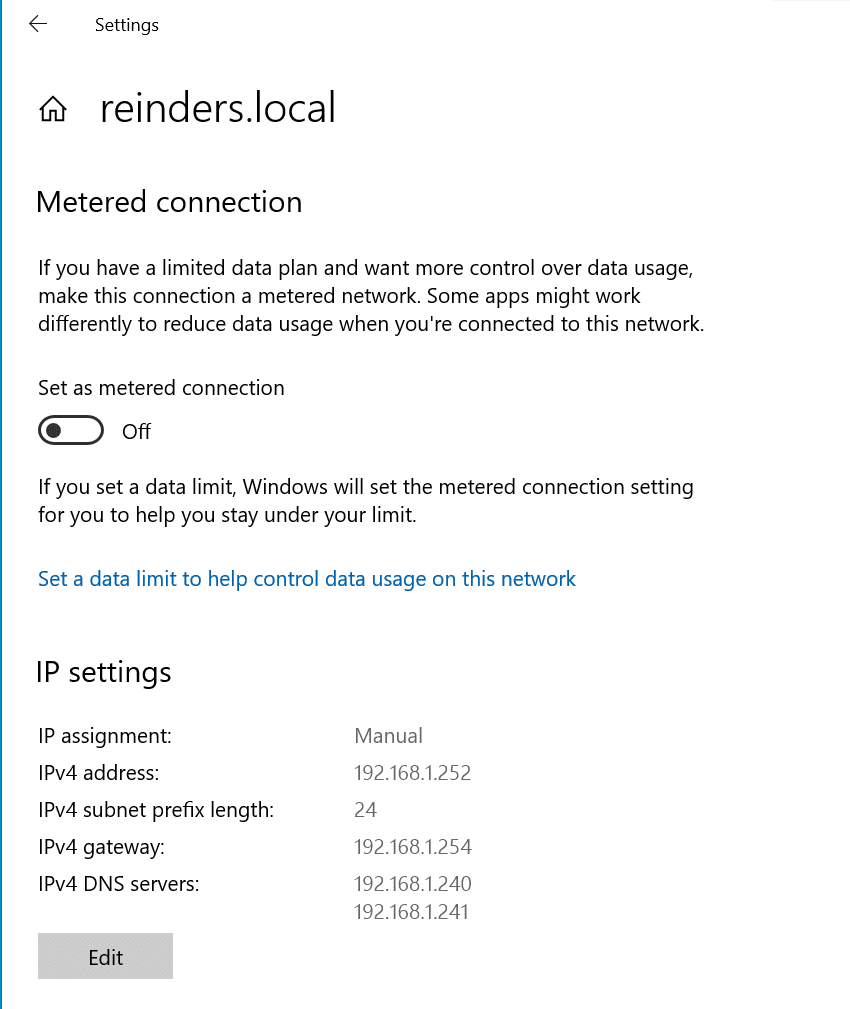
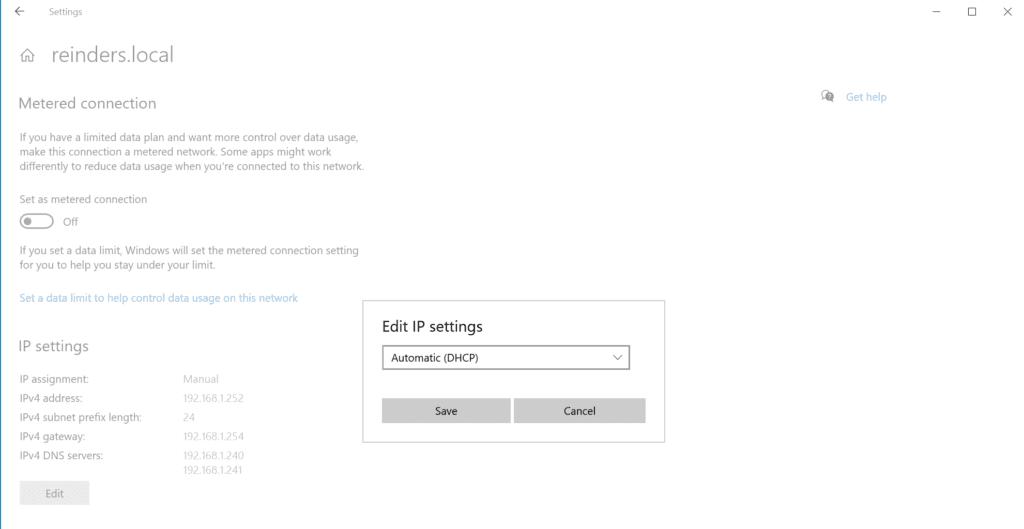
Incidentally, if you’ve read my prior posts, you’ll know that I’m running these machines in my Windows Server 2022 Hyper-V lab environment. I chose (for reasons) to allocate static IP addresses for my servers/workstations, etc. Here, you can see my machine is set to 192.168.1.252.
All you need to do is click the ‘Edit‘ button, click the dropdown at the top of the ‘Edit IP settings‘ window, and choose ‘Automatic (DHCP)‘ and click Save.
13. Enable persistent bitmap caching
And, for our final troubleshooting step, another less prevalent but possible issue is a setting on the Experience tab in the Remote Desktop Connection application. Persistent bitmap caching can improve performance by storing bitmap images that were sent to the RDP client using the cache bitmap, and this feature requires additional disk space.
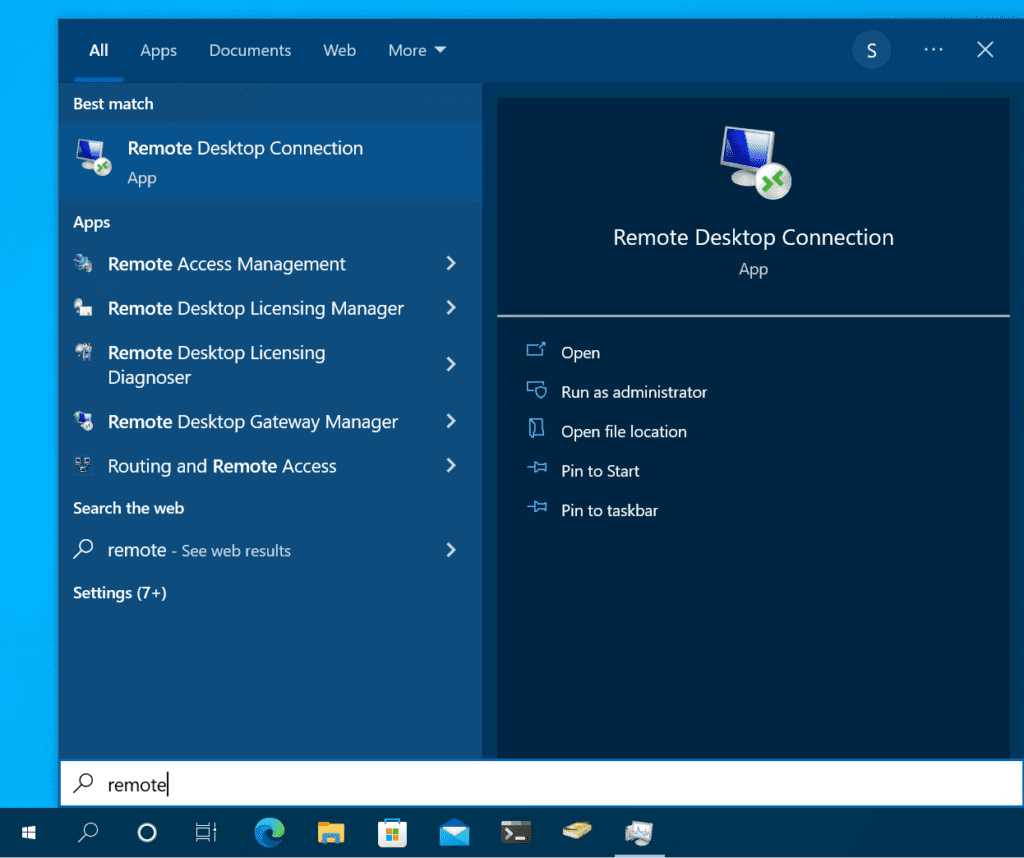
Let’s find out how to check and verify if persistent bitmap caching is enabled in the Remote Desktop Connection client, or more traditionally, the terminal server client. Press the Start button and start typing in ‘remote‘. Choose Remote Desktop Connection.
Click the ‘Show options‘ link at the bottom to expand the dialog. Click the ‘Experience‘ tab.
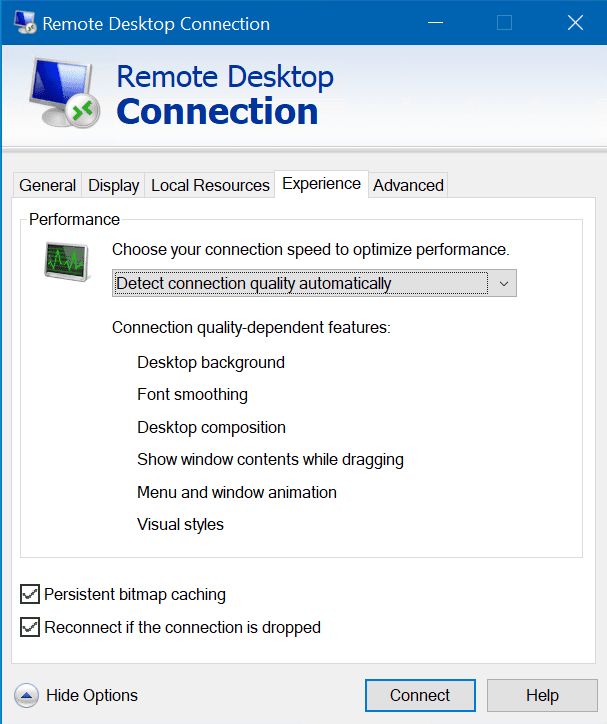
Regardless of the state of the ‘Persistent bitmap caching‘ setting, toggle it: If it’s off, turn it on, and vice versa. 😉 Then attempt your connection again.
Conclusion
Well, well. As we’ve discovered here, there is a myriad of settings on the client computer, on the server (or computer) you’re trying to remotely log into, your network, your firewalls (hardware and software), and other settings that can cause the “Remote Desktop Connection: An internal error has occurred” issue. There are even potential Internet and/or ISP scenarios in case you’re attempting to RDP from your home office into your secure work networks.
We hope the troubleshooting steps we detailed in this guide helped you to fix your RDP connection issues. There are really a LOT of variables, settings, and configurations involved here, though if you’re methodical you shouldn’t have too much trouble getting your RDP connection up and running again.
FAQs
Why does an internal error occur in RDP when my internet connection is stable?
An internal error has occurred RDP issue can arise even with stable internet due to corrupted RDP certificates, incompatible protocol versions, or DNS resolution problems. The error commonly appears when the certificate exchange process fails during the initial handshake between client and server.
Can antivirus software cause an internal error has occurred RDP message?
Yes, certain antivirus software can interfere with RDP connections by blocking necessary ports or protocols. The internal error has occurred RDP problem may appear when security software identifies the connection attempt as potentially suspicious activity.
Does updating Windows resolve the RDP internal error permanently?
While updating Windows can help resolve an internal error has occurred RDP situation, it’s not always a permanent fix. The error might reoccur due to system changes, policy updates, or conflicts with other software installations.
What registry modifications can prevent RDP internal errors?
Registry modifications like adjusting the RDP security layer settings, TCP timeout values, and authentication protocols can help prevent an internal error has occurred RDP message. However, these changes should only be made by experienced administrators.
Are there third-party tools to diagnose RDP internal errors?
Several diagnostic tools can help troubleshoot when an internal error has occurred RDP, including Remote Desktop Analyzer, Network Monitor, and Connection Quality Indicator. These tools provide detailed logs and connection metrics to identify the root cause.

Michael has been an IT Pro since 1998. He has worked predominantly in the Windows world including client and server operating systems, on-prem systems engineering (AD, DNS, etc.), and over the last ten years or so has embraced and immersed himself in...