Pinning a File in Tiered Microsoft Storage Spaces
Microsoft Storage Spaces in Windows 8 and Windows Server 2012 R2 allows you to have two tiers of storage. Storage Spaces automatically manages the placement of blocks across storage tiers, but sometimes you will want to override the behavior and pin a file to one tier in Storage Spaces. I will show you how to do this operation in this blog post.
Tiered Storage Spaces Benefits
Microsoft added tiered storage to Storage Spaces in Windows Server 2012 R2. The concept is that you can merge low cost but large capacity hard disk drives (HDDs) with expensive high speed solid state drives (SSDs), giving you the best of both worlds. For example, you might place 12 x 200 GB 65,000 IOPs SSDs and 48 x 6 TB 7200 RPM HDDs into a JBOD, pool the disks and create a number of 8 column virtual disks. Each virtual disk can be tiered, consuming space from both the SSD and the HDD tiers.
You get huge capacity from the 6 TB drives, but they are slow. There are two benefits that adding the SSDs will offer:
- Overall speed: Storage Spaces will track block usage (1 MB) of your files using a heat map. Hot blocks will be moved to the SSD tier. Cold blocks will be moved to the HDD tier. A file might reside on both tiers. The movement of blocks happens transparently beneath the file system so you won’t notice anything, hopefully other than an increase in performance.
- Write performance: Virtualization writes through any write cache that is in your storage controllers. Storage Spaces provides a persistent write cache with committed writes, thus avoiding the need for write-through via a Write-Back Cache (WBC). Each virtual disk created on tiered storage will get 1 GB of WBC capacity by default, and this is used to absorb spikes in write activity.
Pinning Files to a Tier
We have the ability to pin an entire file to a single tier. In Windows Server 2012, we can pin a file entirely to the HDD tier or to the SSD tier. Why would you consider doing this? Here are several different reasons that I might pin a file:
- VDI: I have created a golden image of a pooled virtual machine. New virtual machines in the pool will have differentiating disks that use the VHDX image file as their parent. I will pin the VHDX file to the SSD tier to get the best possible read performance from the virtual disk. This should speed up the boot times and general performance of all virtual machines in the VDI pool.
- Low SLA: A customer has paid a very small amount to get a low performing virtual machine on my cloud. I will pin their virtual machine’s files to the HDD tier. If they want better performance, then I will remove the pinning from the files.
- Testing: I recently did some testing of a third party on-host caching solution. I wanted to see the before and after results of using this add-on. I first pinned my virtual machine to the HDD tier to test, and then I pinned it to the SSD tier to test. This allowed me to see exactly how the performance product modified the results of my benchmark testing.
How to Pin a File to a Tier
I hope you’ve been paying attention to what I’ve been preaching here on the Petri IT Knowledgebase since I started writing: You need to learn PowerShell. Manipulating file placement on a storage tier is yet another example of operations that can only be doing via Microsoft’s scripting and administration language.
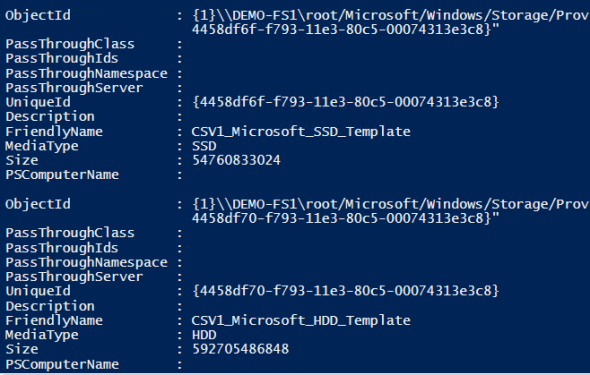
The first thing you need to do is identify your storage tiers. Each tiered virtual disk will have a pair. You can find the name of the required tier by running Get-StorageTier. The following figure shows the results after running Get-StorageTier:
The results from the Get-StorageTier PowerShell Cmdlet (Image: Aidan Finn)
I know that the file I want to pin is on CSV1. I want to pin the file to the SSD tier. There are two tiers for CSV1, CSV1_Microsoft_HDD_Template and CSV1_Microsoft_SSD_Template; the latter is the one I will pin my file to.
I can pin a file to a tier using Set-FileStorageTier. The tricky bit is the parameter for DesiredStorageTier; I embed a query using Get-StorageTier to return the object for the desired storage tier to satisfy the requirements of the parameter.
Set-FileStorageTier –FilePath "C:ClusterStorageCSV1SharesCSV1PooledVDITemplateWindows81-Build2.vhdx" -DesiredStorageTier (Get-StorageTier -FriendlyName CSV1_Microsoft_SSD_Template)
You will likely run this cmdlet and rush to test the results. And that would be a mistake. Nothing has actually been moved yet. You can verify this by running Get-FileStorageTier and specify your file with the –FilePath flag. You’ll see that the file has not got a value of “Completely On Tier” for PlacementStatus.
All that you have done so far is tag a file to be entirely moved to the SSD tier. If you leave things as they are, the next optimization job (1am by default) will move the file. You can use the remaining time to pin lots more files to your desired tiers.
If you do not want to wait for the default optimization job, then you can force it to run now for your volume using the following cmdlet. This could take a little while to run because files are being moved around the storage system.
Optimize-Volume -FileSystemLabel CSV1
Once the job is complete you can validate the results by running Get-FileStorageTier. The PlacementStatus value should be set to “Completely On Tier”. Your file is now pinned to the SSD tier.


