How to Manually Onboard Devices to Windows Autopilot

Windows Autopilot is a collection of technologies that allows organizations to simplify deployment and setup of Windows 10. First introduced in the Windows 10 Fall Creators Update, Autopilot lets organizations ship devices directly to users and have all the necessary security policies, networking profiles, and applications installed without IT needing to touch the hardware. Additionally, Autopilot can reprovision devices should they need to be reset or passed on to other users.
Since its initial launch, Autopilot has seen some improvements like the enrollment status page, which shows device status so users can understand whether it’s ready to use. Organizations can also prevent users logging in until a device has been fully provisioned. Integration with Azure Active Directory dynamic groups, self-deploying mode, and white-glove provisioning are all features added to provide more flexibility and value.
For more information on Windows Autopilot, see New Windows Autopilot Deployment Options in Windows 10 1803 and Redstone 5 and Get Users Working Faster with Windows 10 Autopilot White Glove Provisioning on Petri.
Onboarding Devices to Windows Autopilot
Let me start by saying that Microsoft doesn’t want you to manually onboard your Windows 10 devices. That’s not how Autopilot is supposed to work. If you buy devices directly from an OEM, you provide consent for them to directly register devices in your Azure AD tenant. You can find a list of OEMs that support Windows Autopilot on Microsoft’s website here.
If you buy devices from a reseller, distributor, or Microsoft Partner that is part of the Cloud Solution Partners (CSP) program, they are also able to register devices for Windows Autopilot. And as with OEMs, an Azure AD Global Administrator needs to provide consent before partners can register devices with Windows Autopilot.
For organizations that have already purchased devices and that would still like to use Windows Autopilot, it is possible to automatically onboard PCs running Windows 10 version 1703 or later and that are already enrolled in a Mobile Device Management (MDM) service like Microsoft Intune.
Hardware ID (Hash)
Windows Autopilot needs a device’s hardware ID, or hash as it’s sometimes referred, before it can be onboarded. The hash is generated using information about the hardware, like manufacturer, model, device serial number etc. If the hardware changes substantially, the hardware hash also changes. MDM services can retrieve the hash from Windows and then automatically onboard devices to Autopilot if a deployment profile exists.
Manual Onboarding of Devices to Autopilot
If Microsoft doesn’t want you to manually onboard devices to Autopilot, in what scenarios might you need to go the manual route? If you have existing devices that aren’t enrolled in an MDM service, then manual onboarding is an option. Or if you are buying devices from OEMs or partners that don’t support Autopilot, then you will need to harvest the hardware hashes and onboard the devices yourself.
For the purposes of this demonstration, I will use Microsoft 365 Business, which includes Intune and Windows Autopilot; and I will onboard a device running Windows 10 version 1909.
Harvest Hardware IDs
The first step is to retrieve the device hardware hash. Microsoft advises that devices shouldn’t be connected to the Internet until you have successfully captured hardware IDs, uploaded the IDs to Autopilot, and assigned a profile. If a device is connected to the Internet before onboarding, a blank profile is downloaded and will remain until it is removed by resetting the device using OOBE setup.
To get a hardware ID from a device, Microsoft provides a PowerShell script which can be run locally or against remote machines. Let’s run the script to get the hardware ID.
- Log in to the device that you want to onboard to Autopilot.
- Start a PowerShell prompt with administrator privileges.
- Run Get-ExecutionPolicy and make a note of the current policy setting. The default setting is Restricted.
- If the execution policy is anything other than Unrestricted, run the following PowerShell command to change the policy and confirm the change as prompted.
Set-ExecutionPolicy Unrestricted
- Create a directory c:temp
- Get the PowerShell script from Microsoft’s website here.
- Expand FileList and click Get-WindowsAutoPilotInfo.ps1
- Select the script contents and copy it to the clipboard.
- Open Notepad and paste the contents of the clipboard.
- Save the file in c:temp as Get-WindowsAutoPilotInfo.ps1
- In the PowerShell window, change the working directory to c:temp

cd c:temp
- Now run the script and add the -OutputFile parameter as shown below.
.Get-WindowsAutoPilotInfo.ps1 -OutputFile c:tempautopilot.csv
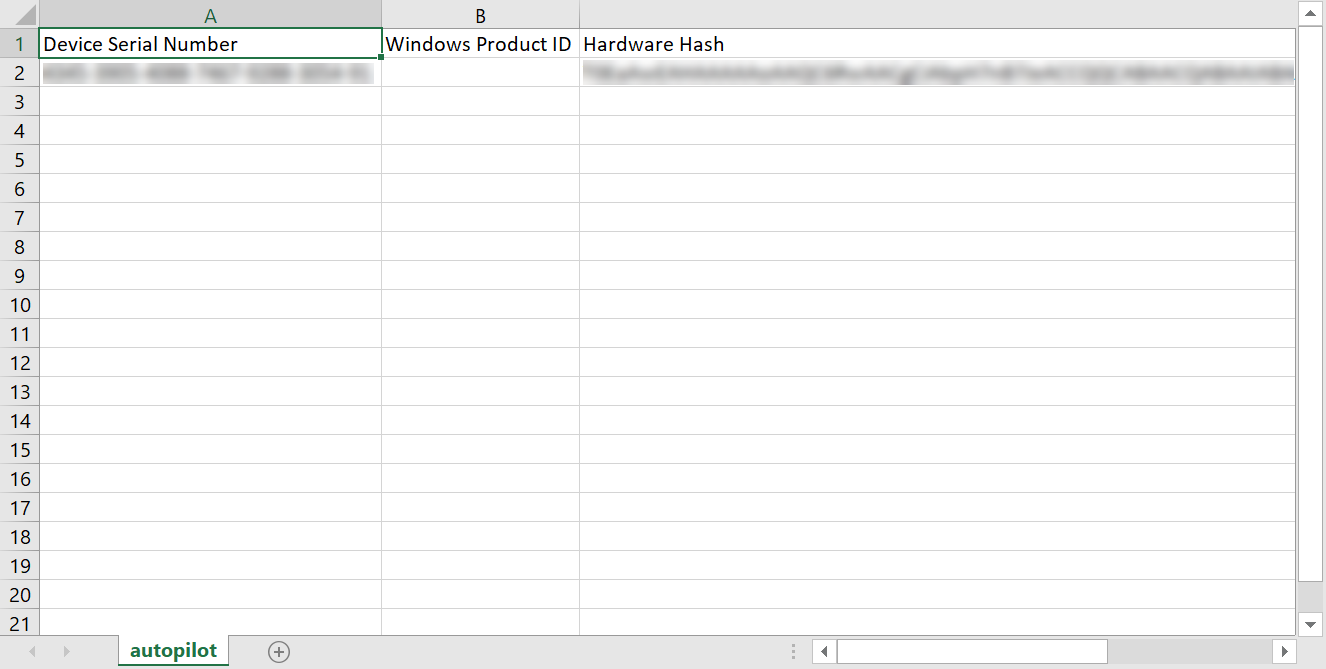
- Open autopilot.csv and you should see a comma-delimited file with three columns: Device Serial Number, Windows Product ID, and Hardware Hash. The latest version of the script doesn’t collect the Windows Product ID. Don’t worry, Autopilot doesn’t need it.
- Below the headings, you should see your device’s serial number and hardware hash. Close the file.
- Don’t forget to set the PowerShell execution policy back to Restricted, or to whatever the policy was previously configured on the device, using Set-ExecutionPolicy.
- Close the PowerShell window.
That’s most of the hard work done. In the second and final part of this article, I will show you how to upload the CSV file to Microsoft, create and assign an Autopilot profile to the device, connect Windows 10 to Azure Active Directory, and confirm Intune enrolment.
Windows Autopilot is a collection of technologies that allows organizations to simplify deployment and setup of Windows 10, letting organizations ship devices directly to users and have all the necessary security policies, networking profiles, and applications installed without IT needing to touch the hardware. Additionally, Autopilot can reprovision devices should they need to be reset or passed on to other users. For more information on Windows Autopilot, see New Windows Autopilot Deployment Options in Windows 10 1803 and Redstone 5 and Get Users Working Faster with Windows 10 Autopilot White Glove Provisioning on Petri.
If you missed the first part of this series, be sure to read it and follow the instructions there before continuing. Today, I’ll show you how to upload the CSV file generated in Part 1, how to create and assign a Windows Autopilot profile, how to connect Windows 10 to Azure Active Directory, and how to verify Intune enrollment.
Upload Hardware IDs to Microsoft
Once you’ve got one or more hardware ID’s in a CSV file, you can upload it and Microsoft will onboard the devices to Autopilot. There are several places where you can upload hardware IDs, including Intune, the Partner Center, Microsoft 365 Business and Office 365 admin portals, and the Microsoft Store for Business. In this demonstration, I’m going to use the Microsoft 365 Business admin portal, where you can onboard up to 1000 devices at a time and create and assign an Autopilot profile.
- Log in to the Microsoft 365 Business admin portal here using a Global Administrator account.
- In the list of options on the left, expand Devices and click AutoPilot.
- On the Devices tab, click + Add devices.

- In the Add devices panel, click Browse, select the autopilot.csv file created in the previous steps, and then click Save in the panel window.

You will see a message saying that the file is being uploaded. It might take a minute or so before your device(s) appear on the Devices tab in the Autopilot window.
Create an Autopilot Profile
If you don’t already have an Autopilot profile, you’ll need to create one. If you already have a profile, you can skip this section.
- Click + Create profile in the Autopilot window.
- In the Create profile panel, give the new profile a name and configure the privacy and local administrator settings as required.
- Click Save.

Assign an Autopilot Profile
Finally, assign a profile to your device(s).
- Click your device in the Autopilot window.
- In the device panel, select a profile using the dropdown menu under Assigned profile.
- Click Save.

Connect Windows 10 to Azure Active Directory
Now that everything is set up in Microsoft 365 Business, you can connect the device to the Internet and join it to Azure AD. There are a couple of ways to connect (join) a Windows 10 PC to Azure AD. One option is during the OOBE setup phase. For more instructions about how to do that, see Join Windows 10 to Azure Active Directory During OOBE on Petri.
Alternatively, you can connect a device to Azure AD in the Windows 10 Settings app. Just navigate to Accounts > Access work or school and then click Connect. Follow the instructions to connect the device to Azure AD, making sure on the Set up a work or school screen that you click Join this device to Azure Active Directory. You’ll need an Azure AD account that has permission to connect devices. To confirm that Windows 10 is connected to Azure AD, check out the instructions in How to Check Whether Windows 10 is Joined to Azure Active Directory on Petri.

If everything worked as expected, you should also see the device enrolled in Intune. You can check in the Device Management portal here. Click on Devices in the list of options on the left, and then All devices to see a list of all enrolled endpoints.

And that is it! You now have a device successfully enrolled in Windows Autopilot.
Related Article:
Russell Smith, the Editorial Director at Petri IT Knowledgebase, has over two decades of hands-on experience in IT, in both small business settings and government IT infrastructure projects. Russell started writing for Windows IT Pro Magazine in t...
