How to Install Windows Server 2022 Core
In this post, I will demonstrate how to install Windows Server 2022 Core the way Microsoft recommends… using the ‘Server Core’ option. Yes, by default, this is the default installation choice.
You should install Windows Server 2022 using the Server Core option whenever possible. Windows Server 2022 contains new features and it is the most secure version of Windows Server available to date.
The Windows Server Core option removes all the code associated with the Desktop Experience server role and it has a small disk footprint. Because of the reduced code base, there’s a significantly reduced attack surface and Server Core requires less reboots because there are fewer security patches each month.
To install Windows Server 2022 Server Core, you will need to boot your virtual or physical device using the Windows Server media or mounted ISO file. The out-of-box experience (OOBE) will then run, allowing you to select your regional options, like language; enter a product key; choose between Standard and Datacenter SKUs; and select a disk to install the operating system on. Finally, you need to set an administrator password.
Windows Server 2022 – New Features
Windows Server 2022 contains several new features that are designed to improve security and integrate better with the Azure cloud. You can get a full rundown of the new capabilities on Microsoft’s website here. But here are some of the highlights:
- Windows Server 2022 Core enables TLS 1.3 by default. TLS 1.3 brings faster and more secure HTTPS connections.
- DNS over HTTPS (DoH) improves DNS security.
- Fileservers get Server Message Block (SMB) AES-256 encryption.
- East-West SMB encryption controls are included for internal cluster communications.
- Organizations can now enable encryption for Remote Direct Memory Access (RDMA) without compromising performance.
- SMB Compression in Windows Server 2022 Core lowers bandwidth and decreases operation times when copying large files.
- Azure Automanage brings hotpatching, enabling admins to install security patches for up to three months without rebooting.
- Microsoft Edge is now the default browser in Windows Server 2022.
- SMB over QUIC is an SMB Virtual Private Network (VPN) designed for mobile users and high security organizations.
- And finally, Windows Server 2022 Datacenter – Azure Edition offers the latest hybrid and compute features in the Azure public cloud and on Azure Stack HCI 21H2.
Windows Server 2022 – Hardware Requirements
Regardless of whether you choose to install Windows Server 2022 Core on physical hardware or in a virtual machine, you’ll need to make sure you meet the minimum hardware requirements. Exceeding the minimum hardware requirements is recommended for most workloads.
| Windows Server 2022 Server Core Hardware Requirement | Details |
| Processor | 1.4 GHz 64-bit processor Compatible with x64 instruction set Supports NX and DEP, CMPXCHG16b, LAHF/SAHF, and PrefetchW Supports Second Level Address Translation (EPT or NPT) |
| Memory/RAM | 512 MB Error Correcting Code (ECC) type or similar technology for physical host deployments 800 MB RAM for initial VM deployments |
| Disk Space | 32 GB |
| Network Requirements | An ethernet adapter capable of at least 1GB per second throughput Compliant with the PCI Express architecture specification |
| Other | UEFI 2.3.1c-based system and firmware that supports secure boot Trusted Platform Module (TPM) Graphics device and monitor capable of Super VGA (1024 x 768) or higher-resolution |
Download the Windows Server 2022 ISO
Before you can install Windows Server 2022 Core, you’ll need to get hold of the media. There are several ways you can do this. If you don’t have a license for Windows Server, you’ll need to use the evaluation version. You can download an evaluation of Windows Server 2022 from the Microsoft Evaluation Center. Make sure that you select Download the ISO and save it to your hard drive.
Alternatively, if you have access to an MSDN subscription, you can download the Windows Server 2022 from the MSDN website and even get a key to activate Windows Server by clicking Get Key.
For organizations that have a volume licensing agreement with Microsoft, you can get the Windows Server 2022 media from the Volume Licensing Service Center (VLSC).
All those Windows Server VMs running up in Azure, supporting all your Microsoft 365 services? Core. I mean, the vast majority of them are running on Core. No doubt. There is an incredible amount of surface (like that?) footprint that simply doesn’t exist in this infrastructure with the main ‘Desktop Experience’ missing. There are countless vulnerability attack vectors that aren’t there.
Install Windows Server 2022 Server Core
In this demonstration, we’re going to install a new Hyper-V VM and install Windows Server 2022 from the ISO using the Core option. And at the end, I’ll show you my recommendations for post-setup tasks. Let’s jump right in!
Create a new Hyper-V virtual machine
Let’s start by creating a new virtual machine (VM) for Windows Server. Note: If you are familiar with creating Hyper-V VMs, feel free to skip this section. If you want to install Windows Server 2022 Server Core on physical hardware, you need to make sure the Windows Server media is connected to the server and that the server is configured to boot using the disk that will read the media. Most commonly, the ISO will be available on a bootable USB drive.
- First, under the Actions menu, click New > Virtual Machine…

2. Add a name for this virtual machine so it’s descriptive and precise. ‘AD-WS22-FS04-Core’

Now, this may seem a bit pedantic to explain, but it may help a few of you. Naming conventions, in many organizations, don’t exist! Now, for my purposes, I am prefacing every VM destined for my Active Directory (AD) domain with ‘AD.’ I know, right? Then, ‘WS22’ for Windows Server 2022, ‘FS04’ for my fourth File Server (Role), and ‘Core’ to designate it as a Server Core install type.

3. Almost ALWAYS, you should choose Generation 2 for a more robust VM guest experience with access to more RAM and modern features, especially TPM 2.0 and Secure Boot, requirements for Windows 11!

4. For my purposes, 3 GB should be enough RAM. Another nice side effect of the Core option.
In just 3 GB, I can have a fairly decent File Server. Also, I tend not to utilize Dynamic Memory with my VMs. With Dynamic Memory enabled on VMs, Windows and the Hyper-V Manager can dynamically allocate RAM where it’s needed most and pull some from running VMs that aren’t needing it. Hmmm, a post on Hyper-V and Dynamic Memory… 🙂

5. Here, I have my default Internet connection type. This network utilizes my wired Intel NIC on my host PC, and allows Windows to manage the ‘sharing’ of the NIC with VMs. The guest VMs can pass through to my LAN and get a DHCP IP Address from your router.

6. A new hard disk is created. I generally give it 60 GB. This can always be expanded after the fact, and even when the VM is running.
7. For the rest of the screens, I simply accepted defaults, opting to install an OS later.
Additional steps
Next, we’ll go through some additional steps in prep for installing Windows Server 2022 Core.
- Right-click on the new VM and click Settings.

2. We need a DVD drive to mount the ISO to. With SCSI Controller selected, click Add, then select DVD Drive, and Add again.

3. Here, I chose Image file, clicked Browse, and found my local Windows Server 2022 ISO file.

4. Here, I click Apply, then go to Firmware to move the new ISO-mounted DVD Drive to the top of the Boot order.

5. Just two more changes to make. I click in the Processor category and bump it up from 1 to either 2 or 4. As this is a Core File Server, I’ll see how things go with 2 virtual cores.

6. Lastly, click on Checkpoints and turn off Use automatic checkpoints.
This is just something I do. I would prefer to keep control of when I create Checkpoints. But, feel free to keep this checked if you want the extra security of knowing you can revert if something goes wrong. Click OK and we are ready to go!
Install Windows Server 2022 Core in a virtual machine
- First, right-click on your new VM and click Connect. This will open the ‘KVM’ window for our new install.

2. Click Start! Be ready to click in your window and press any key to boot from our mounted ISO file. And here we are, starting ‘Microsoft Server Operating System Setup’. Click Next, let’s do this.

3. Click Install Now, and you’ll come to the Activate screen. Here, if you have one, you can enter a product key from your license agreement. A MAK (Multiple Activation Key) would work, in addition to any retail keys you may have purchased. Honestly, I would choose I don’t have a product key so you can allow your KMS Server (if you have one…you have one, don’t you? What?) to activate the server automatically after you join it to your domain.
4. At the Select the operating system you want to install screen, we will choose Windows Server 2022 Datacenter. Note…without the ‘Desktop Experience’.

5. Click Next, Accept the license terms, choose the Custom install type as this is a clean install, and verify the single 60GB or whatever size you chose partition is selected, and click Next.

Alright, we are in motion.

6. When it’s done, you’re required to create a new password for the local Administrator account. Enter complex password and confirm it.

And, that’s it! SConfig will autoload. You just installed Windows Server 2022 Core!

Post setup tasks
There are just a few tasks you should perform here.
- First, enter ‘2‘ to change the computer name. I’ll change ours to WS22-FS04-Core. (I am omitting the ‘AD’ as it’s redundant in this context).
- Type Y and press ENTER to reboot.

After pressing Y to reboot, I had to wait 3 seconds and I was already back to the login prompt. Nice!
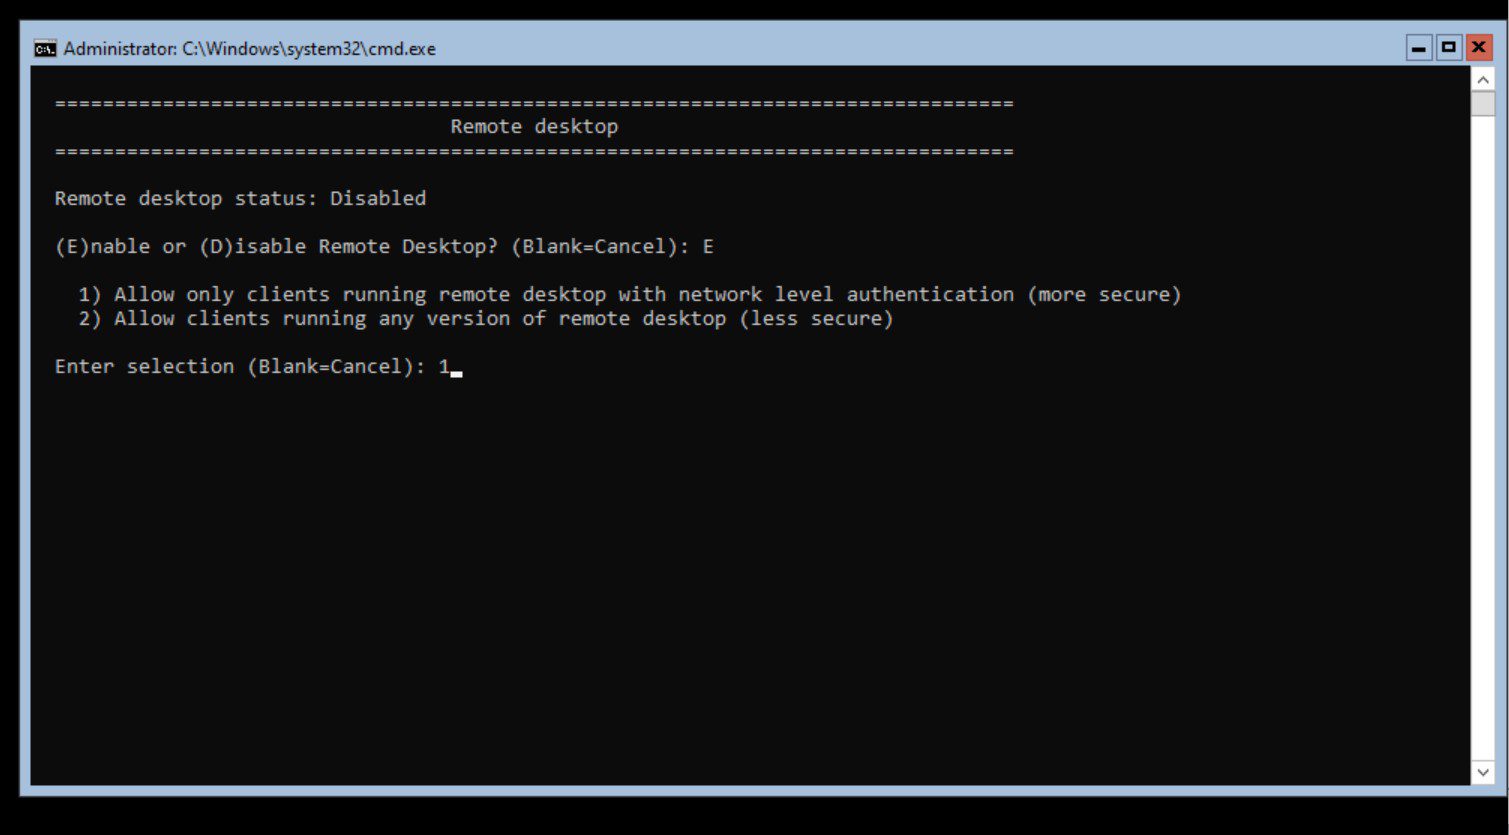
3. Next, choose 7) Remote desktop, ‘E‘ to Enable Remote Desktop, then ‘1‘ to use the more secure NLA, Network Level Authentication.
4. Then, choose 6) Install Updates, then 1) All quality updates.

If you were truly eagle-eyed, you may have noticed the ISO I used was released in August 2021. Microsoft releases newer, updated ISOs usually every month with the latest MCU (Monthly Cumulative Update) incorporated into the ISO.
As I am going through this Patch Tuesday week, September’s MCU (2) is available. I will choose ‘A‘ for all updates, wait for them to install, and then reboot when prompted.

Installing Windows Server 2022 Server Core is easy
And, we’re done! I hope you enjoyed this post on Installing Windows Server 2022 Core in a Hyper-V VM. Not too bad, right? Nope.
In my next (shorter) post on this topic, I’ll be explaining how to join this new server to Active Directory. Thank you for reading!
FAQs
Can Windows Server 2022 Core be managed remotely without a GUI interface?
Yes, Windows Server 2022 Core can be fully managed remotely using PowerShell, Windows Admin Center, or Remote Server Administration Tools (RSAT). These tools provide comprehensive management capabilities without requiring the traditional GUI interface, making it ideal for cloud and datacenter environments.
What backup solutions are compatible with Windows Server 2022 Core installations?
Windows Server 2022 Core supports various backup solutions including Windows Server Backup, Azure Backup, third-party backup tools like Veeam and Commvault, and PowerShell-based backup scripts. These solutions can be implemented without the need for GUI-based management tools.
How does licensing work for Windows Server 2022 Core compared to Desktop Experience?
Windows Server 2022 Core follows the same licensing model as the Desktop Experience version. The license cost is identical, but Core edition typically requires fewer Client Access Licenses (CALs) due to its reduced resource consumption and targeted use cases.
Can Windows Server 2022 Core be upgraded to Desktop Experience after installation?
No, Windows Server 2022 Core cannot be converted to Desktop Experience after installation. The installation type is permanent, and administrators must perform a fresh installation if they need to switch between Core and Desktop Experience versions.
What monitoring tools work best with Windows Server 2022 Core deployments?
Windows Server 2022 Core works effectively with monitoring solutions like System Center Operations Manager (SCOM), Azure Monitor, Nagios, and Zabbix. These tools can monitor server performance, health metrics, and security status through command-line interfaces and APIs.
Related Article:

Michael has been an IT Pro since 1998. He has worked predominantly in the Windows world including client and server operating systems, on-prem systems engineering (AD, DNS, etc.), and over the last ten years or so has embraced and immersed himself in...