How to Create a PowerShell Module
- Blog
- PowerShell
- Post
In the last part of this series I demonstrated how to add custom formatting to your PowerShell scripts and functions. This requires an additional format.ps1xml file, which you have to add to your PowerShell session using Update-FormatData. The challenge is that when you share your script with someone, you need to include the ps1xml file and make sure that it gets loaded. Instead of doing this manually, it makes more sense to package everything as a PowerShell module. A module is a collection of one or more PowerShell files with at least one file with a psm1 file extension. More on that in a moment.
PowerShell looks for modules in directories that are part of the %PSModulePath% environmental variable. The two primary locations are under %UserProfile%\Documents\WindowsPowerShell\Modules and C:\Windows\System32\WindowsPowerShell\v1.0\Modules. The folder under your user profile does not exist by default, and you may have to create it. If you look at %PSModulePath%, you may also see other locations depending on other installed products. You can also modify the path yourself.
Starting with PowerShell 3.0, you can run any command from a module without having to first import it. PowerShell will search the module directories. If your module is in another directory, you will have to manually import it by first specifying the path.
Import-module d:\stuff\dev\mytestI’m going to take what I had from my last article and create a module. First I need to create the necessary folder.
mkdir $env:userprofile\documents\WindowsPowerShell\Modules\MyUptimeOne very important note: the name of the module folder must be the same as the module file. In my case I will be creating a file called MyUptime.psm1 and putting it in this directory. I’ll also copy my ps1xml file to the module directory
copy C:\scripts\My.Uptime.Format.ps1xml -Destination $env:userprofile\documents\WindowsPowerShell\Modules\MyUptimeYou can also move it if you prefer. To create the module file, at a minimum all you need to do is save the script file with your functions as a psm1 file, remembering that the name needs to be the same as the directory. But, you can do much more. Here’s my version of MyUptime.psm1
#define a private function to be used in this command
Function IsWsManAvailable {
[cmdletbinding()]
Param([string]$Computername)
Write-Verbose "Testing WSMan for $computername"
Try {
    $text = (Test-WSMan $computername -ErrorAction Stop).lastchild.innertext
    Write-Verbose $Text
    if ($text.Split(":")[-1] -as [double] -ge 3) {
        $True
    }
    else {
        $False
    }
} #Try
Catch {
    #failed to run Test-WSMan most likely due to name resolution or offline
    $False
} #Catch
} #close IsWsManAvailable
#my main function
Function Get-MyUptime {
<#
.Synopsis
Get computer uptime.
.Description
This command will query the Win32_OperatingSystem class using Get-CimInstance and write an uptime object to the pipeline.
.Parameter Computername
The name of the computer to query. This parameter has an alias of CN and Name. The computer must be running PowerShell 3.0 or later.
.Parameter Test
use Test-WSMan to verify computer can be reached and is running v3 or later of the Windows Management Framework stack.
.Example
PS C:\> get-myuptime chi-dc01,chi-fp02
Computername LastRebootTime         Days Hours Minutes Seconds
------------ --------------         ---- ----- ------- -------
CHI-DC01     11/15/2014 12:02:22 AM   23    17      23      44
CHI-FP02     12/1/2014 8:40:08 AM      7     8      45      58
Formatted results for multiple computers. You can also pipe computer names into this command.
.Example
PS C:\> Get-myuptime | format-list
Computername : WIN81-ENT-01
LastReboot   : 12/10/2014 10:06:00 AM
Uptime       : 01:40:28
.Example
PS C:\> $c = "chi-dc01","chi-core01","chi-dc02","chi-hvr2","chi-dc04"
PS C:\> get-myuptime $c -test | Sort LastRebootTime -Descending
WARNING: CHI-DC02 is not accessible
Computername     LastRebootTime           Days Hours Minutes Seconds
------------     --------------           ---- ----- ------- -------
CHI-CORE01       12/4/2014 4:01:38 PM        5    19      47      31
CHI-DC04         12/4/2014 3:43:47 PM        5    20       5      23
CHI-HVR2         11/21/2014 3:35:55 PM      18    20      13      15
CHI-DC01         11/15/2014 12:06:22 AM     25    11      42      47
The first command creates an array of computer names. The second command gets uptime but tests each computer.
.Notes
Last Updated: December 10, 2014
Version     : 2.0
Learn more about PowerShell:
Essential PowerShell Learning Resources
.Link
Get-Ciminstance
Test-WSMan
.Link
https://petri.com/powershell
#>
[cmdletbinding()]
Param(
[Parameter(Position=0,ValueFromPipeline,ValueFromPipelineByPropertyName)]
[ValidateNotNullorEmpty()]
[Alias("cn","name")]
[String[]]$Computername = $env:Computername,
[Switch]$Test
)
Begin {
    Write-Verbose "Starting $($MyInvocation.Mycommand)"
} #begin
Process {
    Foreach ($computer in $computername) {
        Write-Verbose "Processing $($computer.toUpper())"
        if ($Test -AND (IsWsManAvailable -Computername $computer)) {
           $OK = $True
          }
        elseif ($Test -AND -Not (IsWsManAvailable -Computername $computer)){
            $OK = $False
            Write-Warning "$($Computer.toUpper()) is not accessible via the WSMan protocol."
          }
        else {
            #no testing so assume OK to proceed
            $OK = $True
        }
            #get uptime of OK
        if ($OK) {
            Write-Verbose "Getting uptime from $($computer.toupper())"
            Try {
                $Reboot = Get-CimInstance -classname Win32_OperatingSystem -ComputerName $computer -ErrorAction Stop  |
                Select-Object -property CSName,LastBootUpTime
            } #Try
            Catch {
               Write-Warning "Failed to get CIM instance from $($computer.toupper())"
               Write-Warning $_.exception.message
            } #Catch
            if ($Reboot) {
                Write-Verbose "Calculating timespan from $($reboot.LastBootUpTime)"
                #create a timespan object and pipe to Select-Object to create a custom object
                $obj = New-TimeSpan -Start $reboot.LastBootUpTime -End (Get-Date) |
                Select-Object @{Name = "Computername"; Expression = {$Reboot.CSName}},
                @{Name = "LastRebootTime"; Expression = {$Reboot.LastBootUpTime}},Days,Hours,Minutes,Seconds
                #insert a new type name for the object
                $obj.psobject.Typenames.Insert(0,'My.Uptime')
                #write the object to the pipeline
                $obj
            } #if $reboot
        } #if OK
         #reset variable so it doesn't accidentally get re-used, especially when using the ISE
         #ignore any errors if the variable doesn't exit
         Remove-Variable -Name Reboot -ErrorAction SilentlyContinue
    } #foreach
} #process
End {
    Write-Verbose "Ending $($MyInvocation.Mycommand)"
} #end
} #end function
Set-Alias -Name gmu -Value Get-MyUptime
Export-ModuleMember -Function Get-MyUptime -Alias *
In many ways this is no different than any other script file. For the sake of demonstration, I moved my private IsWsmanAvailable function out of the Get-MyUptime function. This makes it easier to revise either function. You’ll also notice toward the end that I’m defining an alias for my command.
Set-Alias -Name gmu -Value Get-MyUptimeThe last step is to tell PowerShell what I want exposed from my module. In my case I want to make sure users see my alias and primary function.
Export-ModuleMember -Function Get-MyUptime -Alias *My private function is still available to Get-MyUptime, but it isn’t visible to the user in PowerShell. I could stop there if I didn’t have any custom type or format extensions. All I need to do is run the command in PowerShell.
However, I don’t have my custom formatting. So I need to take the next step and create a module manifest. A manifest gives you granular control over how a module is used. The manifest file has a psd1 file extension and will have the same name as the folder and your psm1 file. This means I will be creating MyUptime.psd1.
The manifest follows a specific format and once you have one you can copy and paste to create new ones. But I’ll use the New-ModuleManifest cmdlet to generate it. The cmdlet has many parameters to correspond to the different settings in the manifest. I’ll need to define a path for the new file.
$path = "$env:userprofile\documents\WindowsPowerShell\Modules\MyUptime\MyUptime.psd1"Every module has a unique GUID. For a new module, I’ll need a new GUID. This is the easy way to create one:
$guid = [guid]::NewGuid().guidYou only create the manifest once. I’ve put the parameters in a hashtable to splat against New-ModuleManifest to make it easier to read.
$paramHash = @{
 Path = $path
 RootModule = "MyUptime.psm1"
 Author = "Jeff Hicks"
 CompanyName = "Petri.com"
 ModuleVersion = "1.0"
 Guid = $guid
 PowerShellVersion = "3.0"
 Description = "My Tools module"
 FormatsToProcess = "My.Uptime.Format.ps1xml"
 FunctionsToExport = "Get-MyUptime"
 AliasesToExport = "gmu"
 VariablesToExport = ""
 CmdletsToExport = ""
}
New-ModuleManifest @paramHash
Each key in the hashtable is the same as a parameter in New-ModuleManifest. Most of the values should be self-explanatory. Be sure to specify your psm1 file as the root module. I’m also specifying that I want to load my custom format file. My module doesn’t have any cmdlets or variables so I’m explicitly setting those values to be empty. Here’s the finished manifest.
#
# Module manifest for module 'MyUptime'
#
# Generated by: Jeff Hicks
#
# Generated on: 12/10/2014
#
@{
# Script module or binary module file associated with this manifest.
RootModule = 'MyUptime.psm1'
# Version number of this module.
ModuleVersion = '1.0'
# ID used to uniquely identify this module
GUID = 'bcfb7105-352c-4c41-b099-e587e451a732'
# Author of this module
Author = 'Jeff Hicks'
# Company or vendor of this module
CompanyName = 'Petri.com'
# Copyright statement for this module
Copyright = '(c) 2014 Jeff Hicks. All rights reserved.'
# Description of the functionality provided by this module
Description = 'My Tools module'
# Minimum version of the Windows PowerShell engine required by this module
PowerShellVersion = '3.0'
# Name of the Windows PowerShell host required by this module
# PowerShellHostName = ''
# Minimum version of the Windows PowerShell host required by this module
# PowerShellHostVersion = ''
# Minimum version of Microsoft .NET Framework required by this module
# DotNetFrameworkVersion = ''
# Minimum version of the common language runtime (CLR) required by this module
# CLRVersion = ''
# Processor architecture (None, X86, Amd64) required by this module
# ProcessorArchitecture = ''
# Modules that must be imported into the global environment prior to importing this module
# RequiredModules = @()
# Assemblies that must be loaded prior to importing this module
# RequiredAssemblies = @()
# Script files (.ps1) that are run in the caller's environment prior to importing this module.
# ScriptsToProcess = @()
# Type files (.ps1xml) to be loaded when importing this module
# TypesToProcess = @()
# Format files (.ps1xml) to be loaded when importing this module
FormatsToProcess = 'My.Uptime.Format.ps1xml'
# Modules to import as nested modules of the module specified in RootModule/ModuleToProcess
# NestedModules = @()
# Functions to export from this module
FunctionsToExport = 'Get-MyUptime'
# Cmdlets to export from this module
CmdletsToExport = @()
# Variables to export from this module
VariablesToExport = @()
# Aliases to export from this module
AliasesToExport = 'gmu'
# List of all modules packaged with this module
# ModuleList = @()
# List of all files packaged with this module
# FileList = @()
# Private data to pass to the module specified in RootModule/ModuleToProcess
# PrivateData = ''
# HelpInfo URI of this module
# HelpInfoURI = ''
# Default prefix for commands exported from this module. Override the default prefix using Import-Module -Prefix.
# DefaultCommandPrefix = ''
}
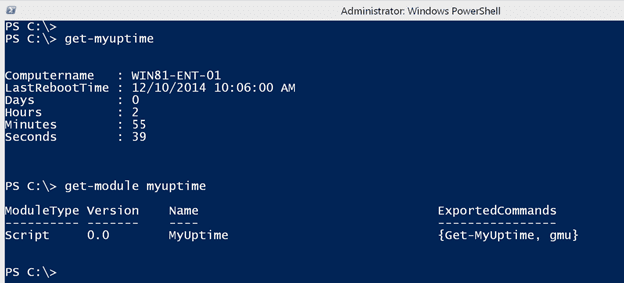
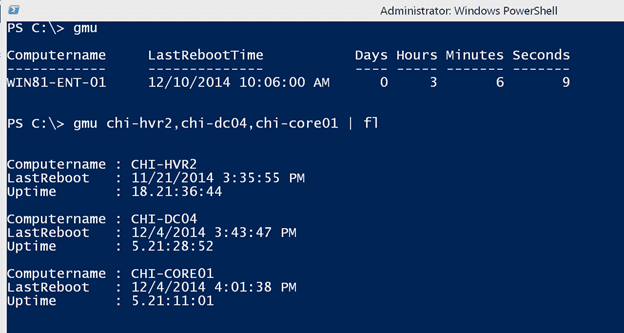
Now look what happens when I start using the commands:
To review, my module directory has the same name as my module file and manifest.
Modules can be quite complex and consist of many files. All I have done in our journey is to move from simple commands to a re-usable tool that you can share with others. Not everything has to be written in PowerShell as a module or even as an advanced function. You could have stopped anywhere along our journey. But I wanted you to know where you could go when you are ready to venture out on your own journey.


