Create New Active Directory Users with Excel and PowerShell
Need to manage Active Directory (AD) users in bulk or integrate user management with a business process? Look no further than PowerShell’s new-aduser cmdlet.
The ability to create and manage AD user accounts from the command line has existed in Windows Server long before the appearance of PowerShell. Maybe you remember the dsadd, dsmod, and dsquery commands, which can still be found in Windows Server 2012 R2 today if the AD Directory Services (AD DS) server role is installed. But the DS commands exist in isolation, unlike new-aduser, which can leverage PowerShell’s advanced object-orientated scripting capabilities, making it easier to automate common administrative tasks.
That said, new-aduser doesn’t lend itself to creating AD users on an ad-hoc basis. This is partly because like any command-line tool, there’s a syntax to memorize. Secondly, it doesn’t allow passwords for new user accounts to be typed in plaintext, complicating the command since passwords must be encrypted as secure strings.
Nevertheless, if you regularly create more than one AD user at a time, don’t disregard new-aduser. In this article, I’ll walk you through the basics of creating new users with PowerShell and show you how to use Excel and a simple script to streamline the process.
Creating new AD users from the command line
To run the command line examples in this article, you’ll need to open a PowerShell prompt with an account that has permission to create new user accounts in AD, and the Active Directory module for Windows PowerShell needs to be installed if the machine is not a domain controller. For more information about installing the AD PowerShell module, see How to Install the Active Directory PowerShell Module on a Member Server and Remote Server Administration Tools (RSAT) for Windows 8: Download and Install on the Petri IT Knowledgebase.
To open a PowerShell prompt, click the blue PowerShell icon on the desktop taskbar (Windows Server 2012), or switch to the Start screen, type PowerShell and select Windows PowerShell from the search results. In the example command below, I’ve created a new user account with no password:
new-aduser –name smithrussell –samaccountname smithrussell –givenName Russell – surname Smith –displayName “Russell Smith”
New users must have a SAM account name, and while the remaining parameters are optional, it's unlikely you'd want to exclude them. When you add an account using new-aduser and don't set a password, the account is created disabled. Unless you specify otherwise (see more on the
–path
parameter below), the account will be added to the default Users container. To find out more about the available parameters for new-aduser, type
get-help new-aduser –full
 in a PowerShell prompt.

To set an initial password for the account, I need to use a secure string, which is stored in memory using reversible encryption and can only be decrypted by the security principle that created it. The easiest way to do this is to convert a plaintext password into a secure string and store it in a variable ($password), which is then used in the new-aduser command.
$password = (convertto-securestring -asplaintext "PassW0rd!" -force)

new-aduser –name smithrussell –samaccountname smithrussell –userprincipalname [email protected] –givenName Russell –surname Smith –displayname “Russell Smith” -accountpassword $password -changepasswordatlogon $true –enabled $true
Setting additional parameters
If you can’t find the parameter you want to set listed in get-help new-aduser, then you can use the –otherattributes parameter, which works with custom attributes if the AD schema has been extended.
-otherattributes @{title="CIO";mail="[email protected]"}
If you don’t want to add new users to the default Users container, use the –path parameter to specify an alternate container or OU.
-path “OU=sales,dc=ad,dc=contoso,dc=com”
Import users from an Excel spreadsheet
Even if you don’t create new users in bulk often, when you have more than one new user to deal with, importing from a comma-delimited file is faster than using the GUI server administration tools or manually typing PowerShell commands. Just fill out the fields in the spreadsheet, run the script and the job is done.

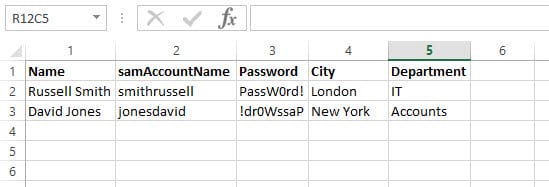
In the script below, I’ve used a simple foreach loop and the import-csv cmdlet to import and generate the new user accounts. The only additional code I’ve added is a split to separate users’ first and second names in the .csv file’s Name field, to populate the –givenName and –surname parameters, for the sake of completeness and to keep the number of columns in the .csv file to a minimum.
import-csv -path c:\temp\users.csv | foreach {
$givenName = $_.name.split()[0]
$surname = $_.name.split()[1]
new-aduser -name $_.name -enabled $true –givenName $givenName –surname $surname -accountpassword (convertto-securestring $_.password -asplaintext -force) -changepasswordatlogon $true -samaccountname $_.samaccountname –userprincipalname ($_.samaccountname+”@ad.contoso.com”) -city $_.city -department $_.department
}
Save the script as a .ps1 file. The default PowerShell script execution policy in Windows 8 is set to Restricted, so if you’ve not run PowerShell scripts before, you might need to set the execution policy to Remote Signed, which allows local unsigned scripts to run. Run get-executionpolicy to see the current policy on your machine and set-executionpolicy remotesigned to change the policy if necessary.
Now fill out the columns in the .csv file as shown in the image above as appropriate, save it and run the script.


