Create a PinPoint DNS Zone to Support Identical Internal and External Exchange Server HTTPS Namespaces
Microsoft recommends that Active Directory (AD) is configured with a different DNS namespace to the domain used by the organization on the Internet. The namespaces can be completely different. For example, adcontoso.com might be used for the internal DNS namespace and contoso.com used externally. Or a subdomain of the public domain is used internally. If the public domain is contoso.com, then ad.contoso.com is used for the internal AD DNS namespace.
Exchange Server HTTPS namespaces
While different internal and external DNS namespaces is recommended for AD, Exchange Server HTTPS internal and external namespaces are generally identical. There are several namespaces that Exchange sysadmins need to configure to enable client access to Exchange services like Outlook Web Access (OWA), MAPI, and the Offline Address Book (OAB).
Keeping the internal and external namespace URLs identical makes it easier for users to locate resources. And it reduces the number of certificates required to configure secure SSL/TLS communication between clients and servers.
But let’s consider a situation where you have an Active Directory DNS namespace of ad.contoso.com and the public Internet domain is contoso.com. You should configure MX and Autodiscover DNS records for contoso.com so that email can be routed to your organization’s Exchange Server.
The DNS records in the public domain could be called mail.contoso.com and autodiscover.contoso.com, although you can change ‘mail’ and ‘autodiscover’ to anything you like. Both records should point to the public IP address of your Exchange Server.
If a DNS record is created for mail.contoso.com on the nameserver that hosts the contoso.com public domain, both internal and external clients will resolve mail.contoso.com to the Exchange Server’s public IP address.
And while you could leave your DNS configuration like that, it means internal clients accessing Exchange HTTPS services are routing traffic out of your intranet firewall and back in again via a public IP address. It works but it isn’t an efficient solution.
Split-Brain DNS
One way to solve this problem is to create a copy of the public contoso.com DNS zone on your internal DNS server. That is usually Windows Server with an AD-integrated zone. The contoso.com zone records will be identical internally and externally, apart from mail.contoso.com and autodiscover.contoso.com. These records are created on the internal DNS server with the private intranet IP address of your Exchange Server instead of its public IP address. This solution is known as split-brain DNS.
Split-brain DNS is certainly an option, but it creates unnecessary complexity because you need to maintain the contoso.com DNS zone in two different places: on your internal Windows DNS Server and on the nameserver hosting your external domain.
Create a PinPoint DNS zone
A simpler way to split internal and public DNS resolution for just two records is to create a PinPoint DNS zone on the internal DNS server. A PinPoint zone is created in the same way as any other DNS zone. The only difference is that the name of the zone is the same as the name of the DNS record you want to assign a private IP address to internally. Let me explain.
Create a new DNS zone
For example, if you want mail.contoso.com to resolve to 192.168.1.15 for internal name queries, then on your DNS server, create a zone called mail.contoso.com. In the new zone, create an A record with a blank name and set the IP address to 192.168.1.15.
- Log in to a server where you have access to the Windows Server DNS management tool and using an account that has permission to create a new DNS zone on the server.
The DNS management tool can be found on Windows Server in the Tools menu of Server Manager. Or you can install the DNS management tool in Windows 10.
For more information on how to install the Remote Server Administration (RSAT) tools in Windows 10, see How to Install the Remote Server Administration Tools in Windows 10 on Petri.
- In the DNS tool, double click the DNS server in the left pane.
- Expand Forward Lookup Zones in the left pane.
- Right click Forward Lookup Zones and select New Zone from the menu.
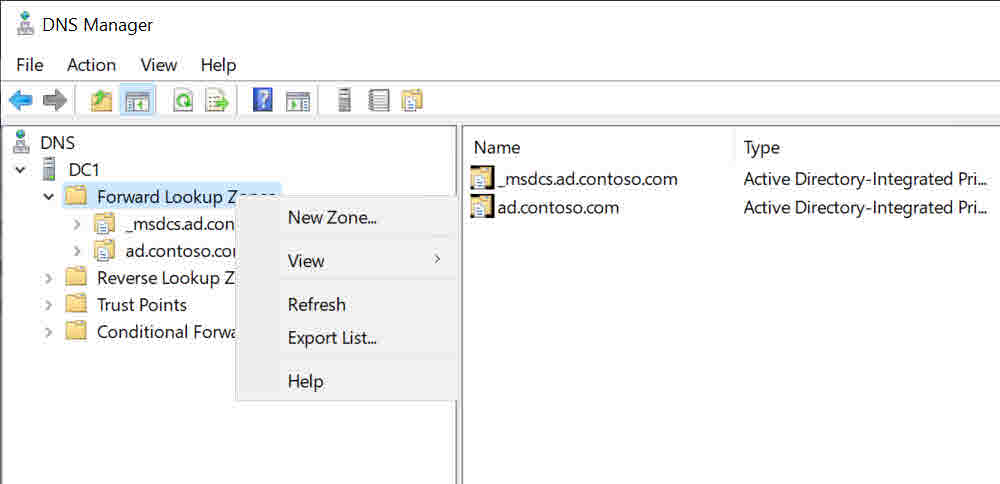
- In the New Zone Wizard, click Next on the welcome screen.
- On the Zone Type screen, check Primary zone and Store the zone in Active Directory. Click Next.
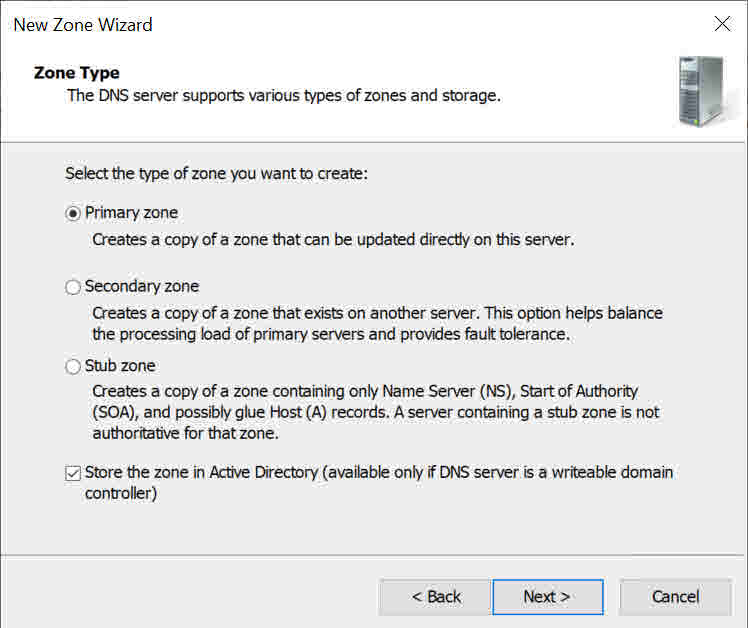
- On the Active Directory Zone Replication Scope screen, decide whether you want to replicate the new zone to domain controllers in the domain or all domain controllers in the AD forest. Click Next.
- On the Zone Name screen, type mail.contoso.com in the Zone name box and click Next.
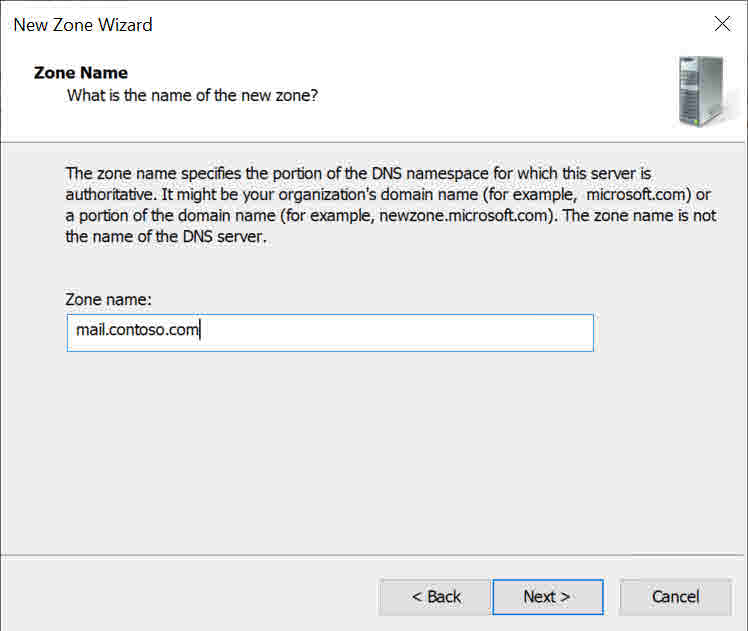
- On the Dynamic Update screen, check Do not allow dynamic updates and click Next.
- Click Finish on the final screen.
The new zone will appear in the left pane of the DNS management tool.
Create a new DNS A record
Now all that is left to do is create a blank record in the new zone.
- Right click the mail.contoso.com zone and select New Host (A or AAAA) from the menu.
- In the New Host dialog, type 168.1.15 in the IP address field and then click Add Host.
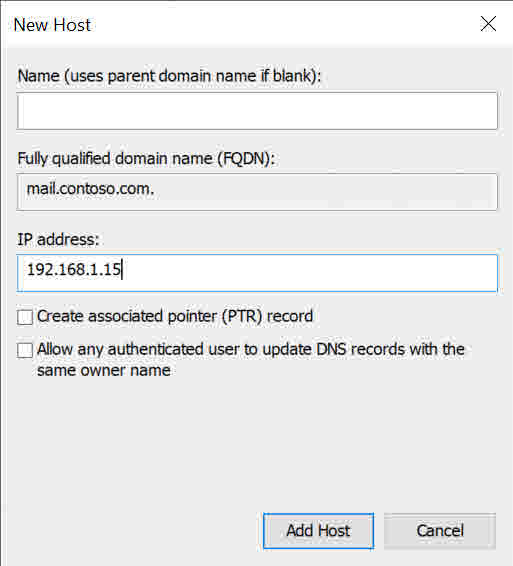
- Click OK in the DNS dialog to confirm the operation.
- Click Done in the New Host dialog.
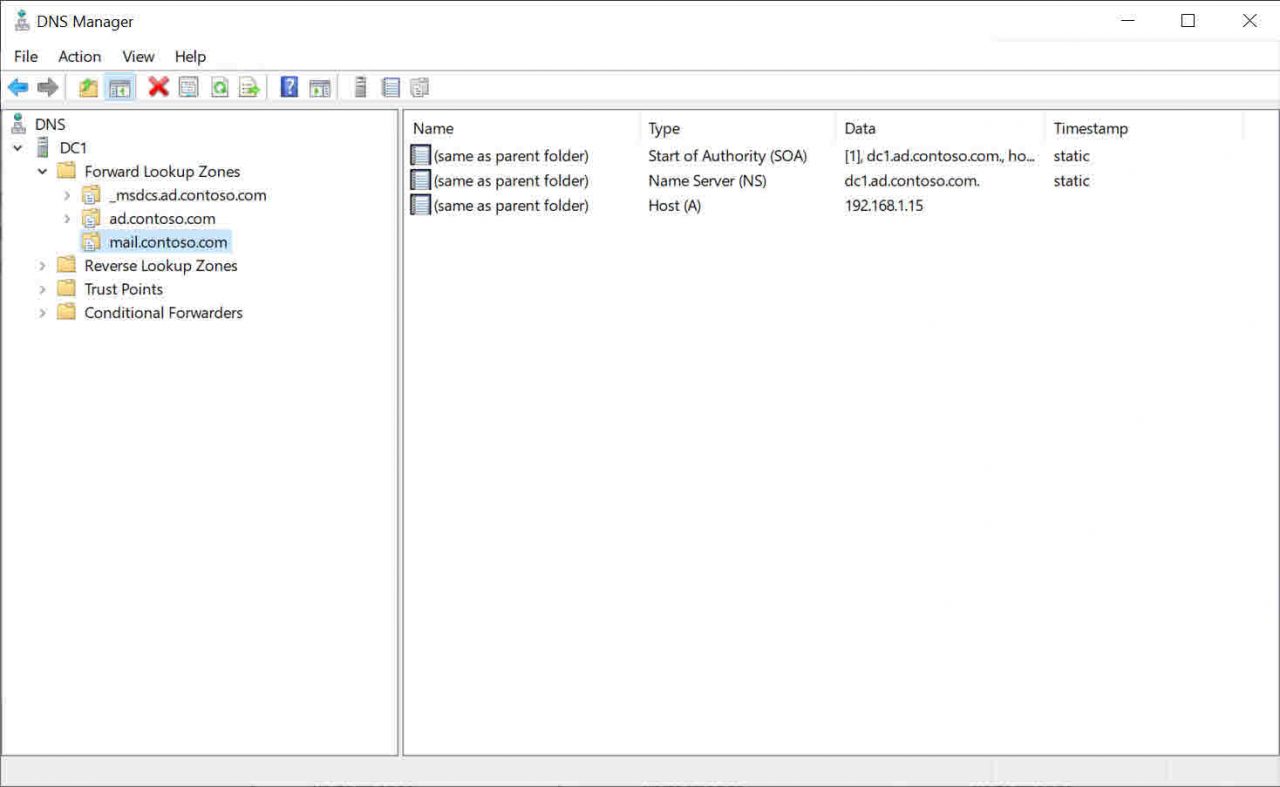
Now if you ping mail.contoso.com, you should receive a reply from the private IP address 192.168.1.15 instead of the public IP address registered in the public contoso.com domain.


