How to Use the Azure Pricing Calculator
Master your cloud computing costs

This guide will show you how to use the Azure Pricing Calculator effectively, offering step-by-step instructions, real-world examples, and key insights on leveraging its advanced features. By the end, you’ll not only understand your potential costs but also feel confident sharing polished estimates with stakeholders.
When managing IT infrastructure, staying ahead of your budget can feel like solving a riddle—especially with the flexible yet complex pricing of cloud solutions like Microsoft Azure. Enter the Azure Pricing Calculator, a tool designed to simplify cost estimation across over 100 Azure services. Whether you’re migrating on-premises workloads, planning a new project, or optimizing existing resources, this calculator is your gateway to financial clarity.
Why cloud cost planning is essential
Navigating Azure pricing without a strategy can lead to unexpected charges, underutilized resources, or budget overruns. Whether you’re working with virtual machines, managed disks, or SQL databases, accurate estimates can help you:
- Avoid surprises: Know what you’re paying for upfront to prevent financial headaches.
- Optimize usage: Right-size resources based on needs, avoiding overspending on underutilized instances.
- Plan confidently: Align your costs with project goals while communicating effectively with your team.
By proactively using the Azure Pricing Calculator, you’re taking the first step toward mastering your cloud investment.
Getting started with the Azure Pricing Calculator
The Azure Pricing Calculator is a free, browser-based tool. It’s updated regularly using Microsoft’s Azure Retail Prices API to reflect current pricing for all supported services.
Keep in mind that prices vary globally across different regions due to factors like data center availability, electricity costs, and local economic conditions. For the best experience, open the calculator in a modern browser.
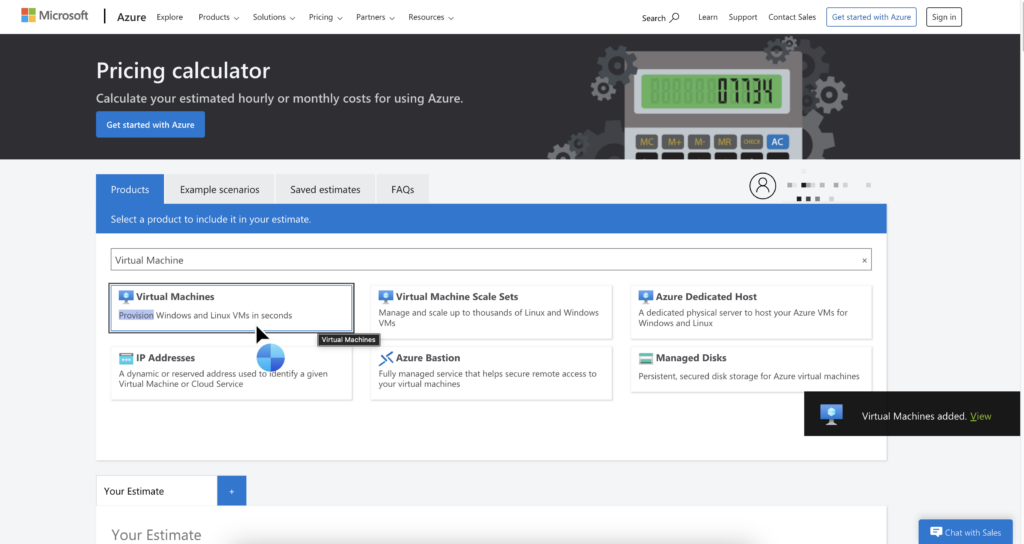
Step 1: Add your services
The first step is to select the Azure services you plan to use. From Azure Virtual Machines to Azure SQL Databases, the calculator offers options across compute, storage, networking, and more.
- Use the search bar to quickly find a service or browse by category.
- Click Add to Estimate for each service you want to include.
For example, if you’re running a compute-heavy workload, search for “Virtual Machine” and select an appropriate instance. The service will appear in your estimate, ready for customization.
Step 2: Customize your configuration
Once you’ve added a service, it’s time to tailor the configuration to your specific needs. Each service offers a range of customizable options:
Example: Virtual machines
- Region: Azure prices vary by geography (e.g., East US vs. West Europe). Select the region closest to your users for low latency or choose a cost-effective region.
- Instance Type: Configure compute power, including vCPUs, RAM, and storage options like HDD or SSD.
- Operating System: Select between Windows or Linux.
- Licensing Options: Use Azure Hybrid Benefit to apply existing Windows Server licenses or SQL Server licenses for cost savings.
The calculator dynamically updates pricing based on your choices, helping you see the financial impact of each adjustment.

Step 3: Review your estimate
After configuring your services, scroll down to review the cost breakdown. The estimate includes:
- Service-specific costs: Details for each selected service, such as compute hours, storage, and bandwidth.
- Discounts and savings: Options like reserved instances or software assurance benefits.
This detailed view empowers you to understand where your money is going and identify potential savings. For example, switching from a premium SSD to a standard HDD might cut storage costs without compromising your workload’s needs.
💡 Note: While the Azure Pricing Calculator provides real-time cost estimates based on the most current pricing via the Azure Retail Prices API, Microsoft makes it clear these estimates are for informational purposes only. They are not binding quotes. For precise cost details or quotes tailored to enterprise contracts, organizations should consult Azure Support or their assigned account representative. This distinction is crucial when presenting estimates internally or to stakeholders to avoid unexpected surprises later.
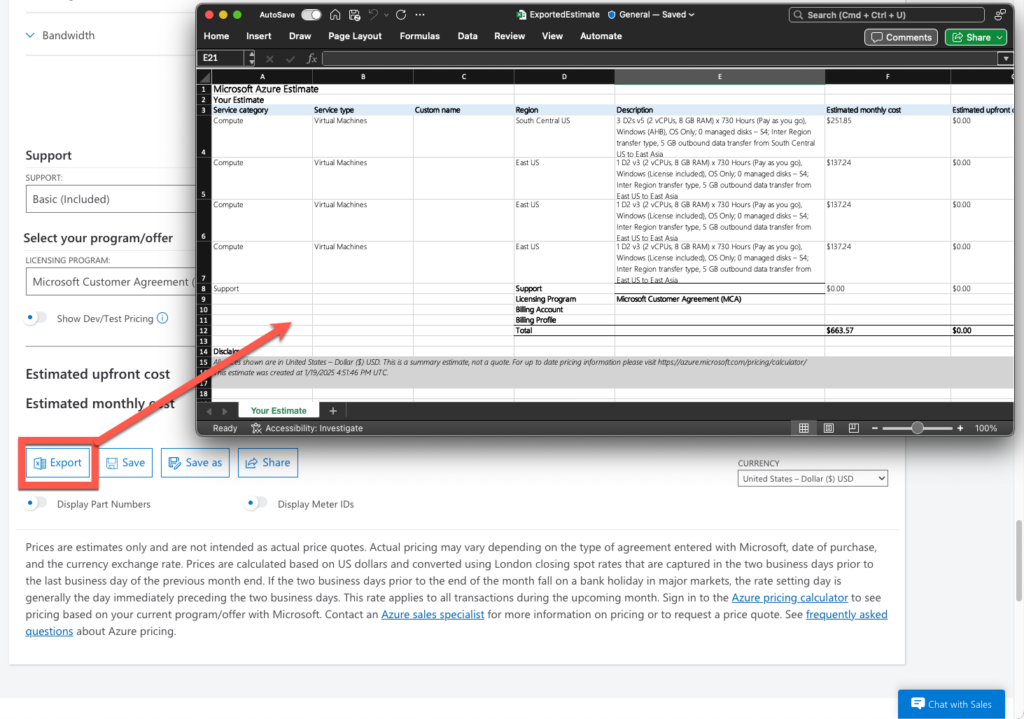
Step 4: Save and share your work
One of the calculator’s most practical features is its export functionality. Once your estimate is complete:
- Save a link: Generate a unique URL to revisit your estimate later.
- Export files: Download your estimate as a PDF or Excel file for sharing. These exports include all cost details, making it easy to integrate into proposals or presentations.
By using these options, you can streamline collaboration and improve transparency with your team.
Advanced features you should know
Real-time pricing via APIs
The Azure Pricing Calculator pulls data from Microsoft’s APIs, ensuring that every estimate reflects the latest rates. This means your costs for Azure Virtual Machines, SQL databases, or managed disks will always align with real-time pricing.
Supported currencies
Azure supports billing in multiple currencies, making the calculator accessible to global teams. Whether you’re budgeting in USD, EUR, GBP, or INR, you can ensure accurate financial planning across regions.
Licensing benefits
For companies leveraging Windows Server licenses or SQL Server licenses, Azure Hybrid Benefit can reduce costs significantly. This option is especially useful when migrating on-premises workloads.
Real-world scenarios
Scenario 1: Migrating on-premises servers
A manufacturing firm is moving legacy Windows Server workloads to Azure. Using the calculator, they:
- Add Azure Virtual Machines to simulate the workload.
- Apply Azure Hybrid Benefit to existing licenses for cost savings.
- Configure premium SSDs for performance-critical applications.
By reviewing their estimate, the team identifies potential savings through reserved instance pricing, ensuring a cost-efficient migration.
Scenario 2: Building a scalable cloud solution
A retail business is deploying a cloud-native e-commerce platform. Their estimate includes:
- SQL databases with geo-redundant backups for durability.
- Load balancers for high availability during peak traffic periods.
- Reserved instances for predictable workloads.
With these configurations, the team ensures scalability while optimizing costs.
Frequently asked questions
What if I need to compare costs across regions?
You can add the same service multiple times and assign it to different regions. This allows for side-by-side comparisons.
Can the calculator account for usage patterns?
Yes, you can specify the number of hours per month a resource will run or the volume of data stored, ensuring estimates reflect real usage.
How do I share my estimate?
Export your estimate as a PDF or Excel file. These formats are ideal for collaborating with stakeholders or integrating into larger project documents.
Tips for effective use
- Include All Costs: Don’t forget to account for bandwidth, technical support, and security updates when planning your budget.
- Experiment with Configurations: Adjust parameters to find the balance between performance and cost.
- Monitor Changes: Azure pricing evolves, so revisit your estimates regularly to ensure they remain accurate.
Conclusion: Take control of your cloud costs today
The Azure Pricing Calculator is more than just a tool—it’s your first step toward making informed, data-driven decisions about your cloud investments. Now that you’ve explored its features and seen how it can simplify budgeting for Azure services, it’s time to put it into action.
Your Homework: Test drive the calculator
- Set up a real-world scenario: Imagine your organization is deploying a web application.
- Add Azure App Services for hosting.
- Configure a SQL Database for data storage.
- Include a Virtual Network for secure connectivity.
- Explore configurations:
- Adjust the region to see how costs vary globally.
- Try different instance sizes to balance performance and cost.
- Experiment with reserved instances to identify long-term savings.
- Export and evaluate: Save your estimate as a PDF or Excel file. Share it with your team or stakeholders to start a conversation about cloud budgeting.
Call to Action
Go beyond just testing—use this exercise to build confidence in forecasting your cloud costs. The more you practice, the easier it will be to optimize configurations for future projects. Ready to get started?
Remember, understanding your costs upfront is the key to a successful cloud strategy. Take charge and turn complex pricing into actionable insights. Thanks for reading, and I’ll catch you next time.
Tim Warner is a seasoned IT professional and educator with extensive experience in Microsoft Azure, PowerShell, and cross-platform solutions. As a contributor to Petri, Tim breaks down complex technical concepts into accessible, practical insights fo...

