Add Email Disclaimers in Office 365 and Exchange 2013 Using Transport Rules
Many organizations are legally required or simply choose to have their users add disclaimers to the end of every email they send. There are various ways of making sure these disclaimers appear in messages from adding them to email signatures to having users paste them in at their own discretion. If you need a more robust, organization-wide solution, then you might consider using transport rules to add these disclaimers.
Using the Exchange Admin Center to Create Email Disclaimers
We’re going to walk through the steps of doing this through Office 365, but the same procedure can be performed with an on-premise Exchange 2013 server as well.
1. Sign-in to your Office 365 portal and select Admin (top-right corner), then Exchange.
2. Now select mail flow and then rules. Note: Rules is the first tab and should be selected by default.
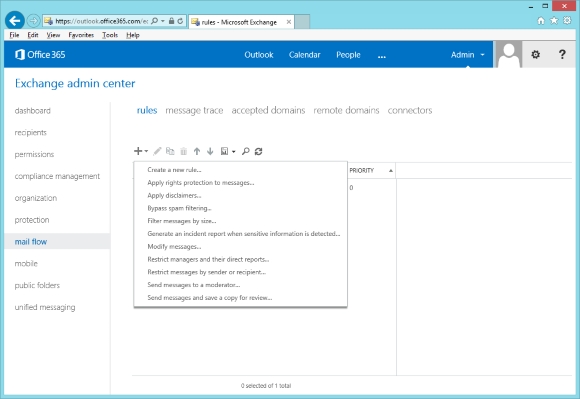
3. Select the little downward triangle next to the plus sign and in the drop down choose Apply disclaimers, as shown below.

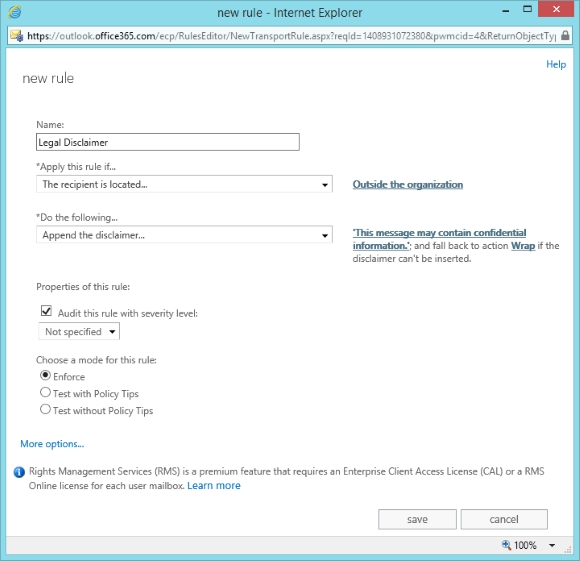
4. Now enter a name for the rule. For this example we will call the rule, “Legal Disclaimer”.
5. In the drop-down below “Apply this rule if…” we have a few options that allow us to narrow down which emails need the disclaimer appended at the end. Let’s limit the disclaimer to emails sent outside the organization.
6. In the drop-down menu choose, “The recipient is located…“, select “Outside the organization“, and select ok.
By default, “Append the disclaimer” will be selected under “Do the following…” Now click on “Enter text” and enter the text of your disclaimer. For now we will simply add, “This message may contain confidential information.”
7. Now choose “Select one…” to choose a fall-back action. This will determine what action is taken when a disclaimer cannot be added to a message. You have the following options:
- Wrap: A new message is created with the original message enclosed. The disclaimer is included in the body of the new message.
- Ignore: The message is sent without the disclaimer
- Reject: The message is not sent and the sender receives an NDR
Keep in mind that if you choose the Wrap option as the fall-back action, then subsequent transport rules will apply to the new message that is created and not the original message. For this reason, you should make sure that the rule that applies the disclaimer runs after all other rules.
We will choose Wrap for our purposes in this walkthough.
There are additional options you can select with regard to auditing. We can also choose to place this rule in a test mode with or without policy tips, however those are rule features that typically don’t come into play with the establishment of a disclaimer.
8. Ultimately we’ll leave the default settings in that portion of the dialog, review the new rule as shown in the figure below, and select save to add the disclaimer transport rule.

Note: So far, the options we have selected will apply to all senders in our organization. If at this point we decided that we wanted the disclaimer to only apply to a certain department, then we would do the following:
- Select the link at the bottom more options.
- Click add condition.
- Select “The sender…” and “is a member of the group”, and then select a group corresponding to the department you would like the disclaimer to apply to. This would, for example, allow the legal department to have different language in their disclaimer from what is used by the accounting department.
And, that’s pretty much all there is to it.
However, if you are looking to add a bit more robust disclaimer than the simple text we used in this example, you may need to consult with your legal department to obtain the appropriate text, which may vary by location or country. Or you can consider the following site with a variety of sample disclaimers to choose from and tweak to fit your needs.


