OpenSSH Comes Out of Beta in Windows April 2018 Update
In this Ask the Admin, I’ll show you how to get started with the OpenSSH client in the Windows 10 April 2018 Update.
Microsoft has quietly been integrating an OpenSSH client and server into Windows 10 and Windows Server over the last year. Without much fanfare, both client and server came out of beta along with the Windows 10 April 2018 Update. As of Windows 10 version 1803, the OpenSSH client is installed by default. But if you want to use the server component, you’ll need to manually install it.
The addition of OpenSSH in Windows is intended to make it easier for system administrators who manage hybrid Windows/Linux environments. SSH is also the default remoting protocol in PowerShell Core (PowerShell 6). WinRM remains the only supported remoting protocol in Windows PowerShell. SSH allows true multiplatform remoting in PowerShell Core but in the current release, Core doesn’t support all the features of WinRM. One missing feature is Just Enough Administration (JEA), so you can’t configure constrained endpoints. Although Microsoft does have JEA on its roadmap.
For more information on using PowerShell Core, see Managing Linux, Windows, AWS, and Azure Using PowerShell Core Part 1: Installing PowerShell Core and Modules for Azure and AWS and Managing Linux, Windows, AWS, and Azure Using PowerShell Core Part 2: PowerShell Remoting Over SSH on Petri.
OpenSSH Client
Let’s start by looking at the client. Unlike popular SSH client Putty, the OpenSSH client in Windows is only accessible from the command line. It’s installed by default in Windows 10 1803. All you need to do is open a command prompt and type ssh, followed by a username and machine name or IP address.
ssh [email protected]
The default port 22 is used unless you specify otherwise. Once you are connected to the remote host, you can run whatever commands are supported in the terminal session.
OpenSSH Server
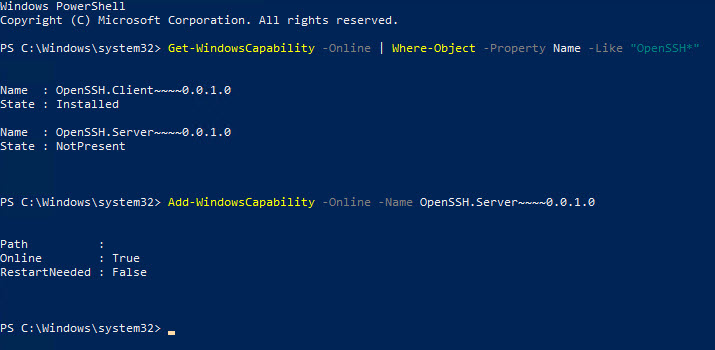
Working with the SSH server is a bit more involved. First, you should install the component using PowerShell. Log into Windows 10 version 1803, open a PowerShell prompt with administrator privileges, and check what components are installed. Note that the Windows Update service must be running to use the Get-WindowsCapability cmdlet. The -Online parameter is used to run the command against the running operating system, instead of an offline WIM image.
Get-WindowsCapability -Online | Where-Object -Property Name -Like "OpenSSH*"
In the command output, you should see OpenSSH.Server~~~~0.0.1.0 listed as a capability. If the State is NotPresent, then you’ll need to add it:
Add-WindowsCapability -Online -Name OpenSSH.Server~~~~0.0.1.0

Password-Based Authentication
Once the OpenSSH server is installed, all you need to do is start the service to authenticate to using a username and password.
Start-Service sshd
If you want the SSH server to start up automatically when Windows starts, change the service startup type to automatic:
Set-Service -Name sshd -StartupType Automatic
To connect to the SSH server running on the local PC (DESKTOP-6UG6042), use the command below. You will need to replace DESKTOP-6UG6042 with the name of the PC you want to connect to.
ssh russell@DESKTOP-6UG6042
The ssh command also accepts usernames in NETBIOS and UPN formats:
ssh [email protected]@DESKTOP-6UG6042
ssh AD\russell@DESKTOP-6UG6042

Key-Based Authentication
While you can authenticate to the SSH server with a Windows username and password, it is more common to use key-based authentication with SSH. To enable key-based authentication, you’ll need to perform a couple of extra steps. For more detailed instructions on how to enable key-based authentication, see Microsoft’s site here.
In this Ask the Admin, I showed you how to install the OpenSSH server in Windows 10 version 1803 and how to connect to the OpenSSH server with a Windows username and password. We have a more detailed guide on how to install and configure OpenSSH on Windows, with instructions for connecting remotely to Linux, Unix, Oracle, Windows, Windows Server, and other OS via the secure command line.
Follow Russell on Twitter @smithrussell.


