List Operations with React JS and SharePoint Framework
For the past few months, I have been posting articles that walk through the basics of SharePoint Framework (SPFX) development with React JS. This month, I am going to introduce a completed web part that shows how to perform CRUD operations against SharePoint lists. After introducing the web part in this article, I will focus on the code necessary to interact with the SharePoint list APIs. In subsequent articles, I will examine additional aspects of the project in more detail. You can grab the completed code right away from my GitHub repository.
Introducing the CRUDSheet Project
CRUDSheet is a client web part design to demonstrate operations against SharePoint lists. Many of the patterns you need to know for web part development are embodied in this sample, which performs CRUD operations against a list of contacts. Contacts are displayed in a grid format with in-place editing of each cell. Figure 1 shows the grid with a cell in edit mode.
Figure 1 — Editing a Cell
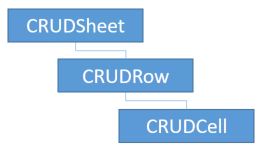
The CRUDSheet project consists of several React JS components designed to represent elements in a spreadsheet. These components have a parent-child relationship representing the entire grid, a grid row, and a grid cell. Figure 2 shows the component hierarchy.
Figure 2 — Component Hierarchy
Understanding the Contacts Service
Along with the React JS components, the project also has a service that supports SharePoint API calls against the contact list. For the remainder of the article, I am going to focus on the design of this service. You can follow the patterns presented here to create your own services.
Creating a service begins with the definition of a model to hold the data. In this case, I defined a model to represent a SharePoint contact. The Contact class implements an interface that requires various fields such as Id, FirstName, and LastName, which are all field lists that SharePoint developers have been using for many years. I then defined an interface for my service to represent CRUD operations performed with the Contact class.
Working with Mock Data
When developing client web parts with SPFX, you can debug your code without actually deploying the code to SharePoint. This can make development more efficient but often means that you do not have a SharePoint context under which to perform API operations. Therefore, it is important that your service provides a mock implementation with local data. In my case, I simply used a local array of contacts for debugging.
Choosing between the mock implementation and the actual service is done at runtime by checking the environment type. If the solution is running locally, then the mock data is used. If the solution is running in SharePoint, then the actual service will be used.
Implementing the Service
Implementing the service requires that you make asynchronous calls to the SharePoint REST API. In order to make these calls, SPFX provides the SPHttpClient class, which is a subclass of the Fetch API that provides additional SharePoint-specific behaviors. You can import the required classes using the following code:
Filling out the functionality for each of the CRUD operations becomes straightforward when using SPHttpClient. The code has the same feel as many other XHR implementations such as jQuery ajax. The following code shows how to retrieve the items in a list.
Because the service is Promise-based, it becomes simple to make the required calls and pass the data to components through their properties. Communication between components is a critical part of the design, which I will cover in a later article. For now, the following code shows how easily a new component instance can be created and populated.
Looking Forward
Creating a service is the first part of building a client web part that interacts with the SharePoint REST APIs. Once completed, the next step is to create the React JS components that will define the UI. These components will utilize properties, a little state, and user interactions to define the functionality of the web part. As promised, I will examine those aspects in future articles.


