How to Use the Terraform AWS Provider
The Terraform AWS provider lets you connect Terraform with Amazon cloud services such as AWS Elasticbeanstalk, AWS Lambda, etc. And unless you have the Terraform Amazon Web Services (AWS) provider defined, you cannot manage or work with Amazon Web Services.
But no worries, in this tutorial, you will learn everything you need to know about the AWS provider, how you can declare it in Terraform, and how to use the provider to create an AWS EC2 instance (virtual machine).
Let’s get started!
Prerequisites
Before you dive into the main part of this ultimate guide, make sure you have the following in place:
- An Amazon Web Services account (AWS).
- An IAM user with an access key ID and secret key set up on your local machine.
- Terraform v1.0 installed.
- An Ubuntu 20.04.3 LTS machine.
Configuring the AWS provider
Amazon Web Services contains dozens of services that need to be managed. And if you plan to manage these using Terraform, then the AWS provider is a must.
This tool allows Terraform to interact or connect with Amazon Web Services resources such as AWS EC2, Load Balancer, AWS S3 buckets, AWS IAM roles, etc., using the AWS API.
Callout: To find a provider, search for the required provider on the Terraform website.
To declare the AWS provider, you must first specify the inside the required_providers block and then the AWS provider inside the terraform block.
- Aws is declared under required_providers, which you can find under terraform.
- The AWS provider contains three components:
- aws – a local value that is a unique value within the Terraform module.
- source specifies the location from where Terraform can download plugins. The syntax of source is declared as below:
[<HOSTNAME>/]<NAMESPACE>/<TYPE>
- hostname is the hostname of the Terraform registry, and the default value is terraform.io.
- namespace is a unique organizational namespace within the specified registry, such as the Hashicorp namespace.
- type is a unique short name for the provider, such as Azure or Amazon Web Services.
For example, the official AWS provider belongs to the Hashicorp namespace on registry.terraform.io, so its source address is registry.terraform.io/hashicorp/aws or, more commonly, just hashicorp/aws.
- version defines the appropriate available version of the provider to work with, and the module is compatible with the version declared.
# Declaring the provider requirement in the required_provider
# Declaring the  required_provider  inside the terraform blockterraform {
required_providers {
aws = {
# Defining provider source as registry.terraform.io/hashicorp/aws or
# Defining provider source as hashicorp/aws or
source  = "hashicorp/aws"
version = "~> 3.0"
}
}
}# Configuring the AWS provider in Terraform configuration file.

provider "aws" {
region = "us-east-1"
}
Provisioning AWS infrastructure with Terraform
Terraform is the most widely used automation and Infrastructure-as-code (IaC) tool on the market. It allows you to create, deploy, and manage infrastructure resources efficiently, such as Mircosoft Azure, Oracle, Google Cloud, and Amazon Web Services.
Terraform uses configuration files written in Hashicorp Language (HCL) format, which is easy to understand and code. Usually, Terraform requires five files used to manage infrastructure:
- tf – allows you to define all the resources you want to create in Amazon Web Services. Resources are defined in the file in resource blocks and module blocks. Also, main.tf contains variables such as var.name, var.location, etc. These variables have their values defined in another file named terraform.tfvars, which you will create later in this section.
- tf – a Terraform variables file containing the configuration file’s (main.tf) variables. The variables in the code below, which are defined in vars.tf, are referred to in main.tf.
- tf – if you want Terraform to provide you with details, such as arn and resource id, after a resource is provisioned in Azure, you need to declare it in this file. You can specify all the resources you need to find the output for.
- tfvars – these files contain values that you want to pass to Amazon Web Services. terraform.tfvars contains values Terraform uses to replace the variable references inside a configuration file (main.tf).
How does AWS connect to Terraform?
As previously stated, for Terraform to connect to Amazon Web Services, you need the Terraform AWS provider, which calls the AWS API and manages the cloud resources.
There are multiple ways Terraform providers allow you to declare credentials for authenticating and connecting to Amazon Web Services. Let’s discuss all the ways in the upcoming sections.
Declaring static credentials
The easiest way for Terraform to authenticate using an Amazon Web Services account is by adding static credentials in the AWS provider block, as shown below. Still, it is not good practice to hardcode access keys. And using secret keys is risky and they can be compromised by attackers.
To declare static credentials in the AWS provider block, you must declare the AWS region name and the static credentials, i.e., access_key and secret_key, within the aws provider block.
provider "aws" {
region     = "us-east-2"
access_key = "us-east-2-access-key"
secret_key = "us-east-2-secret-key"
}
Declaring environment variables
You learned to declare static credentials in the AWS provider in the previous section. Instead of declaring the credentials directly in the provider block, you can declare them as environment variables representing your Amazon Web Services access key and secret key, respectively.
Again, environment variables are risky to use and can be leaked but using them is better than declaring static credentials. To declare the AWS provider using environment variables, execute the export command first on the machine where you intend to use the AWS provider followed by the provider block.
export AWS_ACCESS_KEY_ID="aws_accesskey"
export AWS_SECRET_ACCESS_KEY="aws_secretkey"
export AWS_DEFAULT_REGION="us-east-2"
Finally, declare the provider after executing the export commands as shown below.
provider "aws" {}
Declaring shared credentials in the AWS provider
Another way of specifying the credentials in the AWS provider is by using shared credentials. Shared credentials are different Amazon Web Services profiles that you create on your machine by adding an access key, a secret key, and a region in the .aws folder. These details are stored in the credentials file inside your home directory and are safe to use.
# Declaring the aws provider

provider "aws" {

# Specifying the region of AWS
region = "us-east-2"

shared_credentials_file = "/Users/shanky/.aws/creds"
profile = "shankyprofile"
}
Declaring the ‘assume role’
The last way to declare the credentials in AWS provider is by using the assume_role. The assume_role is declared under the provider block. This way, you get temporary security credentials that you can use to access Amazon Web Services resources that you might not normally have access to.
By declaring the assume_role, there are no security issues and no chances of leaking the secret keys and access keys.
# Declaring the aws provider in provider block using assume_role.

provider "aws" {
assume_role {
role_arn = "arn:aws:iam::ACCOUNT_ID:role/ROLE_NAME"
session_name = "AWS_sesion_1"
}
}
How to declare multiple configurations
In the previous section, you learned how to declare the AWS provider, but you can also define multiple configurations for the same provider if you need to work in different Amazon Web Services regions. The primary reason to declare multiple configurations is to support various AWS regions; or target multiple Docker hosts etc.
To create multiple configurations for a given provider, include multiple provider blocks with the same provider name and use the alias argument. Let’s check out an example to manage two different AWS regions.
The code below uses the same provider aws but with us-east-1 and us-west-2. The provider block for us-east-1 is considered a default provider configuration as there is no alias argument. For the us-west-2 region, an alias argument is used because the provider name (aws) is the same for each additional non-default configuration.
# Defining the default provider

provider "aws" {
region = "us-east-1"
}

# Declaring the resource block that doesn’t require you to specify the provider specifically.

resource "aws_instance" "us-east-1" {}

# Defining the same aws provider with another region.

provider "aws" {
alias  = "west"
region = "us-west-2"
}

# Declaring the module block with aws provider additional configuration for the west region with reference to us-west-2 region (aws. west)

module "aws_vpc" {

source = "./aws_vpc"

providers = {

aws = aws.west

}}
Creating an AWS EC2 instance using the AWS provider
Enough theory! Now that you have sound knowledge of the AWS provider, it is not doing much unless you use it. So, let’s check out how to provision AWS EC2 instances using Terraform.
To create an Amazon Web Services EC2 instance using Terraform, you need to build various Terraform configuration files. Let’s build them.
- Open your favorite SSH client and log in to the Ubuntu machine where Terraform is installed.
- Create a directory named ~/terraform-ec2-aws-demo in the home directory and change to this directory. This directory will contain all the configuration files that Terraform needs to create an AWS EC2 instance in the AWS account.
mkdir ~/terraform-ec2-aws-demo
cd ~/terraform-ec2-aws-demo
- Create a file named main.tf inside the ~/terraform-ec2-aws-demo directory and copy/paste the code below.
The code below contains a resource block that uses the to create four instances of the same type. The code also contains the reference of variables such as var.ami and var.instance_type, which you will create in another file, vars.tf, in the next step.
Resource "aws_instance" "my-machine" {
count = 4
ami = var.ami
instance_type = var.instance_type
tags = {
Name = "my-machine-${count.index}"
}
}
- Create another file, vars.tf, inside the ~/terraform-ec2-aws-demo directory and copy/paste the code below.
The code contains two string variables, ami, and instance_type, referred to in the main.tf file. The values of these variables will be declared in another terraform.tfvars file that you will next.
 variable " ami " {
type = String
}variable "instance_type" {
type = string
}
- Create another file, named provider.tf, inside the ~/terraform-ec2-aws-demo directory and copy/paste the code below.
The code contains the provider’s name (aws) and the AWS region here is us-east-2. You can specify any AWS region, but for this tutorial, you will use us-east-2.
# Defining the provider Amazon as we need to run this on AWS

provider "aws" {

region = "us-east-2"
}
Finally, create one more file, call it terraform.tfvars, inside the ~/terraform-ec2-aws-demo directory and copy/paste the code below. This file contains the values of the variables that you declared inside the vars.tf file.
ami = "ami-0742a572c2ce45ebf"
instance_type = "t2.micro"
Now, you have all the Terraform configuration files set up properly to create the Amazon Web Services EC2 instance. To create an EC2 instance in the Amazon Web Services account, Terraform needs to run three commands: terraform init, followed by terraform plan, and finally, terraform apply. Let’s run each of the Terraform command now from the Ubuntu machine.
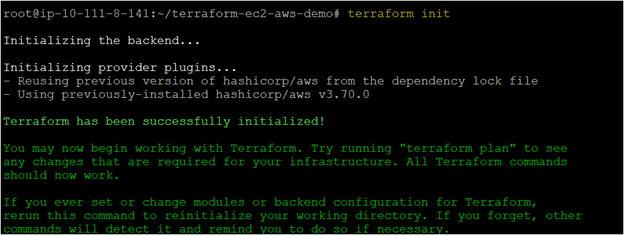
- Navigate to the ~/terraform-ec2-aws-demo directory and run the terraform init command.
# Running the terraform init command

terraform init
- After you execute the terraform init command, you will see a message on your console stating that “Terraform has been successfully initialized,” confirming that the terraform init command was successfully executed without any errors.
- Once Terraform is successfully initialized, you need to run the terraform plan command.
The terraform plan command provides all the details about the Amazon Web Services resources such as resources to add, resources to change, and resources to destroy. Let’s execute the terraform plan command.
# Running the terraform plan command

terraform plan

Finally, to provision the Amazon Web Services resources, i.e., AWS EC2 instances, you need to run the terraform apply command. Terraform connects with the AWS API and creates the four EC2 instances with the terraform apply command.
# Running the terraform plan command

terraform apply

Now that you have successfully created the four EC2 instances using Terraform, which is excellent, you must verify them in the Amazon Web Services account.
- To verify the AWS instances in the Amazon Web Services account, navigate to the AWS account and then go to the AWS EC2 instance dashboard page.
In the image below, you can see the names of the AWS instances, which are my-machine-01, 02, 03, and 04, they have been created successfully. And the instance ids, which the terraform apply command displayed during the deployment process, match those displayed on the EC2 dashboard.

Callout: The AWS EC2 instances are not free to use, and Amazon charges you for every hour, so it is recommended to terminate these instances if you’re not using them.
- To terminate the instance, use the terraform destroy command, which will remove all the previously created instances. Adding the –auto-approve option will skip the Terraform prompt asking you for approval and continue with the destruction of the AWS EC2 resources.
terraform destroy --auto-approve

Creating an AWS S3 bucket using the AWS provider
In the previous section, you learned how to create an AWS EC2 instance with the AWS provider. There is one more widely used Amazon Web Services service named AWS Simple Storage Service (S3), which companies can use to store log data and host static websites etc.
An Amazon S3 bucket is an object storage service that allows you to store and scale data securely. Let’s dive in and learn how to create an S3 bucket using Terraform.
Assuming you are still logged into the Ubuntu machine using the SSH client:
- Create again a folder named ~/terraform-s3-demo in your home directory. This folder will contain all the configuration files required for creating the AWS S3 bucket on the Amazon Web Services account.
mkdir ~/terraform-s3-demo
cd ~/terraform-s3-demo
- Create a file named main.tf file under ~/terraform-s3-demo folder and copy/paste the content below.
The code below will create a new bucket, an encryption key, and public access for the S3 bucket. The code contains references about two variables, bucket and force_destroy, whose values are declared in the separate configuration files that you will create later in this section.
# Specifying if AWS S3 bucket will be publically accessible or not.

resource "aws_s3_bucket_public_access_block" "publicaccess" {
bucket = aws_s3_bucket.demobucket.id
block_public_acls              = false
block_public_policy          = false
}

# Creating the encryption key which will encrypt the bucket objects

resource "aws_kms_key" "mykey" {
deletion_window_in_days = "20"
}

# Creating the bucket

resource "aws_s3_bucket" "demobucket" {

bucket                 = var.bucket
force_destroy  = var.force_destroy
versioning {
enabled                 = true
}
}
Create another vars.tf under ~/ terraform-s3-demo folder and copy/paste the content below into the var.tf file. The file below contains two string variables, bucket, and force_destroy, which are referred to in the main.tf configuration file.
variable "bucket" {
type = string
}variable "force_destroy" {type = string
}
Create another file named provider.tf file under the ~/terraform-s3-demo folder and paste the content below.
provider "aws" {
region = "us-east-2"
}
Finally, create another file named terraform.tfvars under ~/terraform-s3-demo folder and paste the content below. This file contains the values of the variables bucket and force_destroy that the main.tf references to.
bucket             = "terraform-petri-bucket"
force_destroy   = false
Now that you have all the Terraform configuration files set up, you can create an S3 bucket in the Amazon Web Services account using Terraform. Next, run the terraform init → terraform plan → terraform apply commands.
- Navigate to the ~/ terraform-s3-demo directory and run the terraform init command. After you execute this command, you will see that Terraform has been successfully initialized in the output, which confirms that the terraform init command was correctly executed without any errors.
terraform init

- Once Terraform is successfully initialized, run the terraform plan command. After the command has been executed successfully, you will see in the output something like Plan: Number of resources to add, Number of resources to change, and Number of resources to destroy, as shown in the image below.
terraform plan

- Finally, run the terraform apply command. This command allows Terraform to connect with the AWS API and create the S3 bucket.
terraform apply

Now that you have successfully created the S3 bucket using Terraform, which is great. You can verify that the S3 bucket is there.
- To verify the AWS S3 bucket in the AWS account, navigate to the Amazon Web Services account and then go to the AWS S3 service page.
As you can see below, the AWS S3 bucket (terraform-petri-bucket) you provided in the terraform configuration file is present, which confirms the successful creation of the S3 bucket.

Summary
In this tutorial, you learned the most important things about the AWS provider, how to declare it in Terraform and how to use it to connect to the Amazon Web Services cloud. You also learned how to use the tool to deploy AWS resources, like EC2 and S3 buckets.
Using this newfound knowledge, what do you plan to manage in Amazon Web Services using Terraform? Let us know in the comments below.

Sagar is a DevOps consultant and the founder of automateinfra.com. Sagar brings DevOps technology expertise to Petri.com, writing about Terraform, AWS Cloud, Microsoft Azure, Ansible, Kubernetes, Docker, Jenkins, Linux, and Windows.