How To Broadcast Teams Meetings Like a Pro with NDI and OBS
Microsoft Teams gained new functionality last week that enables you to capture audio, video, and shared screens in meetings and feed them into third-party software for professional recording or live streaming.
Improve how you record and produce live events in Microsoft Teams using NDI
This functionality has been available in Skype since 2018 and uses NewTek’s Network Device Interface (NDI) protocol, an open standard used to capture and transmit broadcast-quality video over a network. When you have watched TV stations bring in remote guests from home and it doesn’t look like a Zoom meeting – the chances are they are either using the broadcast version, SkypeTX or Skype with NDI.
With Teams, this enables you to improve the way you record or produce live events; Teams has built-in meeting recording and Live Events functionality. However, neither of these options allow you to fully customize the way that the video streams are shown in the recording, or to live event viewers.
Using NDI-out, you can conduct your Teams meeting as normal and capture the video feeds into a separate piece of software capable of arranging the video feeds in a professional, customized way. For example, you might choose to have a custom background, company logo, and position each video feed in a particular place.
During the recording or live stream, you might choose to switch between different scenes at appropriate times, such as when you want to focus on a particular speaker or switch the focus to shared content.
NDI-out interfaces with a range of hardware and software, including professional broadcast consoles, OBS (Open Broadcast Studio), XSplit, Wirecast, and Streamlabs.
What is Open Broadcast Studio (OBS)?
OBS is free and widely used by video professionals and online streamers. It is capable of live streaming to common services including YouTube, Facebook, Twitter, LinkedIn and you can use it with Live Events in Microsoft 365 instead of using Teams directly. If you aren’t looking to stream live and instead record meetings for wider consumption later, it also can record the meeting directly. Best of all, it is very easy to learn and use.
Enabling NDI streaming in Microsoft Teams
To use NDI in Teams with OBS we need to perform several tasks. We need to enable NDI in Teams, then we need to install OBS and the NDI integration add-in.
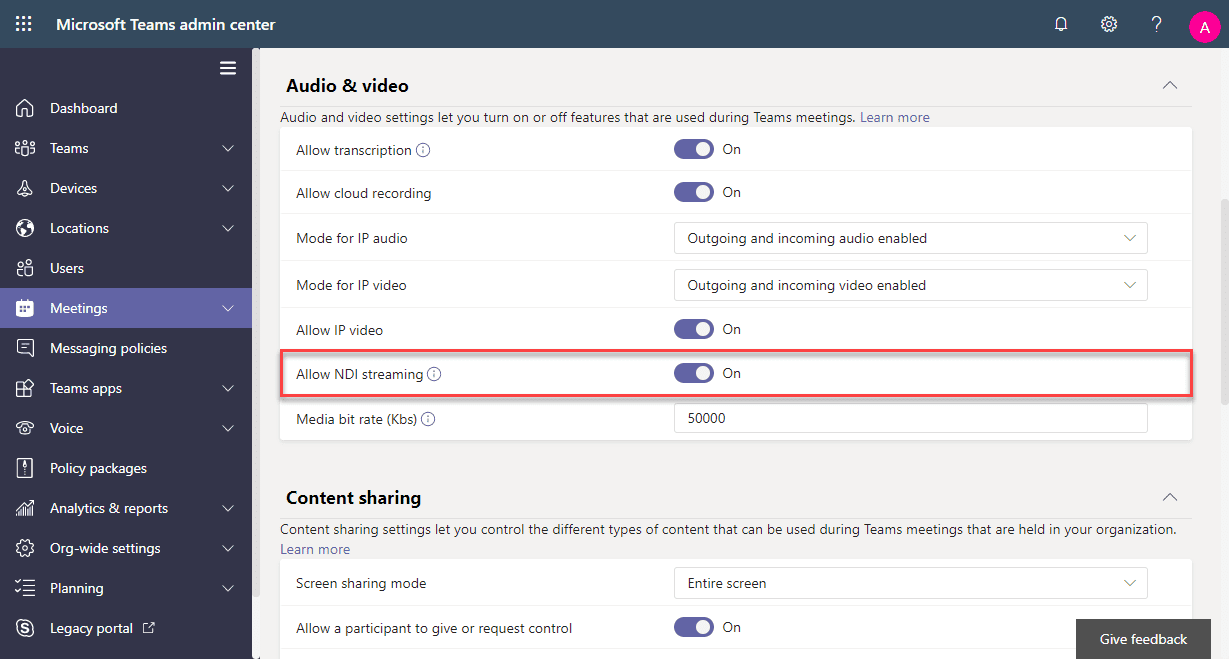
Before a user can enable NDI in Teams, you need to enable NDI streaming within the Teams Admin Center. To do this, navigate to Meetings>Meeting Policies, then select the relevant meeting policy assigned to users you want to use NDI. For example, if you want all users to use NDI, update the Global (Org-wide default).
Within the policy itself, scroll down to the Audio & video section and then switch Allow NDI streaming to on:
After saving the policy, wait several hours before closing and re-launching Teams to ensure the new setting has had time to apply.
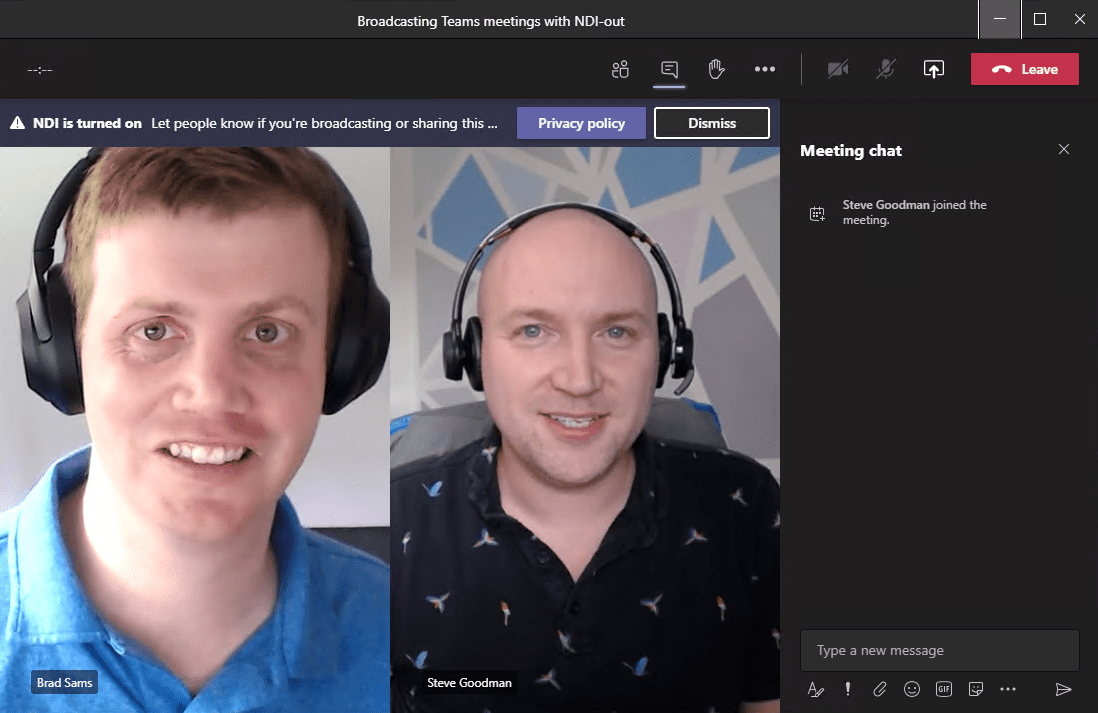
NDI is not enabled by default in Microsoft Teams. You should enable it and disable it when you want to use it because when it is enabled, other machines on the LAN can potentially capture the meeting.
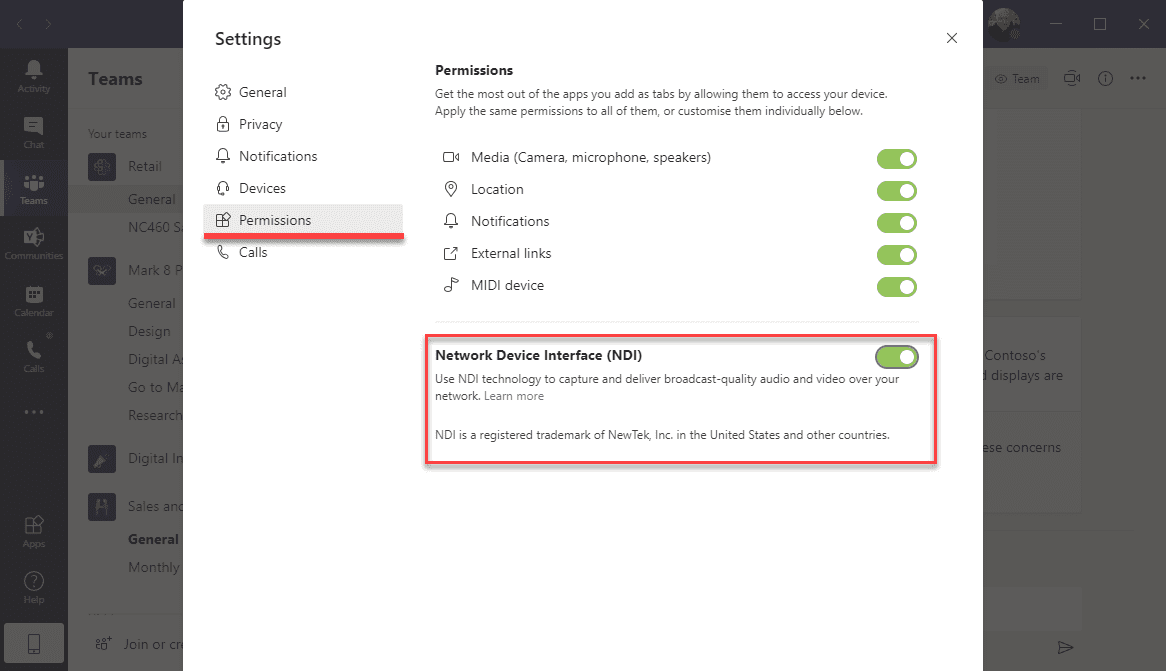
To enable NDI in the Teams client, open your Teams settings and select Permissions. You will see a new option to enable NDI, as shown below. As soon as this is enabled, you can use a tool like OBS to capture the meeting:
Configuring OBS Studio to capture Teams NDI streams
There are many guides on how to use OBS Studio, so we will just cover the basics here.
First, download OBS Studio for free from the OBS Project website.
You’ll also need to download the obs-ndi Newtek NDI integration. From the link, choose Go to download which and choose obs-ndi-4.9.0-Windows-Installer.exe.
Install both OBS and the OBS NDI plugin; you can install both with the default options the installers offer before launching OBS Studio for the first time.
After launching OBS Studio, you will see the main window which is split into several sections (as shown in Figure 4):
- Preview window, also used to arrange content
- Scene list, containing arrangements of sources you can switch between during recording. For example, if you want to switch between a full-screen presenter and two people side-by-side, you will configure two scenes.
- Sources, where you will add your NDI source from Teams. You will also add sources, including background images or text here. These will then show in the preview, with audio for each source shown in the audio mixer where applicable.
- Audio mixer, where you will adjust or mute different sources. For recording or broadcasting, a Teams meeting your first task will be to mute the Desktop Audio and Mic/Aux
- Scene transitions show the effect used when you switch between scenes. By default, when you switch between scenes a fade transition will be used.
- Controls are primarily used to access settings, start and stop recording and streaming and switch studio mode on and off. Studio mode is like Teams Live Events and shows the scene you plan to switch to before you enable it in your recording or live stream.
To add your first Teams video feed from NDI, start a Teams meeting then choose the Add (+) button within Sources, and choose NDI Source from the list:

You will then have the option to configure which Teams source from your meeting.
You’ll see each meeting participant by name, plus an option for the active speaker, and when in use you will see a shared screen, together mode and large gallery mode as options:

If you are arranging your Teams video feeds in advance of a meeting you want to record, you can add multiple NDI sources but configure temporary feeds and then edit them later.
An important quirk you need to be aware of when arranging your content is that video feeds may not always be the same resolution. For example, an attendee joining from a low-bandwidth or mobile device may not have a full 1080p video feed. Therefore, it is worth using the Transform feature against each feed to ensure it always remains a consistent size.
In the example we are creating in this article, we want to have two video feeds side-by-side in our 1980×1080 video stream. Therefore, with a little room for a white border around each video stream, we want each size to be 864×486. To ensure this is always the case, we will right-click on the NDI source and choose Transform>Edit Transform from the menu. We will then select Bounding box type and choose Scale to height of bounds and set the Bounding box size to 864×486:

We’ll then continue to create our arrangement in OBS Studio by adding an Image source with the Petri logo, two Color sources used as white borders around our video feeds and several Text (GDI) sources with the title of our stream and both Brad’s and my Twitter handles.
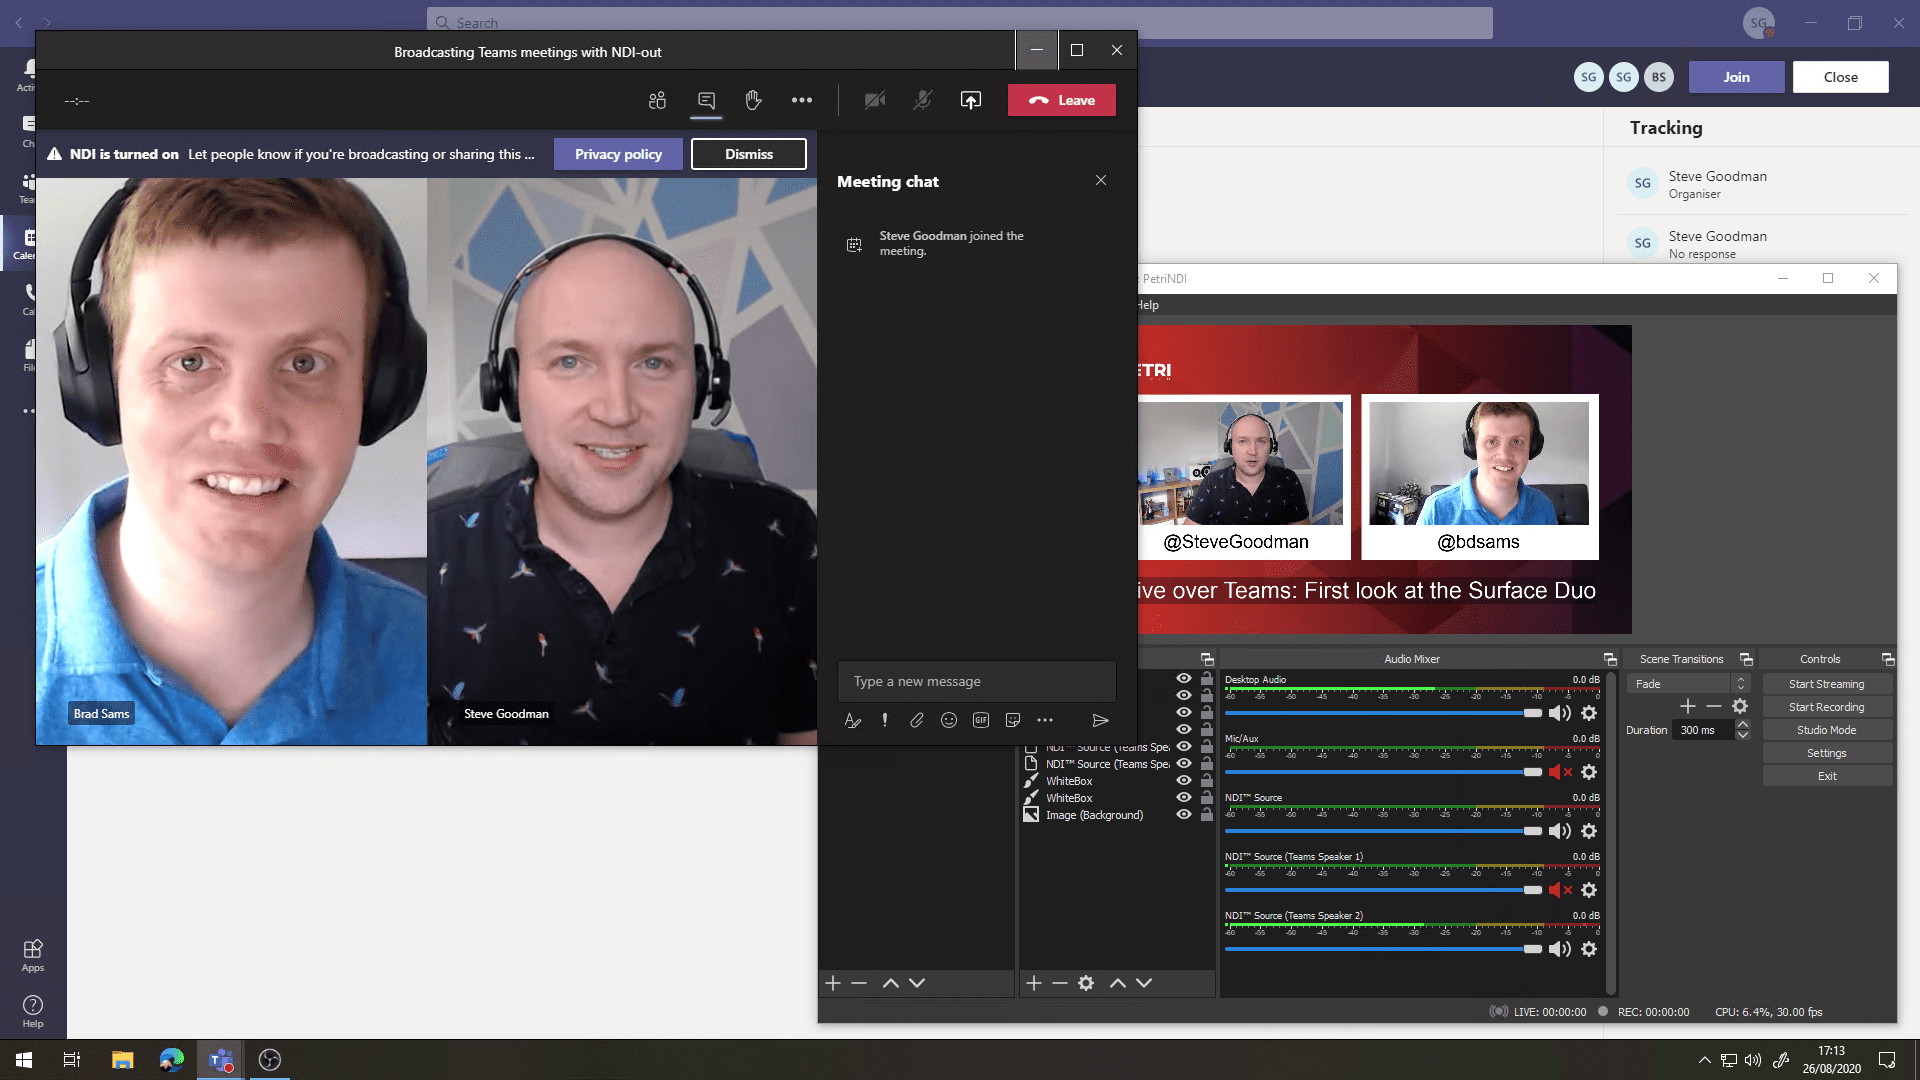
When we start our Teams Meeting and launch OBS Studio with NDI sources configured, all meeting participants will be notified that NDI is enabled and that the meeting may be broadcast or shared, similar to the notification attendees see when a meeting is recorded:
Over in OBS Studio, we should see the video feeds arranged as desired. If it does not show the way you hoped, you can adjust this on the fly by editing each NDI source and selecting the correct Teams feed before you begin your recording or broadcast. You will also see in the example below that although Teams has cropped each attendee in the Teams meeting window, we have the full 16:9 view of each person:

Summary
Assuming you have configured your streaming service in OBS or are recording locally – you’ll be ready to go! From here, you can add different endpoints like YouTube, Twitter, and Facebook and start sharing your stream to third-parties.
Related articles

Steve is a nine-time Microsoft MVP, author of several Exchange Server books and regular conference speaker, including at Microsoft conferences including Ignite, TechEd and Future Decoded. Steve has worked with Microsoft technology for over 20 year...


