Getting Started with Azure SQL Database
In today’s Ask the Admin I’ll show how to provision SQL Server in the cloud using Azure SQL Database v12.
There are lots of reasons why you might want to run SQL in the cloud, primary among them is to support cloud-based business applications. There two options for running SQL in the Azure cloud. The first is to use Database as a Service (DBaaS), which is optimized for software-as-a-service (SaaS) app development and is compatible with the most SQL Server features, and that’s what I’m going to show you how to do in this article. Secondly, you could deploy SQL Server in a virtual machine (VM) running in Azure.
Azure SQL Database is designed to reduce costs by making it easy to deploy and manage one or many databases to support your applications. Because Microsoft deals with provisioning and updating the high availability back-end infrastructure on which Azure SQL Databases run, and backup, there’s much lower overhead compared to deploying your own VMs and installing SQL Server.
The Azure SQL Data Sync service, currently in preview, allows data to be transferred from existing SQL deployments to Azure SQL Databases. Other tools, such as the Microsoft Sync Framework, T-SQL scripting, and the bcp utility can also be used to transfer data to Azure SQL Database.
Unlike SQL Server, Azure SQL Database doesn’t need to be licensed but is sold as a service in several tiers and based on two models: Elastic Database or Single Database. The Elastic Database model is based on the management of collective performance pools, measured in elastic Database Transaction Units (eDTUs), rather than individual databases. The Single Database model has three tiers – Basic, Standard, and Premium – offering different levels of performance based on Database Transaction Units (DTUs). Click here for more information on Azure SQL Database pricing.
Provision an Azure SQL Database
Before starting, you’ll need an Azure account. If you don’t already have one, you can sign up for a free trial here.
- Log in to the Azure portal here.
- In the top left of the portal window, click NEW, and then select Data + Storage below MARKETPLACE.
- In the Data + Storage pane, click SQL Database.
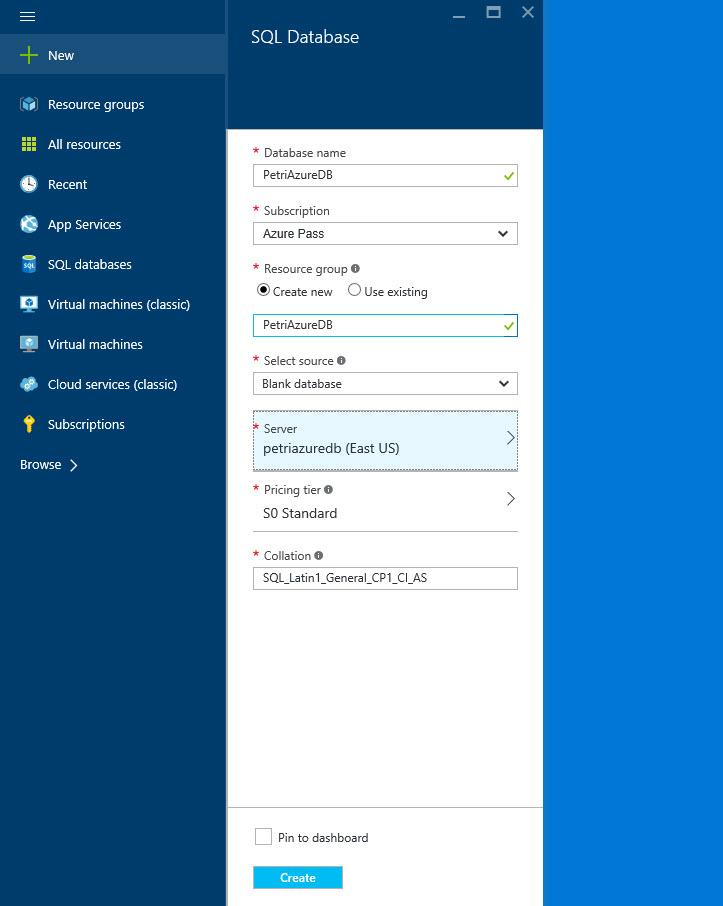
- In the SQL Database pane, give your database a name.

- If you have more than one Azure subscription associated with your account, select the sub to use.
- Under Resource group, check Create new and then type a name for the new RG.
- Select Blank database from the Select source dropdown menu.
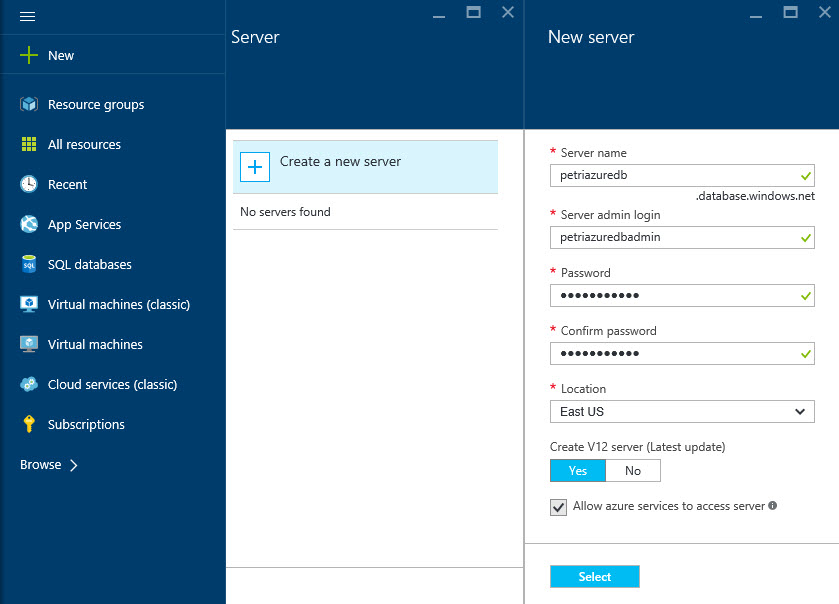
- Below Server, click Configure required settings.
- In the New server panel, type a server name, and a server admin name and password.
- Choose a location from the menu, make sure that Yes is checked by Create V12 server (latest update), and check Allow azure services to access server. Click Select to continue.

- Back in the SQL Database panel, change the pricing tier from S0 Standard if required.
- Finally, check Pin to dashboard and click Create.
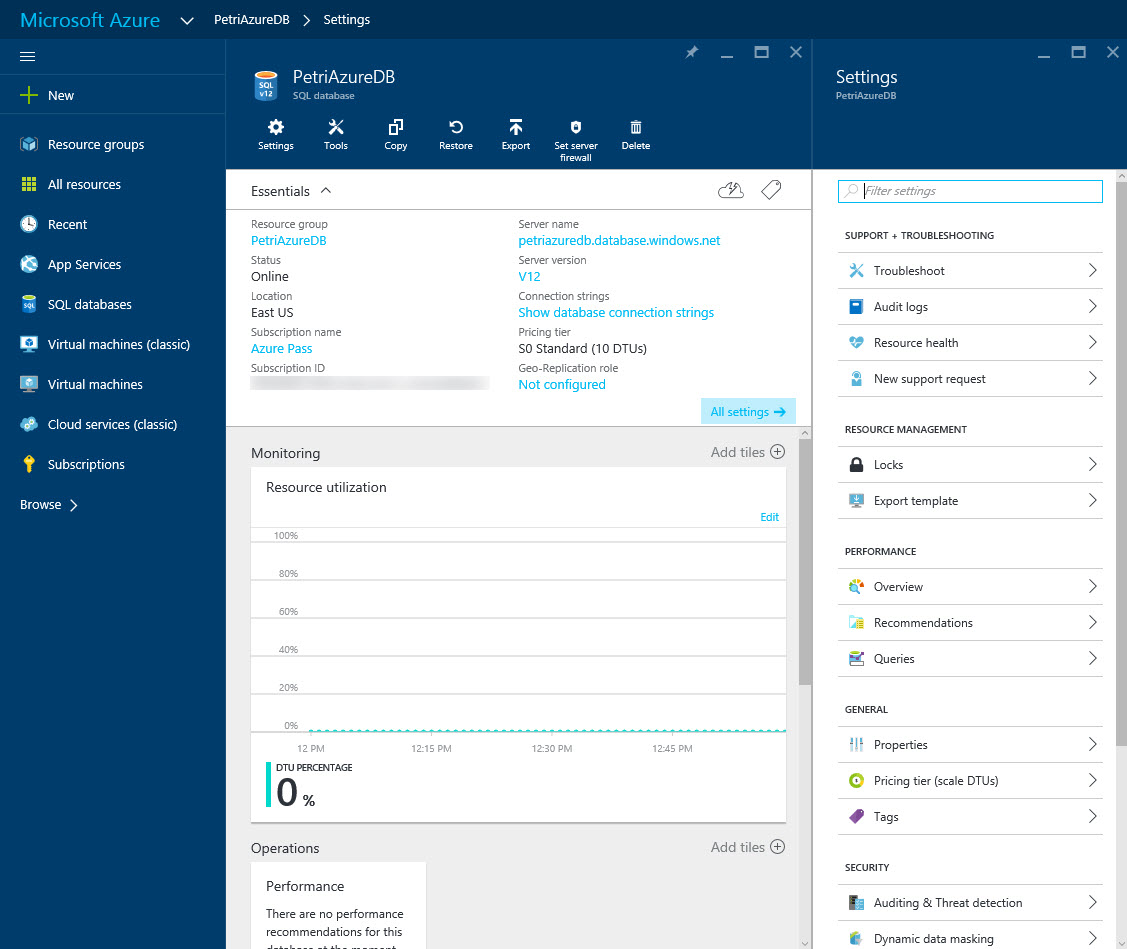
Wait for the database to be deployed. Once it’s ready, the panel for the new database will automatically open in the portal window. If not, you can click the DB’s icon on the portal dashboard, or find it in the all resources menu on the left.

Configure a firewall rule
You’ll need to create a firewall rule before you can connect to the new Azure SQL Database.
- In the panel for the new Azure SQL Databse, click Set server firewall in the list of options at the top.
- In the Firewall settings pane, click Add client IP if the machine you want to access SQL from is that on which the Azure portal is running. A new rule will be automatically generated.
- Alternatively, type a rule name and IP address range to create your own rule.
- Once you’re done, click Save.
- Click OK in the Success! pop-up dialog and close the Firewall settings panel.

Connect using Visual Studio
Now the database is ready, you can connect to it using Visual Studio or other compatible tools.
- On the database panel, click the Tools icon.
- In the Tools panel, click Open in Visual Studio.
- Download Visual Studio using the links provided if you don’t have it already installed, or click Open in Visual Studio if it’s already installed on your device.
- Log in to the database with the credentials provided during the setup process.
In this article I showed you how to create your first Azure SQL Database, configure a firewall and connect using Visual Studio.


