Enabling Auto-Scaling for Azure VMs
In Saving Money with Microsoft Azure Virtual Machines, I discussed how an Azure customer could save money by being carefully planning their design and deployment of virtual machines. In this article, I’ll explain how you can implement one of those methods using scaling for Azure IaaS, in particular, with Azure virtual machines.
Azure Virtual Machine Cost-Benefit Analysis
Imagine that you are asked to deploy a service in Azure that’s going to have high peak demands. The old-school method of deploying this service would be to deploy two or three virtual machines that each have a large number of processors and a large amount of RAM. Let’s figure out the cost of such an example.
We need an infrastructure that can provide at least 16 cores and 112 GB RAM to meet the peak user demands. We’ll allow for fault tolerance because we’re careful, so we will need to allow for one machine being offline (planned or offline), but it still needs to be able to provide the required resources. The Azure Standard A7 has 8 cores and 56 GB RAM. Two of those machines offers enough resources for peak demand, and a third offers fault tolerance. Each A7 costs $1,108.80 in the US East region in a 30-day month, so three of these machines will cost $3,326.40 per month.
Remember that’s $3,326.40 per month to provide resources for peak demand. How often does a business need to meet those demands? Aren’t there natural quiet periods during the working day, not to mention after-business hours and the weekend? Azure VM resources are statically assigned to the VM, so you’re paying for them if the VM is running, regardless of whether they are used or not. This approach seems wasteful.
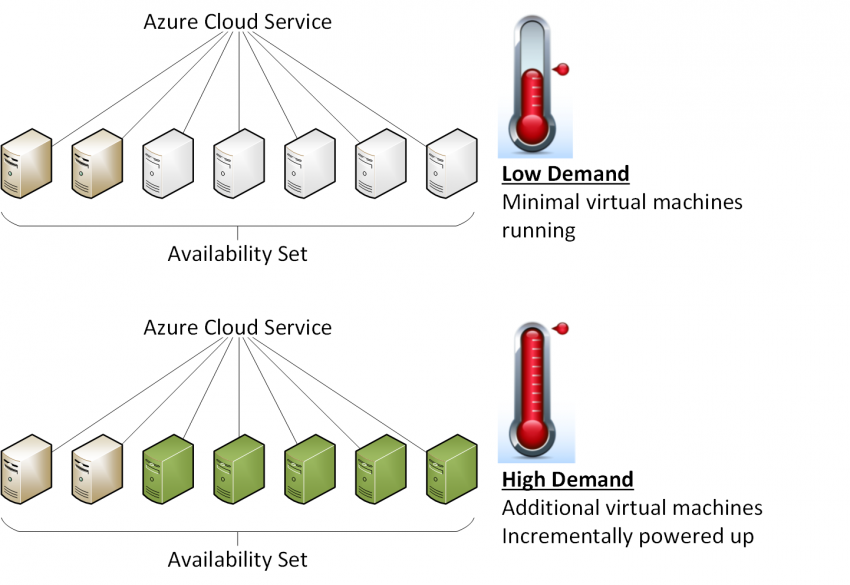
Instead, why don’t we deploy more, smaller virtual machines and enable cloud service scaling, which is also referred to as auto-scaling. We can achieve the same resource capacities with eight A5 virtual machines, where each has 14 GB RAM and two virtual processors. We’ll also include an additional A5 virtual machine that provides fault tolerance, which gives us a total of nine VMs. If we enable scaling, Azure will monitor usage of these virtual machines, where it will automatically shut down and start up virtual machines as demand ebbs and flows. We can keep a certain reserve of machines online all of the time to retain high availability. The savings are obvious: each virtual machine costs $302.40 over a 30-day month, where altogether the VMs cost $2,721.60.
Ah, but wait! Azure only charges you for a virtual machine if it is running. You continue to pay for the minor storage charges, which I have not accounted for in this article. Let’s assume that over a month the average is that half of the scaled virtual machines are running. The cost now drops to $1,360.80 per month, versus $3,326.40 per month for the fewer, bigger virtual machines approach of the past.
Enabling Auto-Scaling with Azure Virtual Machines
One of the things I love about Azure IaaS is that it’s easy to deploy advanced features once you know that they exist and where to look.
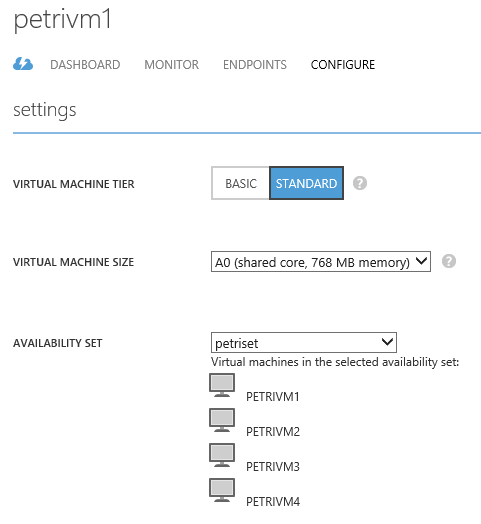
To start, each of your identical virtual machines needs to be created in the same Azure cloud service. Each virtual machine needs to be added to the same availability set. This places the virtual machines into different domains of fault within Azure, providing you with a level of high availability. Create an availability set on one of your virtual machines and then join the other identical machines to that same set.
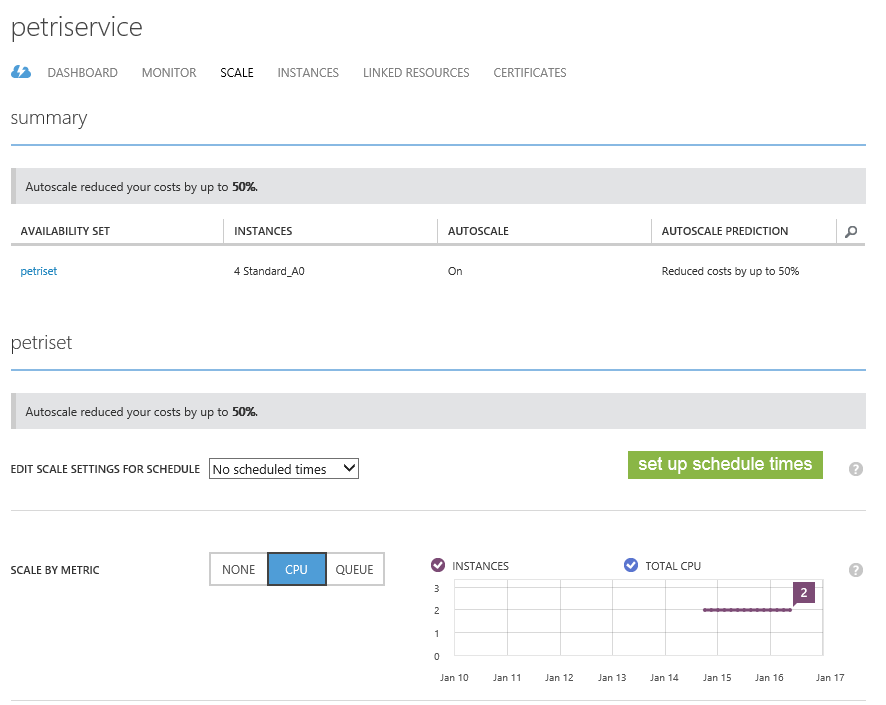
To enable scaling, browse to the cloud service and edit the Scale settings, as shown in the following image. You can start off simple just by changing Scale By Metric from none to CPU and clicking save. Note that the queue option is more of a PaaS thing intended for message queuing.
At this point, Azure will take over control of powering up and down your virtual machines as demand changes. However, we can tweak a few more settings to get better results.
My lab has four virtual machines, which encompasses PETRIVM1 to PETRIVM4. I want two of these machines to always operate and only want others to power up when there’s an increase in processor demand. I want to stagger this growth to avoid virtual machines being turned on for blips. I also want machines to stay online a little longer just in case there are downward blips, too. The available settings allow me to do this.
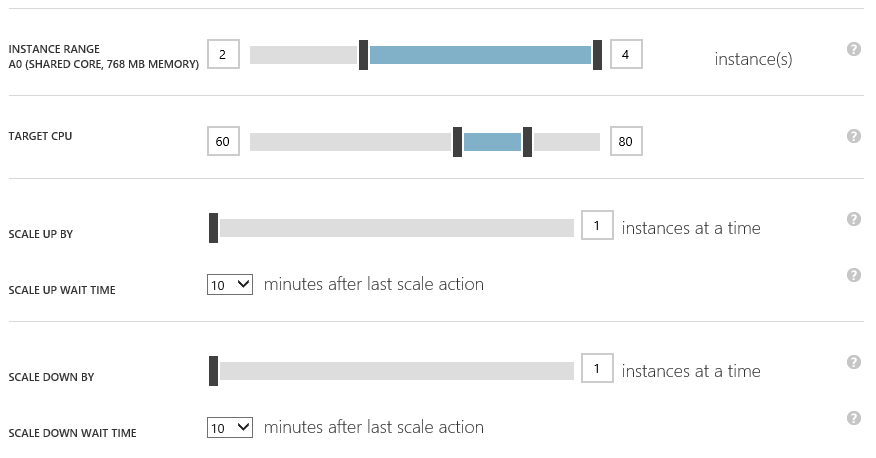
Instance Range allows me to set a range of machines that I allow to run. I have set the minimum to be two virtual machines. This means that I still have high availability, even at the lowest point. The top of the range is four, so I am allowing Azure to power up that machine when there is peak usage.
The Target CPU setting is an interesting one, where Azure will do it’s best to ensure that the sum CPU utilization will stay within the set range by starting up or shutting down virtual machines within the defined Instance Range.
We can control that rate of scaling in two ways, both for scaling up and for scaling down. We can define how many instances are added or removed, and set a delay. By default, one instance is added/removed, and there is a 20-minute delay. You can tweak these settings to increase the rate of growth. For example, powering up more machines at once gives a big step up. However, powering up one machine more frequently gives a more gradual rate of growth, which allows time for the OS and guest services to start up.
Scaling is a very useful feature of Azure. It is very easy to enable, and it can save a customer a lot of money. Go look at my screenshots again, and you’ll see that scaling was saving me 50 percent of my potential spending on these virtual machines by powering down the two unneeded machines. My advice is to try the service out, making sure to spend some time simulating workloads, tuning the rates of scaling, and monitoring performance to make any required changes.


