How to Create a Dockerfile Step by Step

Docker is a popular software platform that developers can use to run applications inside a lightweight environment known as a Docker container. You can run Docker containers using standard Docker images found on the Docker hub. However, you can also use a Dockerfile to create a Docker image with a specific configuration. In this article, I will explain how to create a Dockerfile step by step.
What is a Dockerfile?
To understand what a Dockerfile is, you first need to be familiar with how Docker containers and Docker images work. Moreover, to follow along this tutorial, you’ll need to have the following installed:
- Ubuntu with Docker installed. This tutorial uses a device running Ubuntu 21.10.
- Docker v19.03.8 installed.
How Docker containers and Docker images work?
A Docker image is a package of multiple components (code, runtime, system tools, system libraries and settings) required to run an application. Docker images are either stored privately in own repository or publicly stored in the Docker Hub library, which provides access to over 100,000 container images.
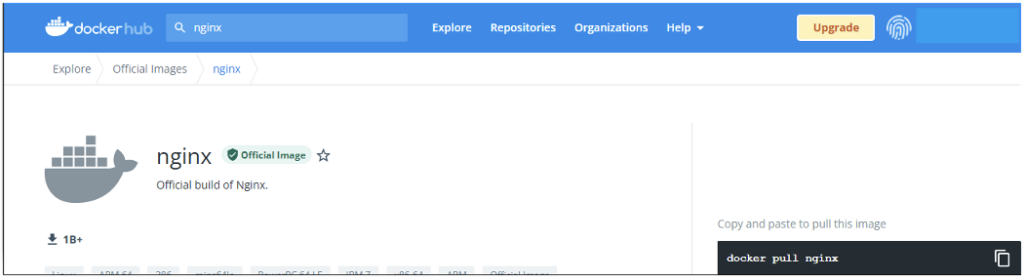
To find Docker images on the Docker hub, you just need to enter the name of the Docker Image you need in the search box. As an example, you can see the Docker image for the Nginx webserver below.
Docker applications run inside a lightweight environment known as a Docker container, which is a runnable instance of a Docker image. A Docker container is different from a virtual machine as it doesn’t run an operating system. Each container shares the kernel of the host OS and you can run multiple containers on the same host.
Docker containers package up applications with everything they need to run, and you can run both Windows and Linux applications in Docker containers. While containerized applications run in an isolated environment, you can also run multiple containers on the same device.
Docker containers aren’t completely isolated from each other as they share the machine’s OS system kernel. This is also why you cannot run Windows-based containers on Linux. In a Windows environment, however, you can run both Linux-based and Windows-based containers by using Docker Desktop for Windows with WSL2.
Developers usually like to work with Docker containers as they provide an easy-to-use environment to build, test, and deploy apps. They can also start, stop, and delete Docker containers at any point in time.
How does a Dockerfile work?
A Dockerfile is a simple text document that contains instructions to build a new Docker image. The multiple instructions or steps declared in a Dockerfile are executed on top of a base image. A base image includes a simplified version of a Linux distribution (Debian, Ubuntu, Redhat, or CentOS) containing basic shell applications and dependencies.
Developers can get Docker images from the Docker Hub or other sources, and they can run instructions on top of them to add more components. These instructions can include installing dependencies, adding code configuration files, etc. Each instruction in a Dockerfile creates another read-only layer, and it also consumes a certain amount of resources. However, Docker offers ways to control how much memory or CPU a container can use.
To create a new Docker image using a Dockerfile, you need to use the docker build command. The syntax for this command is quite simple, as seen below. If you need to build a Docker image from a different path, however, you need to use the -f flag.
docker build .
docker build -f /path/to/a/Dockerfile .
When you execute the docker build command, the Docker client connects to the Docker daemon and executes each instruction defined in the Dockerfile. If any instruction fails, previous instructions will be cached when you rebuild the image.
Lastly, when each command has been executed, the Docker image will be created, and the Docker Image ID will be printed in the console.
The shell and exec forms for Dockerfile instructions
Some Dockerfile instructions can be written in two different forms, the shell form and the exec form. For example, the RUN, CMD, and ENTRYPOINT instructions can be run in both forms. I’ll have more details on these specific instructions later.
For instructions written in the shell form, commands are run by the container’s shell. Here’s how the syntax for the shell form works:
<instruction> command
ENV name John Dow
ENTRYPOINT echo “Hello, $name”
The exec form is usually recommended for instructions that can run directly without going through a shell. The syntax for the exec form is parsed as a JSON array, so you must use double quotes around words:
<instruction> [“executable”, “param1”, “param2”] RUN [“apt-get”, “install”, “python3”]
CMD [“/bin/echo”, “Hello world”]
ENTRYPOINT [“/bin/echo”, “Hello world”]
Environmental variables inside a Dockerfile can be declared as $var_name or ${var_name}. Docker also treats lines that begin with a ‘#’ as a comment.
WORKDIR ${HOME}  # This is equivalent to WORKDIR ~
ADD . $HOME      # This is equivalent to ADD . ~
Understanding Docker commands and instructions
In this section, we will cover the most important Dockerfile instructions or arguments that are used to build a new Dockerfile from a base image.
Dockerfile FROM instruction
The From instruction is used to specify the Docker image you want to use. It usually comes first in a Dockerfile as it sets the base image for further instructions.
Below is an example of a FROM instruction where we’re defining Ubuntu as the base image we want to use.
FROM <base-image:Tag>
FROM Ubuntu
Dockerfile ARG instruction
TheARG instruction is used to define a variable that can be used during the Docker image building process. This instruction may be used before the FROM instruction to use a variable in the latter.
Below is the syntax of an ARG instruction where we’re adding two arguments, user1 and user2.
FROM Ubuntu
ARG user1
ARG user2
To use these two arguments declared in the Dockerfile at runtime, we can use the docker build command as shown below.
docker build ARG_name[=<default value>]
docker build ARG user1= John user2= Peter
Dockerfile RUN instruction
The RUN instruction will execute commands on top of the current image and create a new image layer. Dockerfiles can include multiple RUN instructions to install software packages and other things, and new image layers created by the RUN command will be used for subsequent instructions.
The RUN instruction can be used with either the shell or exec form. Let’s start with the syntax for the shell form:
RUN <command> # Example of Shell form In the shell form, you need to run commands in the /bin/sh -c shell on Linux, where /bin/sh is a shebang, which is a specific character sequence to detail which shell interpreter will be used to execute the script.
In the example below, the source $HOME/.bashrc command is used to update or refresh the changes made in the bashrc file to make them applicable in the shell permanently. Finally, echo $HOME will display the home directory.
RUN /bin/bash -c 'source $HOME/.bashrc; \ echo $HOME On Windows, commands run in the cmd / S /C shell, where /c is used to run a particular command and /s is used to perform quote handling.
Let’s move on to the exec form for the RUN instruction. Again, commands here are parsed as a JSON array, and you must use double quotes around words.
RUN ["executable", "parameter1", "parameter2"] # syntax for the exec form
RUN ["/bin/bash", "-c", "echo hello"] # Example of command in the exec form
Dockerfile CMD instruction
The CMD instruction is used to provide default arguments, including executables, for a container. You should only use one CMD instruction in a Dockerfile. If you list more than one, then only the last one will take effect.
The CMD instruction has two different possible forms:
- CMD [“executable”,”param1″,”param2″] (exec form, this is the preferred form)
- CMD command param1 param2 (shell form)
As an example, if you need your container to sleep for 5 seconds and then exit, you can use the following instruction in your dockerfile.
FROM Ubuntu
CMD sleep 5
Dockerfile ADD instruction
The ADD instruction copies new files, directories, or remote file URLs from your Docker host and adds them to the filesystem of the image. The ADD command basically copies the files or directories into a Docker image.
The first command below adds test.txt in the relativeDir directory, and the second command adds the ownership of the files within the somedir directory.
ADD test.txt relativeDir/
ADD --chown=myowner:mygroup files* /somedir/
Dockerfile EXPOSE instruction
The Expose instruction is used to inform the Docker engine that the Docker container is listening on a specified TCP or UDP port. This instruction does not actually publish the port, it’s just used to let the Docker engine know about which ports are intended to be published.
Here’s the basic syntax for this instruction:
EXPOSE <port> [<port>/<protocol>...]And here is the syntax you need to use to expose TCP and UDP ports:
EXPOSE 80/tcp
EXPOSE 80/udp
Note: You can specify whether the port listens on TCP or UDP, and the default is TCP if the protocol is not specified.
Dockerfile ENV instruction
The ENV instruction is used to set the environment variable <key> to a value <value>. Here’s the basic syntax for this instruction:
ENV <key>=<value>There’s also an alternative syntax where you omit the ‘=’ symbol:
ENV MY_VAR my-valueEnvironment variables are active during the creation of a Docker Image. You can also pass the values of environment variables at runtime when you’re building the image.
Here’s how to use the ENV instruction to create three different variables:

ENV MY_NAME="John Doe"
ENV MY_DOG="Night Owl"
ENV MY_Profile="Devops Engineer"Note: The ENV syntax doesn’t allow us to declare multiple environmental variables under the same ENV instruction such as ENV NAME=Adam=Michael
Dockerfile LABEL instruction
The LABEL instruction can be used to add metadata to an image to better understand it. A label is a key-value pair where both key and value are added within double quotes.
The syntax for the LABEL instruction is the following:
LABEL <key>=<value> <key>=<value> <key>=<value>Example: The code below contains four labels with each of them containing different keys and values.
LABEL "com.example.company"="Microsoft Corporation"
LABEL com.example.label-with-value="Windows"
LABEL version="1.0"
LABEL description="Windows of Microsoft"
Note: You may still choose to specify multiple labels in a single instruction, in one of the following two ways. The code below contains multiple labels either in a single line or in multiple lines.
LABEL multi.label1="value1" multi.label2="value2" other="value3"
LABEL multi.label1="value1" \
      multi.label2="value2" \
      other="value3"
Dockerfile VOLUME instruction
The VOLUME instruction is used to create a mount point, which will act as an externally mounted volume from the Docker host or other containers and make files persist even after the container stops.
In the command below, we are creating a Docker volume named my-vol, which you can use and attach to Docker containers.
Docker volume create my-volDockerfile COPY instruction
The COPY instruction copies new files or directories from the local machine and adds them to the filesystem of the container at a path you define.
The instruction below copies the test.txt file from the mydir path to the container where we will run the docker build command.
COPY test.txt mydirIf we are not already in the mydir directory from where we would like to run the docker build command, then we need to provide the complete path with the following command:
COPY test.txt relativeDir/
COPY –chown=55:mygroup files* /tmp/newdirectoryDockerfile ENTRYPOINT instruction
The ENTRYPOINT instruction allows you define the executables that will run when a container is launched. A Dockerfile always includes one CMD or ENTRYPOINT instruction.
The ENTRYPOINT instruction has two forms. Here’s the syntax for the exec form, which is preferred:
ENTRYPOINT [“executable”, “param1”, “param2”]And here is the shell form:
ENTRYPOINT command param1 param2The code below shows how to automatically add the sleep command when we’ll run our Docker container. We’ll just need to provide a value for it.
FROM Ubuntu
ENTRYPOINT ["sleep"]
When we execute the docker run instruction with a new image, the sleep command will automatically get appended as shown below. However, you need to specify the number of seconds your docker container should sleep.
docker run <new-image> sleep <add-value-of-your-choice> If you don’t provide a value, this will result in an error. To avoid this, you should consider using both the CMD and ENTRYPOINT instructions, but make sure to define both in Json format.
FROM ubuntu
ENTRYPOINT sleep
# This command will always run the sleep command  CMD ["5"]  # In case you pass any parameter in the command line; it will be picked, otherwise 5 will be used by default
Note: You cannot override an ENTRYPOINT when starting a container unless you add the –entrypoint flag.
How to create a Dockerfile
Now that you’re familiar with the main Docker instructions, let’s create a new Dockerfile. In the following example, I’ll be configuring a new Dockerfile designed to create a new Docker image that uses the NodeJS image as a base.
Here are the instructions I’ll be using use to create my new Dockerfile:
- FROM: The base image I’m using to create my new Dockerfile is NodeJS. As a result, every next step that we will perform will be done on the NodeJS base image.
- RUN: This instruction willcreate a directory named ‘app’ in the filesystem of the Docker container.
- WORKDIR: This instructiondefines the working directory (/app) that will be used for other instructions in the Dockerfile.
- COPY: This instruction will copy all the files from my current directory to the app directory within the container. In the instructions below, the first Copy instruction will copy package.json in the app directory within the Docker container.
- RUN: This instructionwill install the NodeJS package manager on the Docker container.
- COPY: This second COPY instruction will copy all the content of the local directory to the /app directory. The dot symbol here indicates that everything from our current directory will be copied to the Docker container.
- EXPOSE: The EXPOSE instruction informs Docker that the container listens on the specified network ports at runtime.
- CMD: This command specifies the instruction that will be executed when the Docker container starts. Here, it will start the npm service, which is a package manager for Node.js packages.
FROM node:7              # Sets the base image
RUN mkdir -p /app
WORKDIR /app             # Sets the working directory in the container
COPY package.json /app   # copy the dependencies file to the working directory
RUN npm install          # Install dependencies
COPY . /app              # Copy the content of the local src directory to the working directory
EXPOSE 8081
CMD ["npm", "run", "start"]
Let’s create another Dockerfile using the Python base image. Here is what you need to know about the main instructions I’m using to create this new Dockerfile:
- FROM: The base image I’m using here is Python version 3.8.
- RUN: This instruction installs all the dependencies defined in the requirement text file using Pip, which is the Python package manager.
- WORKDIR: This instruction defines our working directory, which is /code.
- COPY: Again,I’m copying files from the source (src) directory to the working directory.
- CMD: The CMD instruction will execute the Python script (app.py)
FROM python:3.8 # Sets the base image
WORKDIR /code # Sets the working directory in the container
COPY requirements.txt . # Copy the dependencies file to the working directory
RUN pip install -r requirements.txt # Install dependencies
COPY src/ . # Copy the content of the local src directory to the working directory
CMD ["python", "./app.py"] # Command to run on container start
Next, let’s create a third Dockerfile using the base image Ubuntu. Here are the main instructions I’ll be using:
- FROM: The base image used here is Ubuntu version 12.04.
- MAINTAINER: This instruction is used to set details for the author of the Dockerfile. Here, I’m listing the name (ShankyM) and the version that I want to give to the Dockerfile.
- RUN: This instruction installs all the dependencies defined, such as updating the system, install Apache software, cleans all the cached items.
- ENV: This instruction sets 3 environment variables APACHE_RUN_USER, APACHE_RUN_GROUP and APACHE_LOG_DIR.
- EXPOSE: The Expose instruction informs Docker that the Docker container will be listening on the TCP port 80.
- CMD: The CMD instruction will execute the command to start the Apache software.
FROM ubuntu:20.04

MAINTAINER ShankyM version: 0.1

RUN apt-get update && apt-get install -y apache2 && apt-get clean && rm -rf /var/lib/apt/lists/*

ENV APACHE_RUN_USER www-data
ENV APACHE_RUN_GROUP www-data
ENV APACHE_LOG_DIR /var/log/apache2

EXPOSE 80

CMD ["/usr/sbin/apache2", "-D", "FOREGROUND"]
Dockerfile example – how to create a Docker image from a Dockerfile
In the previous section, we created three Dockerfiles using the NodeJS, Python, and Ubuntu Docker images as a base. I will now show you how to quickly create a new Docker image using these Dockerfiles.
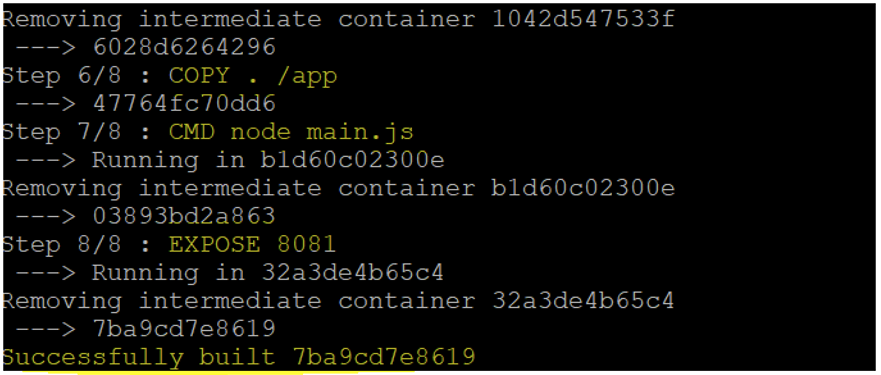
- For our first Dockerfile that uses NodeJS as the Docker base image, we’ll run the docker build command to create a new Docker image. Here, we’re adding a dot (.) after the build command to make it run in the current directory.
docker build .In the following figure, you can see that the new Docker image has been created and its Image ID (7ba9cd7e8619) is visible. After building a docker image, we get an image ID that can be used with other Docker components.
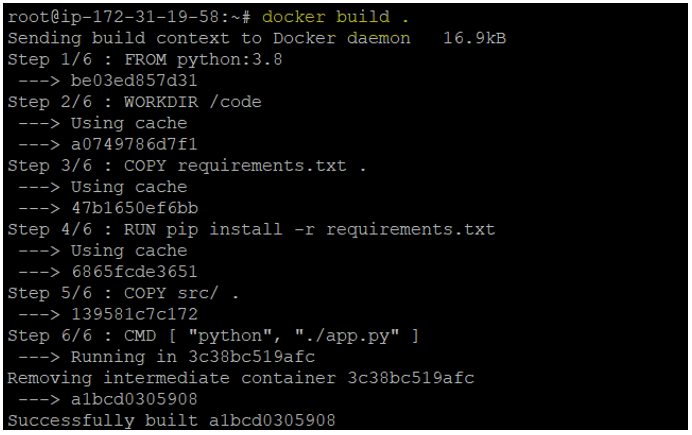
Let’s use our second Dockerfile to create another Docker image. Again, we’ll use the same docker build command.
docker build .That’s it, our new Docker Image has been created, and you can see the Image ID (a1bcd0305908) at the end.
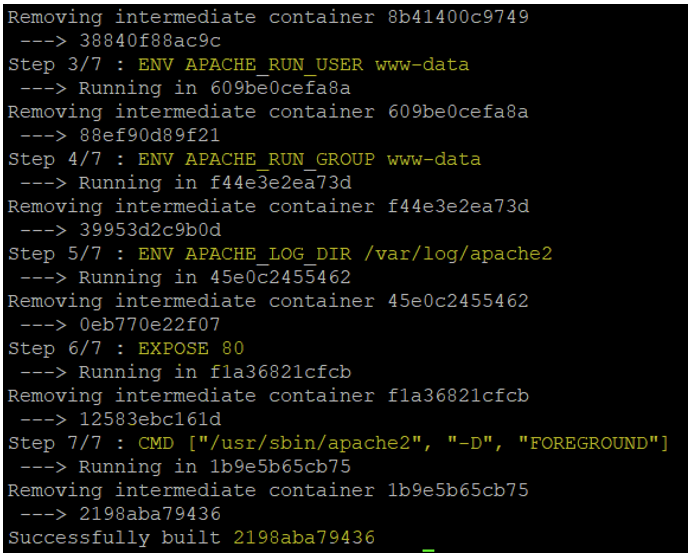
Finally, let’s use the docker build command with our last Dockerfile, and you should see the following results in your terminal window.
How to run a Docker image and create a container
To create or start a new container, you must use the docker run command. This command can be used to either start a container or run a command in a new container.
Let me show you how to quickly start a Docker container by using either an existing Docker image or one we’ve previously created with a Dockerfile. To run a container from the nginx image, you can simply run the docker run command as shown below.
docker run nginxIf you already have the image on your system, then the docker run command will use it. Otherwise, the image will be pulled from the Docker hub.
By default, Docker containers run inthe Foreground or Attached mode. Again, that means containers will be attached to the console or the standard output of the Docker container, and you will see the output on your screen.
To run a Docker container from the hello-world image, run the following command:
docker run hello-world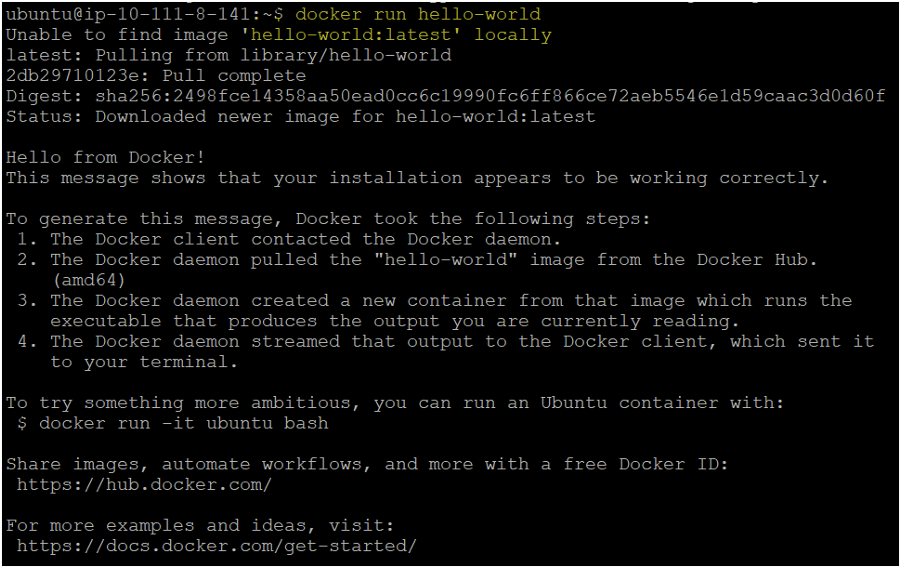
To run a Docker container using the Ubuntu image, you can run the following command.
docker run ubuntu
After executing this command, you can see that the container starts and exits immediately because unlike virtual machines, Docker containers are not supposed to host operating systems. Their purpose is to run any web application, web server, or other specific tasks.
After running a container from an image, you can allow it to sleep for a particular time. To do that, you can use the sleep command. Here, we’re indicating ‘5000’ as the number of seconds we want the container to sleep.
docker run ubuntu sleep 5000 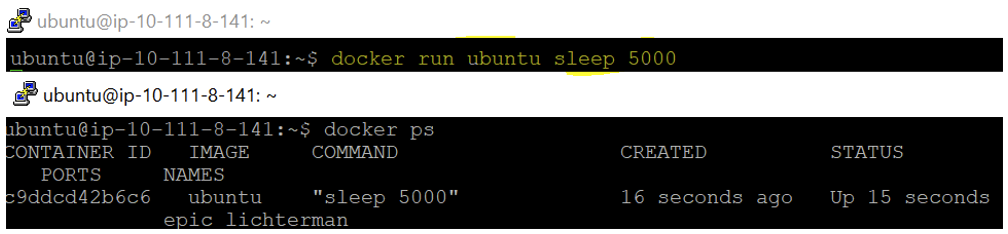
Conclusion
In this tutorial, we learned what is a Dockerfile is, what it contains and how you can create a Dockerfile. Dockerfile allows us to update or configure base images, and on top of those images, we can add software, and configurations, etc. according to the application’s requirement.
With this knowledge you are now ready to create a Dockerfile and launch Docker containers.

Sagar is a DevOps consultant and the founder of automateinfra.com. Sagar brings DevOps technology expertise to Petri.com, writing about Terraform, AWS Cloud, Microsoft Azure, Ansible, Kubernetes, Docker, Jenkins, Linux, and Windows.