Create an Azure RemoteApp Collection with VNET
This post is an update of a previous post that shows you how to create a RemoteApp collection that is connected to a VNet and a Windows Server Active Directory domain, using a simpler network design.
A Simpler Network Design
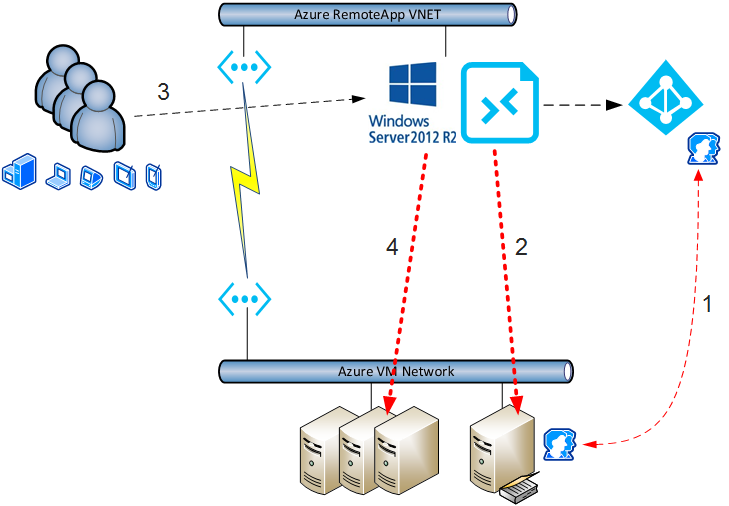
When Azure RemoteApp was released, it required a much more complicated network design to authenticate users against Active Directory and enforce Group Policy settings and restrictions, assuming that you wanted to run Active Directory in the cloud. The diagram below shows:
- RemoteApp was deployed into a dedicated virtual network.
- Active Directory domain controllers and other servers, such as file servers, were deployed onto another virtual network.
- Both virtual networks were connected via a VNet-to-VNet VPN connection, which required dynamic routing gateways; this route-based requirement caused compatibility issues with the majority of on-premises firewall appliances, and in turn, caused complications by adding site-to-Azure VPN connections to the solution.
Since I wrote my how-to article on how to create a hybrid RemoteApp collection, Microsoft has simplified the architectural requirements of RemoteApp. We now can deploy a “With VNet” app collection that can optionally use Active Directory, instead of being forced into the complicated hybrid app collection.
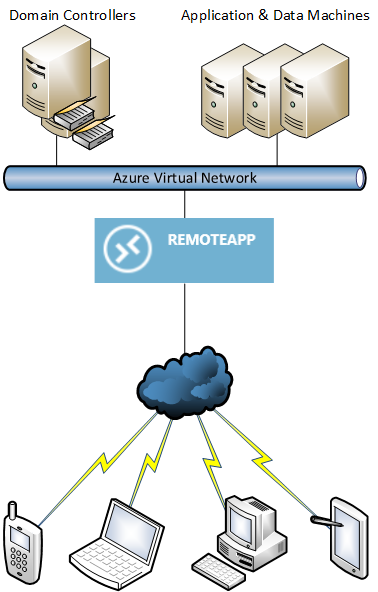
Now you can configure Azure to deploy the session hosts of a RemoteApp app collection to the same virtual network as your domain controllers and application and data virtual machines. Ideally, you’ll do the following:
- Use a dedicated subnet at no cost with enough IP addresses to service the required number of session hosts.
- Consider using security features, such as network security groups and firewall appliances to enforce network and application layer security between the RemoteApp session hosts and the other machine subnets.

Prerequisites
You will start by preparing a template of a session host in Azure and creating a machine template from that machine. Azure will deploy machines from this template to create your new session hosts — so yes; you need to install you required applications in the template and jump over any licensing or activation hurdles.
If you select the Active Directory authentication option, then you will need:
- Active Directory domain controller(s): Users will authenticate with and get GPO from the domain controllers when they sign into a session host.
- Azure AD that is synchronizing or federated with your domain: Users will authenticate with Azure AD when they sign into RemoteApp.
Retrieve the IP addresses of your domain controllers. Make sure that the virtual network is configured to use these IP addresses as the DNS servers.
Create a normal user account as a service account in your domain, for example, [email protected]. Create an OU to store the computer accounts of your Azure RemoteApp session host computer accounts. Grant the service account the following rights to that OU:
- Create computer objects.
- Delete computer objects.
Deploying the RemoteApp App Collection
At this time, you must use the classic management portal and Service Management (Azure V1) instead of Azure Resource Manager (ARM).
Browse to RemoteApp in the management portal and enter “Template Images.” Click “Add,” and select “Import An Image From Your Virtual Machines Library.” This allows you to import your previously created and sysprepped/captured virtual machine image into RemoteApp and makes it available for building new session hosts. Select the image, and check the box to confirm that you have met all of the requirements. Give the image a name and put it into the same region as your desired RemoteApp deployment.
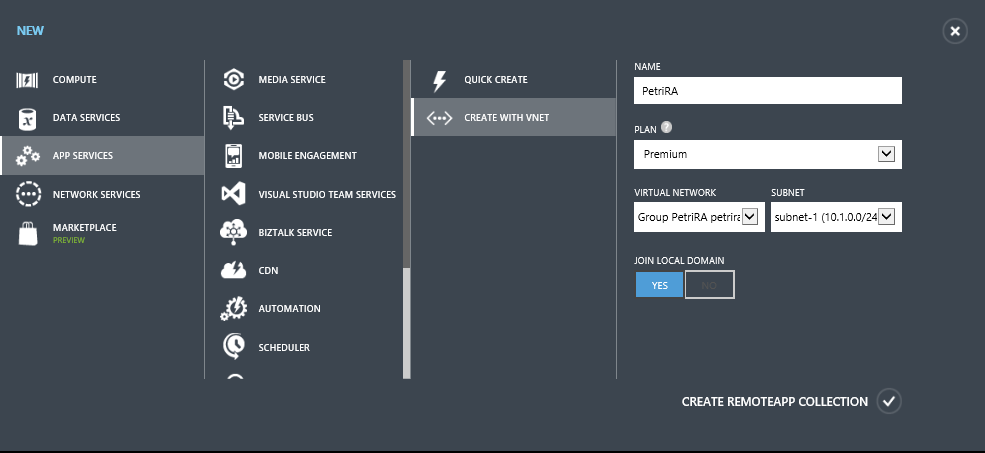
Click New > App Services > RemoteApp > Create With VNet to start creating a With VNet app collection. Enter in details:
- The name of the app collection.
- Determine which of the four plans that you want to use.
- Determine which VNet and subnet that you want Azure to use for the app collection session hosts (terminal servers).
- Choose if you want this app collection to join a domain or not.
An unconfigured app collection is created after a few minutes and awaits your domain and template configurations.
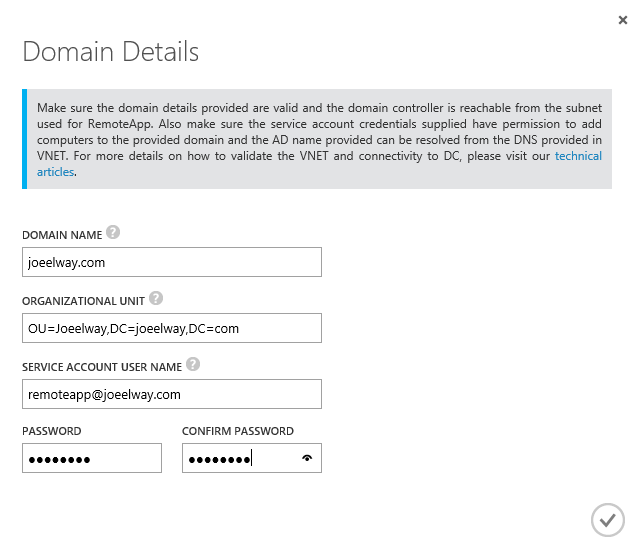
- Domain Name: Enter the FQDN of the AD domain.
- Organizational unity: Supply the LDPA distinguished name of the OU that you created for RemoteApp computer accounts.
- Service Account User Name: Enter the UPN of the user account that has rights over the above OU.
- Password: Supply the password of the service account.
Back in the quick start screen, click “Link A Template Image,” and select your sysprepped virtual machine template that you previously captured. For testing, you can use a 30-day trial or an Office 365 image. After the image is linked, Azure will attempt to deploy the session hosts of your app collection — if there’s a failure, then double-check your AD join and virtual network DNS configurations.
It will take around 45 minutes to deploy the virtual machines for your app collection session hosts. Like normal computers, they will apply Group Policy, which you can and should manage.
Users can then download the RemoteApp client for Windows or use the mobile Remote Desktop app for iOS, Android, or Windows with Continuum support for phones. The users will sign into the RemoteApp service once via Azure AD using their UPN ([email protected]) and see a list of published applications. When they connect to their first application, they will be prompted to sign into the session hosts via legacy Active Directory, thus getting Group Policy, which you can and should manage.


![A new and un-configured RemoteApp app collection [Image Credit: Aidan Finn]](https://petri-media.s3.amazonaws.com/2016/04/NewRemoteAppCollectionInputRequired.png)
