Configuring Simple Storage Spaces in a Failover Cluster
In this blog post we will show you how to configure the JBOD storage space in Windows Server to create a failover cluster. This cluster can then be used to create a small Hyper-V cluster or an SMB 3.0 Scale-Out File Server (SOFS). The following example has been done using Windows Server 2012 R2, but the instructions include Windows Server 2012.
How to Configure Storage Spaces in a Failover Cluster: Physical Storage
In this solution we will deploy two clustered servers with a single JBOD (Just a Bunch of Disks or Just a Bunch of Drives) tray. Storage space will be created on the JBOD and be made available to applications, such as a SOFS (to share using SMB 3.0 to other servers) or Hyper-V which will be running on the two servers.
The first step will be to acquire the servers and the storage. Please consult the Windows Server Catalog to find a selection of storage that is supported for Storage Spaces. Use the guidance of that vendor to purchase disks and to cable the storage to the servers. And then you will create a normal Windows Server Failover Cluster; do not add the disks of the JBOD to the cluster during this step. The disks will be managed by Storage Spaces as a single entity.
Creating a Storage Pool
- Open Failover Cluster Manager and connect to the new cluster.
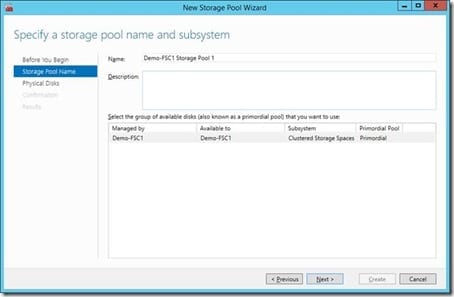
- Browse to Storage > Pools. Right-click and select New Storage Pool. Give the new storage pool a descriptive name, an optional description, and select the set of primordial disks (pool) from the JBOD. Primordial disks are unformatted disks that have not been assigned to any purpose.
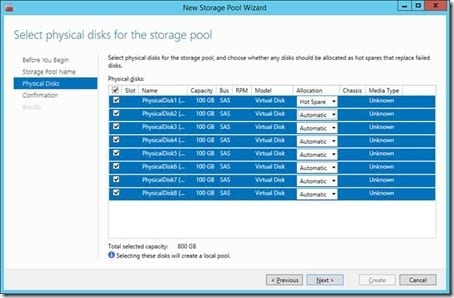
- The next step is to select the physical disks from the JBOD (the primordial pool) that will be used in the new storage pool. You can select individual disks or check the box at the top left to select all disks. Allocation allows you to configure hot spare disks. These are disks that remain unused until another disk has a detected failure; supported JBODs use a communications mechanism called SCSI Enclosure Services (SES) to share information with the attached servers. A hot spare is automatically used to recover redundant data to replace the dead disk.
Note that in Windows Server 2012 R2, the use of hot spares will not be recommended. Instead, a storage pool with sufficient free space can automatically perform a parallel repair process to copy redundant slabs to the remaining active disks in the pool. This parallelism allows a repair process to be completed more quickly than using a single hot-spare disk where that disk’s solo IOPS become a bottleneck … and there’s a potential risk of data loss during that recovery period if other disks fail at the most inopportune time. A new disk is added to replace the dead drive and the pool uses it simply as new capacity.
A new cluster pool will appear under Pools in Failover Cluster Manager once the New Storage Pool Wizard is completed. You don’t have usable storage just yet; you need to provision virtual disks with your chosen type of fault tolerance first.
Creating a Virtual Disk
- You can start the New Virtual Disk Wizard by right-clicking on the storage pool in Failover Cluster Manager and selecting New Virtual Disk. The first step will be to select the storage pool that you want to consume raw storage space from; remember that you might have more than one storage pool.
- Give the virtual disk a name. Note that in Windows Server 2012 R2 you can enable tiered storage for this virtual disk if you have a storage pool that is made up of SSD and HDD disks (maximum of two tiers).
The next step is to select the disk fault tolerance of the new virtual disk. You have three choices:
- Simple: No-fault tolerance at all and the best overall performance.
- Mirror: Copies of data are spread across two or three disks depending on the type of mirror chosen (two-way or three-way). Mirroring consumes the most space from the storage pool but gives the best blend of fault tolerance and performance.
- Parity: Data is made redundant across disks using parity. Single-parity keeps two copies of your data with a minimum of three disks in the pool and dual-parity retains three copies of your data with a minimum of five disks in the pool. Parity gives the best mix of fault tolerance and free space, but it comes with reduced write performance.
Note that WS2012 clusters only support Simple and Mirror virtual disks. Support for parity was added in WS2012 R2. It is recommended that you label the volume with the same name as the virtual disk to make this design self-documenting. The volume will eventually be used as a Cluster Shared Volume either by the Scale-Out File Server cluster role, or directly by Hyper-V running on the cluster members.
You will have resiliency options if you have chosen to create either a mirror or a parity virtual disk.
- The next step is to specify the size of the new virtual disk.
- At the end of the wizard you will have the option to continue into formatting the new volume. This is a good idea. It is recommended that you use label the new volume with the name of the virtual disk; this will make troubleshooting and documentation much easier.
Do not assign a drive letter; there is no point in doing this because the resulting volume will eventually be used as a Cluster Shared Volume (CSV) either in a SOFS or a Hyper-V cluster. In Windows Server 2012 R2 you have a newly supported option to format this future CSV with ReFS instead of NTFS; this is great for huge volumes because there is no CHKDSK in ReFS.
Cluster Shared Volume
The new disk will appear under Available Disks in Failover Cluster Manager. Once again, it is a good idea to rename this disk (under properties) to match the volume label and virtual disk name to make troubleshooting and documentation easier. Once done, you can convert the volume into a CSV by right-clicking on the disk and selecting Add To Cluster Shared Volumes.
The resulting CSV appears in C:\ClusterStorage as a mount point called Volume1 on every host in the cluster. This means the new virtual disk is active on every server in the cluster at once, making it a cluster file system. You can rename the anonymous sounding Volume 1, once again to match the cluster disk, the volume label, and the virtual disk name.
A useful rule of thumb is to have one CSV for each node in the cluster. WS2012 R2 will automatically balance the CSVs across each node.
Using The Cluster
This cluster and storage can now be engineered into:
- A small Hyper-V cluster that uses the shared storage in the storage pool.
- A SOFS with scalable and transparent failover storage thanks to the active/active nature of SMB 3.0 and the CSVs that are created in the resilient storage pool.
This implementation is the simplest possible architecture of Storage Spaces. It can use:
- Multiple JBODs with mirroring.
- More than two servers per JBOD depending on storage vendor support (four servers per JBOD is not unusual).
- Multiple servers connected to multiple JBODs.
- Clusters that scale out with multiple footprints of servers and JBODs with a single cluster administration point.


