- Blog
- PowerShell
- Post
Understanding PowerShell Objects

One of the features that both makes PowerShell so easy to use yet sometimes difficult to learn is its focus on objects. I have taught PowerShell objects to many people over the last 10 years and this is not as difficult as people make it out to be.
That is to say, I think many beginners get it into their heads that because PowerShell is based on the .NET Framework, and there is all this talk about objects, that they need to start thinking like a developer. Absolutely not.
Understanding PowerShell Objects
I always teach PowerShell as a management tool first. PowerShell is made up of numerous building blocks; it is up to you to combine the building blocks into an expression or series of expressions that accomplishes a given task. The big paradigm jump is to realize that when you are running PowerShell commands, you are working with objects and not text output. So let’s take a quick look at objects in PowerShell.
What is a PowerShell object?
A PowerShell object is some thing that was created by a developer. Objects have a name, properties, and methods. Properties describe the PowerShell object and methods are actions you can perform on it. We don’t care how the object was developed or how it works internally. It is essentially a black box. There are additional elements, like events, but those are advanced features that you aren’t likely to need.
Let’s look at this from the perspective of a real-world object, a boat. We’ll also consider some boat specific commands.
First off, the name of the object is boat. This can also be referred to as the typename. Understanding the object name is important because you might want to research information about the boat type. Or you want to be able to identify commands that can work with a boat object. I know we’re jumping the gun a bit, but you can get the typename by piping a boat object to Get-Member. This cmdlet will also show you other parts of the object, referred to as its members.
Properties
An object has a set of attributes that describe it. These are the objects properties. These are defined by the developer responsible for designing the PowerShell object, although eventually you will learn in PowerShell how to add your own. For now, let’s look at the boat. Some properties are read-only, meaning you can’t change them. For example, a boat might have these constant properties once it is created. All you can do is get them.
|
|
Other properties can be modified, meaning you can get and set them.
|
|
In addition, some properties might be nested objects. In the boat example, there is most likely an Engine property. But Value is an entirely separate PowerShell object with its own set of properties.
|
All of these properties will have values that themselves are also types of objects. But don’t worry. I’m talking about things like text ([string]), numbers ([int]) and dates ([datetime]). All of these settings describe the current state of the boat.
To reference any of these properties you use a dot notation. On the left side is a reference to the object, such as a variable. On the right side is the property name. You could get the name of the boat like this:
$boat.name
For nested objects, you can “drill” down:
$boat.engine.installdate.year
This example assumes the InstallDate property is a DateTime object which itself has a Year property.
Methods
An object usually has a set of methods. These are actions you can do to the boat or have the boat do. Here’s a short list that comes to mind for our boat object.
- Start
- Stop
- DropAnchor
- PullAnchor
- SetSpeed
- Sell
Again, these methods are created by the developer. We don’t care how they work, only what they are called and how to use them. You can invoke them using the same dot notation.
$boat.Start()
Some methods don’t require any customization. To start the boat we simply need to invoke the method, although we do need to include the parentheses even if there are no parameters.
Other methods might require parameters. For example, the Sell() method might need a parameter for the new owner name, a purchase price, and the date. Programmatically it might look like this:
Sell([string]Name,[int]$Price,[datetime]Date)
If I were forced to use this native method, it might look like this in PowerShell:
$boat.Sell("BlairK",20000,"6/1/2016")
Now, before you tell yourself you’ll never learn this, let me point out that you shouldn’t have to directly invoke object methods. At least not until you gain experience and better understand where it makes sense to do so. Instead, you should look for cmdlets and other tools that will do the work for you.
Commands
Ideally, whoever created the boat object, also created a set of cmdlets for managing them. Cmdlets are easy to discover, easy to use, and can add features like support for Whatif and Confirm. You shouldn’t be forced to use .NET techniques to work with objects in PowerShell. Instead there might be a cmdlet like Get-Boat.
$boat = Get-Boat -manufacturer Manitou -model Oasis
The author of the Get-Boat cmdlet is responsible for creating a boat object, with all of the necessary properties and writing it to the pipeline. There might be another cmdlet called Set-Boat that allows you to set things like the name. Ideally, this cmdlet will be designed to recognized pipeline input for boat objects.
$boat | Set-Boat -Name "The Pipeline Queen" -Undock
Of course, we may want to then start the boat and start driving it.
$boat | Start-Boat -passthru | Set-Boat -speed 20
Behind the scenes, the cmdlets are using the object’s native properties and methods. But we don’t care. The cmdlets provide the interface we need for managing boat objects. If the cmdlets are well-written, we can pass the boat object from one command to another in a single expression.
$boat = Get-Boat -manufacturer Manitou -model Oasis | Start-Boat -passthru | Set-Boat -speed 20 -Name "The Pipeline Queen" -Undock -passthru
We never have to manipulate text. At the end of the pipeline, PowerShell will write any objects to the hosting application. And at that point, you see text on the screen. In my pseudo-example, I’m saving the result to a variable that I can then use in my PowerShell session.
Real-world objects in PowerShell
Once you understand my hypothetical examples, it shouldn’t be that much of a leap to work with objects in PowerShell. For example, Get-Process will get a collection of process objects. If you pipe these objects to Get-Member, you’ll see that many properties are read-only, meaning you can only get them. While other properties could be set. And there are methods as well for terminating processes. But you don’t need to necessarily know how to use the methods, all that matters are the associate cmdlets.
get-process -name notepad | stop-process
Perhaps the trickiest part of working with objects in PowerShell is that things can change inside the pipeline.

Even though the command started with process objects, the end result is a different type of object created by Group-Object. I find it helpful to be able to visualize what is happening in the pipelined expression: “Get all processes where there is a Company property. Then group the results by the Company property, sort the group objects by the Count and Name in descending order. And then select the first 5 objects.”
This works because I learned about the Company property on Process objects. And the Count,Name properties for GroupInfo objects. Not once did I think about parsing or grepping any of the text on the screen. The object nature of PowerShell made this an easy task that didn’t require any programming or scripting.
Even so, I know this object concept can still be a struggle to embrace and understand. So, take some time trying things out in PowerShell. Look at cmdlet help and examples. And start trying to visualize what is happening behind your commands. Once this clicks, I think whole new worlds of opportunity will open for you.
Working with PowerShell objects in the pipeline
Here’s an expression I recently came across online as a proposed solution to get a list of running Hyper-V machines, whose name starts with CHI. Additionally, this expression works by saving information to a text file. I’ve tweaked it slightly to fit my environment.
$vms = get-vm | where {$_.name.startswith("CHI") -and $_.state -eq "running"}
$date = get-date
$vms | foreach {
    $msg = "{0}`t{1}`t{2}`t{`3}`t{4}" -f $Date,$_.status,$_.uptime,$_.state,$_.name
    $msg >> c:workvms.txt
}
I can’t argue that code doesn’t work, because it does.

However, my argument is that the PowerShell solution does nothing to embrace the PowerShell paradigm. When I see code like this, I get the sense the author is still trying to manipulate text and isn’t thinking about working with cmdlets that write PowerShell objects to the pipeline. I’ve written about this concept before, which you can read in my series on extending objects in the pipeline.
Once you get your head around that mindset, PowerShell becomes easier to write and offers more flexibility. Although this example is using the Get-VM cmdlet, what I want to explain applies to other cmdlets.
Getting data from a single cmdlet
The ultimate goal is to extract a subset of meaningful data. In this instance, the data comes from a single cmdlet.

The first part of the process is to limit the results to virtual machines that start with CHI and are running. Your first step should be to look at help.

Use Where-Object when a cmdlet doesn’t allow filtering
This cmdlet doesn’t have any filtering capabilities, which means we’ll need to resort to using the PowerShell Where-Object cmdlet. That’s fine. But if there’s a way to do any sort of filtering at the beginning, we want to take advantage of the PowerShell object capabilities. Actually, there’s another filtering requirement and that’s to limit results based on the virtual machine name.

Ideally, we could use a wildcard for the PowerShell object name, although the help says we can’t. Although I always encourage you to read the help, it isn’t infallible.

In this case, there’s no harm in trying, and look at that, it works! This means I can use a simpler filter for Where-Object.
Get-VM -name "chi*" | where {$_.state -eq "running"}

Use Select-Object to display properties
The original need was to display a few properties. If you need to do that, then use Select-Object.
Get-VM -name "chi*" | where {$_.state -eq "running"} | Select Status,Uptime,State,Name

Add custom properties using a hashtable
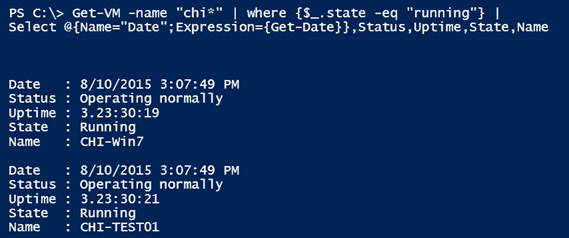
There was also a need to display the current date and time. Select-Object is already writing an object to the pipeline with the properties that interest us. We can easily add a custom property with a hashtable.
Get-VM -name "chi*" | where {$_.state -eq "running"} |
Select @{Name="Date";Expression={Get-Date}},Status,Uptime,State,Name
The name value will the name of the new property (Date), and the value will be the result of the Expression scriptblock, which in this case is the result of running Get-Date.
If you are following along at home, I’ve taken a four-step process and simplified it to a one-step command. The original command displayed results in a tabular format. If you need a table, then tell PowerShell to make you one.
Get-VM "chi*" | where {$_.state -eq "running"} |Select @{Name="Date";Expression={Get-Date}},Status,Uptime,State,Name | Format-Table -AutoSize

Or maybe you want something more like the original output without any column headings. If you take the time to read help for Format-Table, you’ll discover you can do that with PowerShell object handling.
Get-VM "chi*" | where {$_.state -eq "running"} |
Select @{Name="Date";Expression={Get-Date}},Status,Uptime,State,Name |
Format-Table –HideTableHeaders -AutoSize

Use Out-File to save the results to a text file
The last piece of the original command is to save the results to a text file. The original code used the legacy redirection character, >>. Although it works, I’m not a big proponent of its use because it brings nothing to the PowerShell party. I much prefer and recommend to use the cmdlet designed for sending output to a text file, Out-File. One of the benefits is that you can control the encoding.
Get-VM -name "chi*" | where {$_.state -eq "running"} |
Select @{Name="Date";Expression={Get-Date}},Status,Uptime,State,Name |
Format-Table |
Out-File -FilePath d:workvms.txt -Encoding ascii

The other benefit of understanding the pipeline is that I didn’t have to try and do something with each virtual machine using ForEach-Object, as in the original example. Of course, there will be situations where that makes sense. And knowing when, I think, comes from experience.
But now I’ve taken a multi-line command, which was designed to create a piece of text for each virtual machine with relevant information, to a one-line command that wrote an object to the pipeline. With all of the information I needed. I then used other PowerShell commands to get the results into the desired format.
Working with object data
In the section above, I guided you through the process of working with objects in the pipeline. I want to explore a few more reasons why I think this is important.
Export strings to a text file using Export-CSV
In the original code sample above, the author was creating a tabular separated file. That is, a CSV that uses a tab instead of a comma as the delimiter. This is something I see people struggle with all the time. They spend a lot of energy trying to create strings and saving them to a file. When all they need to do is take some time to read PowerShell help and experiment with the Export-CSV cmdlet.
This is a one line expression that creates practically the same result as the original, text-oriented code.
Get-VM -name "chi*" | where {$_.state -eq "running"} |
Select @{Name="Date";Expression={Get-Date}},Status,Uptime,State,Name |
Export-Csv -Path c:workrunning.csv -Delimiter "`t" -NoTypeInformation
Comma-delimited vs tab-delimited files
Personally, I would have stuck with the default comma delimiter, but as you can see it isn’t difficult to modify a PowerShell object output.

Create a log file and take actions on your PowerShell object at the same time
Let’s go a step further and use PowerShell to create a log for any running VM. And start any that aren’t currently running.
Get-VM -name "chi*"| foreach -begin {$running=@()} -process {
   if ($_.state -eq "running") {
   #log it
   $running+= $_
} #if running
   else {
   #start it
   $_ | Start-VM -WhatIf
 } #else start it
} -end {
  #log running
  $running | Select @{Name="Date";Expression={Get-Date}},Status,Uptime,State,Name | Format-Table -AutoSize | Out-File -FilePath C:workvmreport.txt -Encoding ascii
}
As I’ve said before, this isn’t a Hyper-V tutorial. I just happen to be using Get-VM and Start-VM for my example. When I run this in the PowerShell ISE, I get the WhatIf message for the single VM that’s not running:

Otherwise, I create the text file. All of this works because I’m writing VM objects to the pipeline. In this case, I need to use PowerShell’s ForEach-Object cmdlet because I need to do something for each object in the pipeline, depending on the status property.
Next, I create an empty array in the begin scriptblock and add each matching VM object to it. In the end scriptblock, I select what I need, format it, and create the text file. If you can visualize the process, I think you’ll find this much easier.
More than likely, this is a process you want to repeat. And you don’t want to have to type it every time, so you can copy and paste the commands into a script file.
#requires -version 4.0
#requires -module Hyper-V
[cmdletbinding(SupportsShouldProcess)]
Param(
[Parameter(Position=0,HelpMessage="Enter a virtual machine name")]
[ValidateNotNullorEmpty()]
[string]$Name = "*",
[Alias("cn")]
[ValidateNotNullorEmpty()]
[string]$Computername = $env:Computername,
[ValidateNotNullorEmpty()]
[string]$Path = "D:workvms.txt"
)
Try {
    Write-Verbose "Getting virtual machines $Name from $Computername"
    $vms = Get-VM -name $name -ComputerName $Computername -ErrorAction Stop
    $vms | foreach -begin {$running=@()} -process {
    if ($_.state -eq "running") {
        #log it
        $running+= $_
    } #if running
    else {
        #start it
        Write-Verbose "Starting virtual machine $($_.Name)"
        $_ | Start-VM
    } #else start it
} -end {
    #log running
    Write-Verbose "Creating log file $path"
    $running |
    Select @{Name="Date";Expression={Get-Date}},Status,Uptime,State,Name |
    Format-Table -AutoSize | Out-File -FilePath $Path -Encoding ascii
}
} #Try
Catch {
    Write-Warning "Failed to get virtual machines on $computername. $($_.exception.message)"
} #Catch
#end of script
I’ve added some parameters, including validation tests, error handling, and support for WhatIf. This makes it flexible and easy-to-use.

Conclusion
If you think of this script as a canned PowerShell session, you may be quite happy with the result. The script that I’ve come up with is essentially a playback of commands that you would have typed interactively with the added benefits of things like error handling.
Because everything has been scripted, I’m also ensured of consistency. It doesn’t matter who runs the script. As long as they have they necessary credentials, the script will execute the same every time for every user. This is a powerful benefit, often overlooked, when it comes to PowerShell automation.
All of that said, even though this works, fundamentally I think there’s a better approach to all of this, and I’ll go into that in more detail in another article.
FAQs
How can I create custom PowerShell objects with multiple properties dynamically?
You can create custom PowerShell objects using the New-Object cmdlet or PSCustomObject. Define properties using a hash table and use Select-Object to transform them into PowerShell objects. This allows for dynamic property creation based on your needs.
What’s the difference between PowerShell objects and COM objects when working with automation?
PowerShell objects are native .NET objects that offer better performance and integration with the PowerShell environment, while COM objects are legacy Windows components. PowerShell objects provide more consistent behavior and better error handling compared to COM objects.
How do I convert PowerShell objects to JSON for API integration?
Use the ConvertTo-Json cmdlet to transform PowerShell objects into JSON format. You can specify the depth of conversion and handle complex nested PowerShell objects while maintaining data integrity for API communications.
Can PowerShell objects be stored in a database directly?
PowerShell objects need to be serialized before storing in a database. Use Export-Clixml for XML serialization or ConvertTo-Json for JSON format. You can also use SQL Server’s PowerShell provider to interact with databases while maintaining object properties.
What’s the best practice for handling large collections of PowerShell objects?
When working with large PowerShell object collections, use pipeline processing and avoid loading everything into memory. Implement filtering early in the pipeline, utilize Where-Object efficiently, and consider using ForEach-Object for batch processing.

Jeffery Hicks is an IT veteran with over 30 years of experience, much of it spent as an IT infrastructure consultant specializing in Microsoft server technologies with an emphasis on automation and efficiency. He is a multi-year recipient of the Micr...


