The Security Configuration Wizard (SCW) first appeared in Windows Server 2003 Service Pack 1. It helps organizations reduce the attack surface on production servers.
Much has changed since Microsoft first launched the Security Configuration Wizard. Back in the days of Windows 2000 and Windows XP, Windows wasn’t considered secure out-of-the-box. Today, with the exception of highly sensitive deployments, Windows client and server are pretty secure from the get go. Only ill-advised reconfigurations, such as disabling User Account Control (UAC), make the OS less secure than it could be.
Introducing the Security Configuration Wizard
Despite the vastly improved security of Windows Server since SCW was first included in the OS, it can still be used to improve security and ensure that servers are configured using an identical security policy. SCW isn’t the only free tool from Microsoft that can help organizations achieve this but SCW is best suited to small and medium sized organizations with limited IT support on hand.
A Word of Warning
Modifying security settings from the default settings presents risks of creating application compatibility or network connection problems. In the worst case scenario, you could lose access to a remote server. This would be especially catastrophic if it is located in a remote datacenter with no Integrated Lights Out facility.
Any security policies created using SCW should be thoroughly tested in a pre-production environment. When you begin to apply security policies on production servers, there should be a back out plan that doesn’t rely on SCW’s rollback feature. If you suddenly can’t make a connection to the server, you might not be able to perform a rollback so easily!
Do I Need to Run the Security Configuration Wizard on My Servers?
The short answer is, quite possibly not. Default configurations should always be modified with caution. Following simple industry best practices such as not using domain administrator accounts to perform everyday administration tasks on servers and desktops, can significantly reduce the risk of servers being compromised.
If you decide to create your own security policy, or apply a custom security template not provided by Microsoft, you also risk putting the server out of support. For instance, Microsoft may refuse to support your server if you are not using a default configuration as provided by them; whether that is Windows Server as configured out-of-the-box, or a template provided as part of the Security Compliance Manager (SCM) tool.
Evaluate the potential risk for each server in your production environment. How likely is it to be targeted and by what means? If a risk is identified that can be mitigated by using the Security Configuration Wizard, test a security policy in a pre-production environment to make sure it doesn’t affect line-of-business activity. Also don’t forget that extra configuration above the default settings potentially increases complexity, making troubleshooting harder if a problem arises.
Create a New Security Policy
Now that we understand the possible problems and risks of applying our own security policies to Windows Server, let’s start by creating a new security policy using SCW on a test server. All the instructions in this article apply to Windows Server 2012 R2. The options and results you see in earlier versions of Windows will differ slightly. The screens presented in the wizard vary slightly depending on whether the targeted server is a domain controller, member, or standalone server.
- Log in to Windows Server 2012 R2 with local administrative privileges.
- Launch Server Manager using the icon on the desktop taskbar or from the Start screen.
- In Server Manager, select Security Configuration Wizard from the Tools menu.
- Click Next on the welcome screen of the wizard.
- On the Configuration Action screen, select Create a new security policy and click Next.
- On the Select Server screen, make sure the name of your server is displayed in the box and click Next. You will need to wait a few seconds while the wizard processes the local security database.
On the Select Server screen it’s possible to select a server other than the one that you are currently logged in to. If you select a different server, you must have local administrative privileges on that server if you intend to apply the policy at the end of the wizard.
- If you want to look at the information collected about services, roles and firewall rules in more detail, you can click View Configuration Database on the Processing Security Configuration Database screen. Otherwise, click Next to continue.
Server Roles, Features and Additional Options
In this section of the wizard, we will configure what Server Roles, Features and other options the security policy should include.
- Click Next on the Role-Based Service Configuration screen. This part of the wizard collects data on the roles and features installed on the server so that a rule set can be determined for service and firewall configuration.
- On the Select Server Roles screen, check the list of installed roles to make sure it corresponds to the functions your server performs. To make it easier to check the list, you can choose Selected roles from the View menu. Once you’re done, click Next.
- Now do the same for installed features on the Select Client Features screen. If the server is joined to an Active Directory domain, check that Domain Member is selected. Click Next to continue.
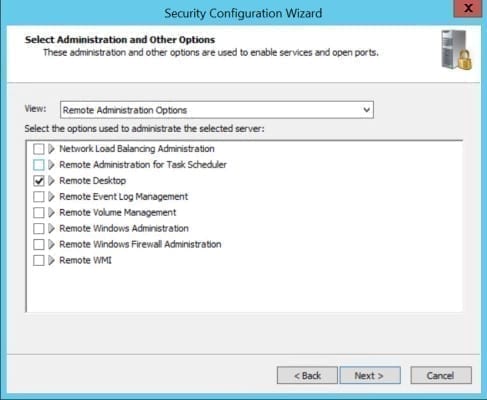
- On the Select Administration and Other Options screen, check the list of selected options. If you need more information about any of the available options, click the arrow to the left of the description.
In this example, I want to check Remote Desktop in the list because I use it for remote administration of the server. If it’s not selected, SCW disables the service in the policy. Note that in the figure below I selected Remote Administration Options from the menu just to make it easier to find the Remote Desktop option.
Select Administration and Other Options in the Security Configuration Wizard
- Finally, check any other services your server requires on the Select Additional Services screen and click Next.
- On the Handling Unspecified Services screen, decide how you want services not specified in the policy to be dealt with. You have the option to ignore any services not specified in the policy and allow them to run unchanged, or to disable services not included in the policy by selecting Do not change the startup mode of the service or Disable the service respectively. Click Next to continue.
- The Confirm Service Changes screen displays a handy summary of the current service configuration on the server and how it will change after the policy has been applied. Check through the list to make sure there will be no nasty surprises and click Next to continue.
Network Rules
The next part of the wizard configures Windows Firewall rules.
- Click Next on the Network Security screen to continue.
- The Network Security Rules screen shows a list of firewall rules required for the roles and features installed on the server.
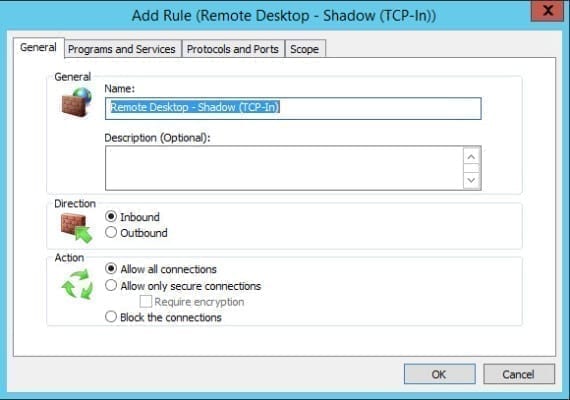
Here you can add and edit rules as necessary, but you’ll likely want to accept the rules as determined by the wizard. Even though a rule exists for Remote Desktop (TCP-In), it’s not enough to make a Remote Desktop Connection to your server. You’ll need to add three rules to enable Remote Desktop.
- Click Add on the Network Security Rules screen.
- In the Add Rule dialog, type Remote Desktop – Shadow (TCP-In) in the Name: field.
- Under Action, make sure that Allow all connections is selected.
- Switch to the Programs and Services tab. Under Programs, select This program. In the This program field, type %SystemRoot%system32RdpSa.exe
- Switch to the Protocols and Ports tab. Set the Protocol Type to TCP. Leave the Local Port and Remote Port options set to All Ports.
- Click OK to add the new rule.
- Add a second new rule but this time call it, Remote Desktop – User Mode (TCP-In). Set the This program field to %SystemRoot%system32svchost.exe and set Local Port to Specific Ports and type 3389 in the field below the menu.
- Add a third rule. Call it, Remote Desktop – User Mode (UDP-In). Set the This program field to %SystemRoot%system32svchost.exe and set Protocol Type to UDP instead of TCP. Set Local Port to Specific Ports and type 3389 in the field below the menu.
- Now that you have the three rules necessary for Remote Desktop Access in the list, you can click Next to continue.
Set Windows Firewall rules for Remote Desktop
The Windows Firewall rules allow any device to connect to Remote Desktop Services on TCP port 3389. Although Microsoft Azure uses random ports for Remote Desktop by default, no special rule to accommodate this is required on Azure VMs so the default firewall rules that use port 3389 will work properly.
Registry Settings
Now let’s configure the server’s registry settings for LAN manager authentication. While Active Directory uses Kerberos authentication by default, it is sometimes necessary to use older authentication protocols for legacy applications.
- Click Next to continue on the Registry Settings screen.
- On the Require SMB Security Signatures screen, check the attributes that your server meets. Your answer will be used to determine SMB protocol security settings.
(Critical Note: If you check the first criteria, be absolutely certain all clients on your network meet the requirements otherwise they will not be able to connect to the server. Click Next to continue.) - If you are running the Security Configuration Wizard on a domain controller, you will see the Require LDAP Signing screen. If all servers and devices in your domain and any trusted domains meet the requirement, check Windows 2000 Service Pack 3 or later and click Next.
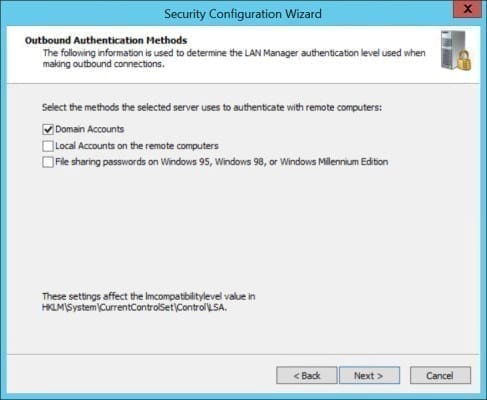
- If your server is a member of an Active Directory domain, check Domain Accounts on the Outbound Authentication Methods screen and click Next.
This sets the LAN manager compatibility level in the registry. It is preferable to leave the other two options unchecked unless you have a requirement to authenticate using local accounts or file sharing passwords. Beware that local accounts are often used for authentication, even on servers joined to a domain.
LAN manager compatibility level
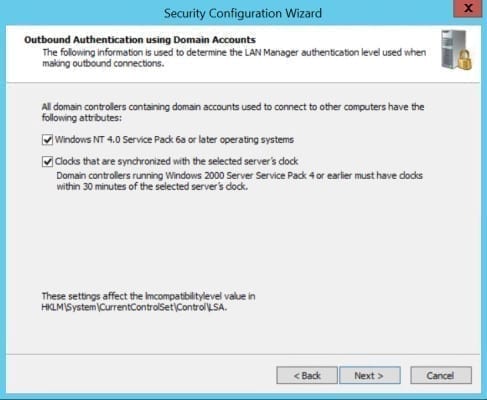
- As we selected Domain Accounts on the previous screen, we are now presented with the Outbound Authentication using Domain Accounts screen. If you check both options on this screen, NTLMv2 will be forced. Click Next to continue.
Both LM and NTLMv1 are considered insecure and should be disabled whenever possible. There are some legacy applications that rely on these protocols so you should test these settings thoroughly before configuring production servers.
Outbound Authentication using Domain Accounts
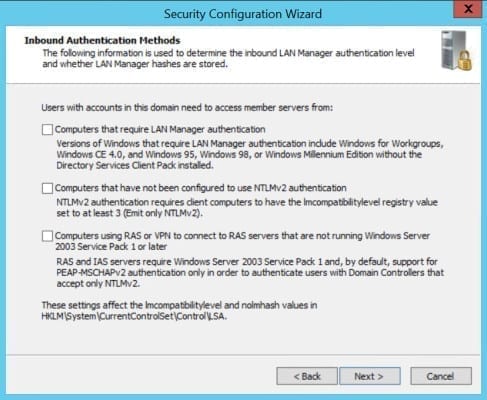
- On the Inbound Authentication Methods screen, it’s preferable to deselect all the options for best security, as shown in the figure below. Click Next to continue.
Note: If you have computers running Windows XP or earlier or their Windows Server equivalents, you need to make sure they are configured to work with NTLMv2 authentication before configuring servers to respond only to NTLMv2.
Inbound Authentication Methods
- Check the summary displayed on the Registry Settings Summary screen and click Next.
Configure Auditing
The auditing section of the wizard allows you to increase the auditing level over what is configured as standard in Windows Server.
- Click Next on the Audit Policy welcome screen.
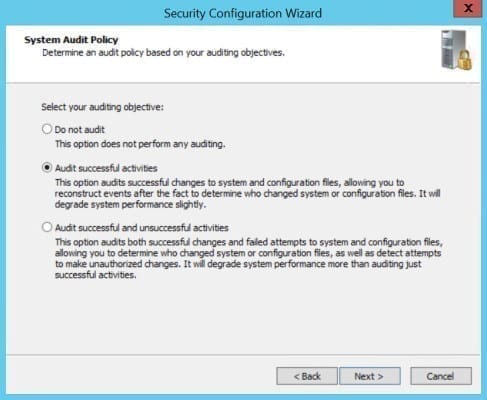
- There are three simple levels of auditing to choose from, as shown in the figure below. Decide whether you want to audit just successful activities, or both successful and unsuccessful activities. Click Next.
System Audit Policy configuration
- On the Audit Policy Summary screen, check the resulting settings to be applied. These are shown in the Policy Setting column. If you opt to include the SCWAudit.inf security template to audit the file system, remember that this action cannot be undone using the wizard’s rollback feature.
Save and Apply the Policy
Now we can save the policy and apply it now or at a later time.
- Click Next on the Save Security Policy screen.
- Now you get the option to save the settings you’ve configured using the wizard. In the Security policy file name box, type a filename including the full path to the file. Alternatively, click Browse to select a name and location.
You also have the option to view the settings configured using the wizard by clicking View Security Policy, and to add a security template (.inf file) to the settings. If you decide to include a security template any settings it includes cannot be rolled back using the security wizard.
- Once you’re done, click Next to continue.
- Finally, you have the option to apply the settings now, or later on the Apply Security Policy screen. Don’t forget that settings shouldn’t be applied directly to production systems without thorough testing so proceed with caution! Click Next to continue.
- Click Next on the Application complete screen.
- Click Finish to close the wizard.
In the next part of this series, I’ll describe how to apply and roll back this policy using the GUI, how to convert a SCW policy into a Group Policy Object (GPO) and how to secure multiple servers using SCW.


