Windows 10 Tip: Change Network Profile

The default network profile for all new networks in Windows 10 is Public if your device is not joined to a domain. Network profiles work in conjunction with Windows Firewall to determine which inbound and outbound firewall rules should be applied when connected to a given network.
The Public profile provides the most protection and in general doesn’t allow Windows 10 to receive unsolicited connections from remote devices. However, on a home or work network, you may want more flexibility by setting the network to use the Private profile. By default some Windows services, such as Wireless Display and Network Discovery, require that the network profile be set to Private.
Change network profile
In Windows 10, Microsoft has moved the network profile setting into the Settings app. What’s more, you’ll need to logged in as an administrator to see the necessary configuration in the Settings app. Unfortunately, unlike the carefully engineered UAC in Vista and Windows 7, Windows 10 contains GUI inconsistencies in what can be accessed as a standard user.
In Windows 7, the control panel marked inaccessible settings with a UAC shield to indicate that you must elevate privileges to make changes but in Windows 10, unavailable settings are often hidden from standard users. Additionally, you can’t use the Run as administrator option to launch the Settings app with elevated privileges, so you must be logged in with an administrator account.
- Log in to Windows 10 with an administrator account.
- Click the Start menu and select Settings in the bottom left corner.
- In the Settings app, click Network & Internet.
- If the network you want to modify isn’t wireless, click Ethernet in the panel on the left of the Settings app and following the rest of the instructions below.
- In the right pane of the Settings app, click the network that you want to modify.
- Scroll down the list of available networks until you reach the end, and then click Advanced settings.

- On the Advanced settings page, toggle Make this PC discoverable to On to change the network profile to Private.
- Close the Settings app.
Using PowerShell
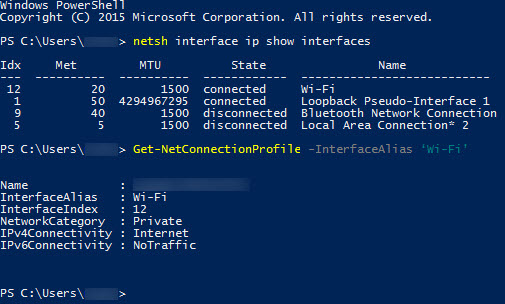
In this example, I’m going to set the network profile back to Public using PowerShell. Open a PowerShell prompt with elevated privileges and type the following netsh command to list the installed network interfaces on the device:

Now let’s get the current network profile for the network interface labelled ‘Wi-Fi’:
Finally, we’ll set the network profile for the Wi-Fi network interface to Public:
>


