I’ve heard a couple of feature requests for Hyper-V since I started working with Hyper-V back in 2008. Nested virtualization is one of those heavily requested features. Microsoft repeatedly said that they would love to provide Hyper-V nested virtualization, but they didn’t see the need for real world applications, outside of demos, testing, and training. As a result, we never got the feature. That was until Microsoft released the Windows 10 Build 10565, a preview of the November Threshold 2 release, to Windows Insiders. What is this feature, what does it mean to you, and how can you use it? I’ll answer those questions in this post.
Nested Virtualization
I’ve talked about Hyper-V architecture on Petri.com before, and you should find my article useful in understanding Hyper-V nested virtualization. Let’s start with how this nested virtualization has worked with Hyper-V before Build 10565.
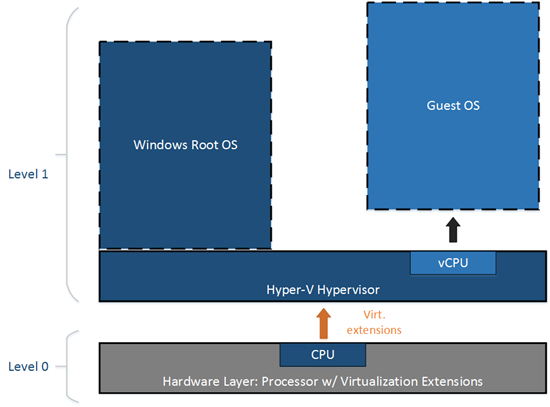
Hyper-V runs on the hardware of a physical host. A series of partitions run on the hypervisor. The parent partition runs the management operating system, which is the copy of Windows that you installed on the host to enable Hyper-V. A child partition is created for each guest or virtual machine, and you install a guest OS into that virtual machine.
A requirement of Hyper-V is that the host’s processor must have virtualization functionality enabled. The hypervisor takes ownership of these virtualization extensions and does not virtualize these extensions. In other words, the guest has no visibility of the Intel VT-x or AMD-V features.
For almost everyone, the lack of VT-x or AMD-V in the virtual machine was zero. But a few of us wanted or needed to enable Hyper-V inside of VMs. This was not possible because the guest OS of the VM could not see the required processor virtualization features.
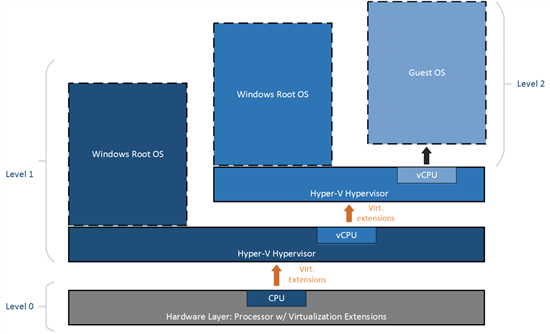
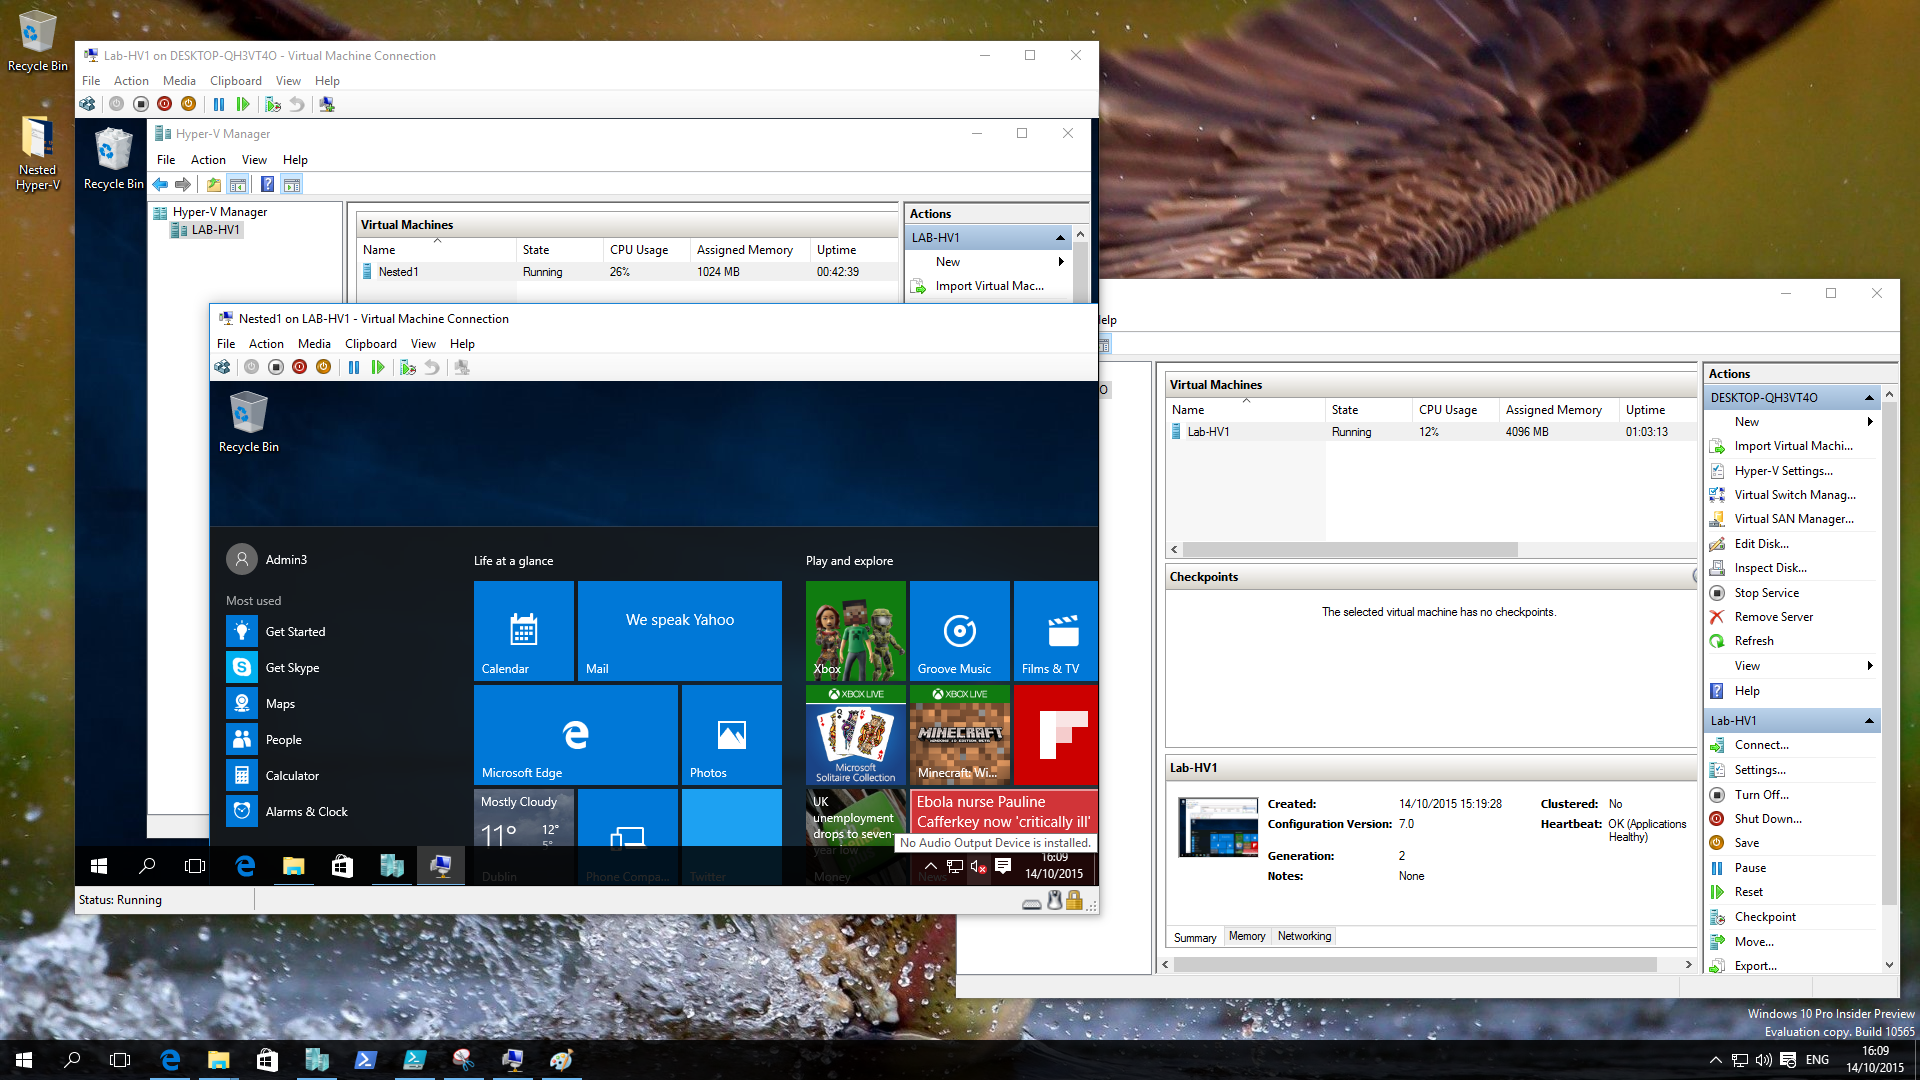
This changes with Build 10565, starting with Intel VT-x. The virtualization features can be virtualized on a per-VM basis. This means that if we deploy a Build 10565 guest OS into the virtual machine, then we have the system requirements to not only enable and use the Hyper-V role. In other words, a virtual machine running on Hyper-V can be a Hyper-V host and run real virtual machines. This is nested virtualization.
Note: we have been able to enable the Hyper-V role in Azure and Hyper-V virtual machines before, but the hypervisor would not start, and we could not start virtual machines.
Nested Hyper-V Implications
Those of us who have wanted nested virtualization in the past typically had reasons related to tests or demos. Imagine that you have a laptop with lots of fast disk, RAM, and a good nested virtualization-capable processor. With this setup, you could run several hosts and some shared storage as virtual machines on this physical machine, and you could even do customer or event demonstrations of Hyper-V in action.
One of the things that has been lacking in the Hyper-V world is training on failover clustering. Microsoft’s training partners aren’t equipped to give each student three to four machines to run Hyper-V and Scale-Out File Server (SOFS) clusters. This could change with Windows Server 2016 with Shared VHDX.
An interesting scenario is the world of hosted private cloud. If nested Hyper-V gives good performance, then traditional public cloud vendors could enable nested virtualization. This might allow vendors to use a public cloud to deploy their own private cloud infrastructure, enabling cloud on their own terms without worrying about the physical investment.
And finally, there’s the reason that nested virtualization was developed for Hyper-V: Hyper-V Containers. Windows Server Containers enable dense and fast deployment of applications. But the isolation of these containers does not provide inter-container security. Hyper-V can provide this boundary, and Microsoft will use nested virtualization to deploy Hyper-V containers:
- A physical Hyper-V host will run many VM hosts for containers
- Nested virtualization will be enabled for some of those VM hosts
- Those VM hosts with nested virtualization can run Hyper-V containers
System Requirements
Build 10565 is a preview of Windows 10. Furthermore, this is the first preview release of nested virtualization, something that I don’t expect will be ready until the GA release of Windows Server 2016. When you enable nested virtualization for a virtual machine, you are warned that this is a test release, and you should not use it for production systems.
You should also be aware of the following:
- Build 10565 or later: The physical host and the virtual host must be running Build 10565 of Windows or later. Note that Windows Server 2016 Technical Preview 3 (TPv3) and Windows 10 (generally available) are older and therefore will not work. Other hypervisors, such as vSphere, will not work, but I’d be surprised if this doesn’t change eventually.
- Unsupported VM features: Dynamic Memory, hot memory resizing, applying checkpoints, Live Migration, and save/restore. You can tell that Microsoft’s announcement has been future-proofed for the release of WS2016 Technical Preview 4 (TPv4), expected before the end of 2015.
- Mac Spoofing: You must enable MAC spoofing on the virtual NIC of the VM host that will be used to network the nested virtual machines — the virtual switch of the physical host will see multiple MAC addresses on that virtual NIC.
- Virtualization Based Security (VBS): This feature, otherwise known as VSM and present in the Enterprise edition of Windows 10, must be turned off on the physical host because it prevents virtualization extension to virtual machines.
- AMD-V: AMD virtualization is not supported yet; you must use VT-x to preview Hyper-V nested virtualization.
- RAM: You’ll need plenty of memory to try out nested virtualization. Make sure you have accounted for the host reserve.
Deploying Nested Virtualization
Follow these steps if you want to try out Hyper-V nested virtualization.
Install Windows 10 Build 10565 on a physical machine with Intel VT-x and all Hyper-V system requirements present. Enable the Hyper-V role and configure a virtual switch.
Execute the enablement script by running the following in an elevated PowerShell window:
Invoke-WebRequest https://raw.githubusercontent.com/Microsoft/Virtualization-Documentation/master/hyperv-tools/Nested/Enable-NestedVm.ps1 -OutFile ~/Enable-NestedVm.ps1
~/Enable-NestedVm.ps1 -VmName <VmName>
Create a virtual machine and install Windows 10 Build 10565. Enable the Hyper-V role in the guest OS of the VM host and configure a virtual switch on the vNIC. A simple solution is to share the new switch with the VM host.
Run the following on the physical host to enable MAC spoofing on the virtual NIC of the VM host:
Set-VMNetworkAdapter -VMName <VMName> -MacAddressSpoofing on
Create nested virtual machines in the VM host, power them up, and install guest operating systems.


