


Understanding the PowerShell Pipeline
- Blog
- PowerShell
- Post

If you want to really understand PowerShell, then it’s essential that you understand the PowerShell pipeline. It’s critical to understand this key concept because everything you do in PowerShell takes place in the pipeline, and as such, you’ll find different ways to take advantage of it.
- Related: Configuring the PowerShell Console
Pipeline Fundamentals
To begin, let’s think of the pipeline as the length of a pipe. Commands go in one end, and objects come out the other. You can’t always see what’s happening inside the pipe, but you can provide some direction. In PowerShell, the vertical bar ( | ) is the pipe symbol. This tells PowerShell that you want to take the output of one command and pass it as the input (or pipe it) to the next command. This concept has been around a long time in console-based shells and is hardly new to PowerShell. But a major difference is that instead of piping or passing text between commands, you are passing complete objects.
Let’s look at an easy example. When you run Get-Service, the cmdlet creates the necessary objects to represent the services on your computer, and PowerShell displays the results.

But these are objects, complete with properties that describe them. PowerShell has a command called Sort-Object that will sort any type of object, typically on a given property. Sort-Object needs some type of object to sort. If you look closely at help, you’ll see that the InputObject parameter accepts pipeline input ByValue.
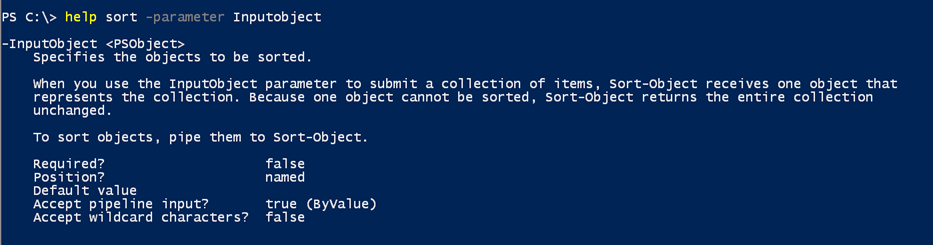
Stated differently, PowerShell assumes that anything Sort-Object detects coming in from the pipeline also belongs to the parameter, which means I don’t have to specify it. That’s why you usually see expressions with Sort-Object like this:
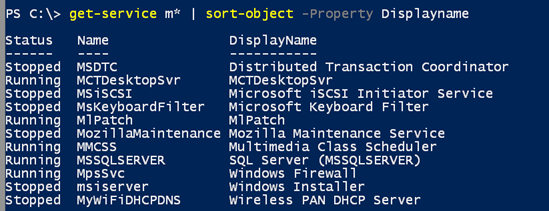
PowerShell takes the output from Get-Service and passes it to Sort-Object, which sorts on the Displayname property. Finally, because I’m not asking PowerShell to do anything else, it displays the results.
An Easy Pipeline Example in Windows PowerShell
Using a pipelined expression is a great technique for refining results until you get exactly what you need. For beginners, I recommend breaking this down into several steps. Here’s an example.
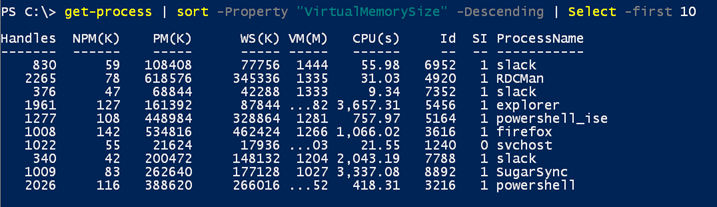
First, I need to sort all processes by their Virtual Memory in descending order.
get-process | sort -Property "VirtualMemorySize" -Descending
I already know that my simple Get-Process command works otherwise I would have run that first by itself. If this gives me the results I’m expecting then I can add the next pipelined step:
get-process | sort -Property "VirtualMemorySize" -Descending | Select -first 10
I can continue adding steps as necessary to meet my desired goal.
get-process | sort -property "VirtualMemorySize" -descending | Select -first 10 | measure-object VirtualMemorySize -sum –average

This also brings up a valuable lesson about pipelines: objects can change. I started out with process objects, but by the end of the pipelined expression, PowerShell gave me a measurement object. If you don’t get the result you expect from a pipelined expression, rerun your command, and pipe the results to the Get-Member cmdlet to identify what’s coming out of the pipeline. Next, remove the last part of the expression, and rerun your expression, piping the results to Get-Member. Of course, if you follow my suggestion and add each step in an incremental fashion, you are less likely to run into issues.
Finally, just because you can create a long pipelined expression doesn’t mean you should. When it comes to processing a large number of objects, you might find it easier to understand the overall process, as well as realize performance benefits by breaking a command down into several steps and saving results to variables.
A Two-Step Pipelined Expression Example
This is only a two-step pipelined expression, but I think you’ll get the idea. I could run this:
dir c:\scripts\*.ps1 -Recurse | measure-object -Property length –sum
That works just fine, and took a little over two seconds to execute. I could also break it into steps:
$files = dir c:\scripts\*.ps1 –Recurse
$files | measure-object -Property length -sum
The first command took 974 milliseconds, and the last command took 67 milliseconds, which taken together is still slightly faster. I’ll admit this isn’t a thrilling example, but I hope it makes my point.
Better PowerShell Scripting with the Pipeline
Using pipelined expressions in PowerShell lets us do things that used to require complicated batch or VBScripts. Not anymore, as long as you think about passing objects in the pipeline.
You can learn much more about PowerShell pipelines by reading the help topic About_Pipelines.