System Center 2012 SP1 – Orchestrator: Sample Runbook Creation
Over the last number of posts we have achieved a lot with System Center 2012 SP1 – Orchestrator and EUPSCO, so congratulations for following along! In this post we’re going to demonstrate how this all ties together by creating a simple runbook with which we’ll create a new user account — and add that account into a specific group — to demonstrate the simplicity of the runbook creation procedure.
The next objective is to offer this runbook to the HR team, providing them with the ability to create accounts. Of course we could have just provided access to the Active Directory Administrative Center to achieve the same objective, but with Orchestrator we can easily extend the logic of the runbook to create home folders, enable Lync, Mailboxes, and so on – a procedure we would never consider passing outside our control. In our next post we will utilize the End User Portal for this interaction to implement this second objective.
System Center 2012 SP1 – Orchestrator: Creating the Runbook
Let’s begin in the Runbook Designer to make our “Create Account” runbook.
- In the Runbook Designer expand the Connections tree, and right-click on the Runbooks node.
- In the context menu select the option New, then select Folder.
- In the Connections tree, replace the New Folder place holder with a suitable name for your project, e.g. “1. Create User Account.”
- Next, select our new folder and right-click to select New… Runbook to create the canvas for our runbook.
- The title of the canvas will be by default “New Runbook,” which we will change.
- Right-click the title and select Rename from the context menu.
- You will be prompted to Check Out the runbook for editing, which we must do in order to begin editing.
- Now, you can type the new name for your runbook, e.g. “1.0 Create User Account.”
Preparing Activities
At this point, we now have our new empty runbook ready for drawing. This next phase of the process will evolve over time as you extend the runbook’s function, adding additional features and error handling. For the main Active Directory work, we will use the Open Source Active Directory Integration Pack shared on the community CodePlex.com site. Follow the instructions we posted in our earlier post on installing System Center 2012 SP1 – Orchestrator integration packs to get this deployed to your environment.
With many of the integration packs that connect to external systems, you are going to have to first establish a connection to the target system.
- In the Runbook Designer, select the Options menu and locate the menu item that matches the name of the integration pack just installed.
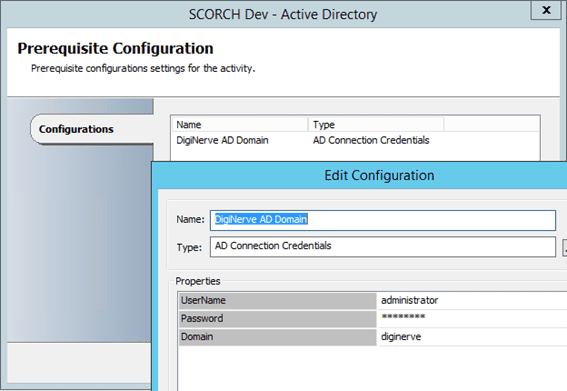
- Once the Prerequisite Configuration dialog is presented, click on Add.
-
In the Add Configuration dialog, type a name in the Name field for the Active Directory to which you are connecting.
- In the Type field, click on the button “…” and select the machine credential type; for example, in this IP we will be offered AD Connection Credentials.
- Once the type has been selected, you will need to supply details which are customized for this connection.
- In this case, the Properties include a UserName, Password, and Domain detail specific for your environment.
- Click OK to store your new configuration details.
- Assuming you have no other domains to connect, you can click Finish.
- This configuration item will be offered as the configuration to choose while customizing the activities later.
Drawing the Flow
With the configuration work now complete, we can begin by placing the activities for our Orchestration.
- From the Activities drawer, expand the Runbook Control area to expose the actives in this category.
- Begin by selecting the Initialize Data activity, and dragging this to the drawing canvas.
- Repeat the procedure, this time dragging the Return Data activity to the canvas.
- Next, find the SCORCH Dev – Active Directory drawer; locate and drag both the Create AD User and Add Users to Group activates to the canvas.
Accepting Input
For our Runbook to be of use, we need to accept from the user the name of the new employee, for whom we are going to create the new AD account.
- On the drawing canvas, right-click the activity Initialize Data and select Properties from the context menu.
-
In the Initialize Data Properties dialog, select the Detail tab.
- Click the Add button twice.
- You should now see two entries in the field list: Parameter 1 (String) and Parameter 2 (String).
- Click Paramater 1 and in the data dialog, enter Firstname, and click OK.
- Click Paramater 2 and in the data dialog, enter Surname, and click OK.
- Click Finish.
Creating the Pipeline
Next, we will connect the activities on the canvas to design the actual flow of the runbook, or the sequence of execution
- Hover your pointed over the activity Initialize Data to be presented with a small arrow pointing to the right (see image above), this is the outbound connection point.
- Move your pointer over this connection point, and observe the pointer will switch to a crosshair.
-
Click and hold the mouse left button to anchor the start of your new link
- Move your pointer to the left edge of the activity you wish to execute next.
- As previously, new connection points will appear on the activity as you get within it range
- Place your crosshair over the left anchor point of the target activity
- Finally release your held mouse click, at which point the canvas should now present a link between both activities
-
The new link, also referred to as the Pipeline, or Data Bus, can be customised in both appearance and in function
- Right-click on your new Pipeline, and select Properties from the context menu.
- Select the Options tab, and set the line Color to Green and Width to 3.
- Click Finish to save the new settings
Repeat this connection procedure connecting up the remaining activates as follows:
- Create AD User to Add User to Group
- Add User to Group to Return Data
Configuring the Activates
We next need to define the actions the activities are to execute for us. In this sample there are two main actions currently, both of which will expect slightly different data for their correct execution.
Start by right-clicking on the Create AD User activity and selecting properties.
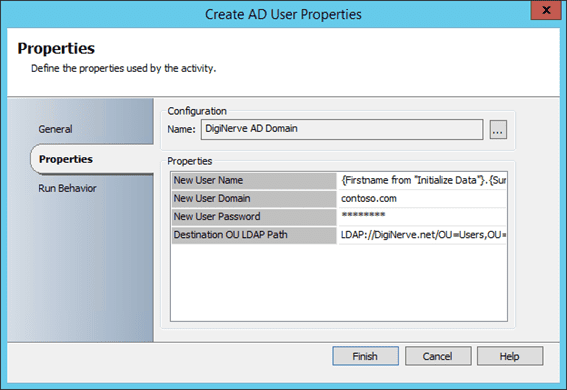
- In the Properties dialog, we will first set the configuration to use the connection to our AD which we established earlier.
- In the Name file, click on the button “…”, and from the popup select the configuration item you defined for your AD, then click OK.
- With a connection to your AD, the Properties pane will now populate. We need to customize this for our requirements
-
In the New User Name field, we will use the supplied Firstname and Surname to create the account as Firstname.Surname
-
In the field New User Domain replace the text to match your domain name, eg DigiNerve.net.
- Click in the New User Name field, and remove the existing text, “username”.
-
Now, in the field, right-click and select from the context menu, Subscribe -> Published Data
- In the new Published Data dialog, ensure that the source Activity is our Initialize Data activity
- In the available fields for this activity, select Firstname and then click OK.
- The field will now update with a reference to the parameter we just selected.
- Postfix a “.” to the end of the text in the field.
-
Again, with the cursor placed after our “.” in the field, right-click and select from the context menu Subscribe -> Published Data.
- In the new Published Data dialog, ensure that the source Activity is our Initialize Data activity.
- In the available fields for this activity, select Surname and then click OK.
- The field will now update again. The completed field will read as {Firstname from “Initialize Data”}.{Surname from “Initialize Data”}.
-
In the field New User Password supply a default password for your new user accounts.
-
In the field Destination OU LDAP Path update the sting to match your domain and OU for user accounts, e.g. LDAP://DigiNerve.net/OU=Users,OU=Field,DC=Diginerve,DC=Net. Note: this is a prime field to populate with the automatic generation of passwords
- Click Finish to save this activities configuration.
Next, we can configure the Add User to Group activity, again right-clicking and selecting properties.
- As in the previous activity, set the configuration name to connect with our defined AD Connection
- Once connected, the Properties pane will again populate, with the parameters suitable for this activity
-
In the User LDAP Path field, we will use the path returned by the previous activity, which actually created the user account for us. This information will be posted to the pipeline if the activity successfully created the users account, allowing us to use this information in the subsequent activities.
In the field Group LDAP Path, replace the text to match the LDAP Path to the Group in AD to which you wish to join the users account.
- Click in the User LDAP Path field, and remove the existing text.
-
Now, in the field, right-click and select from the context menu Subscribe -> Published Data.
- In the new Published Data dialog, ensure that the source Activity is our previous Create AD User activity.
- In the available fields for this activity, select New User LDAP Path and then click OK.
- The field will now update with a reference to the parameter we just selected, and read as {New User LDAP Path from “Create AD User”}.
- For example, I have a group called “Employees” in the Groups OU, which is contained in the Field OU of my domain, to define this group I will use the string: LDAP://DigiNerve.net/CN=Employees,OU=Groups,OU=Field,DC=Diginerve,DC=Net.
- Click Finish to save this activities configuration.
Finishing Up
Congratulations, your first runbook is now complete. Before checking in the runbook to make it available for use, you should give it a test and ensure that everything works as you designed. The Runbook Tester shortcut is available from the main ribbon and will allow you to provide both your Firstname and Surname parameters to the runbook, while also enabling you to step through each activity in the runbook to ensure that the indeed behave as expected.
If you do encounter issues, you can simply close the Runbook Tester, edit the canvas to resolve any issues you might have in the design, and then relaunch the Runbook Tester again until such time as all your issues have being resolved and you are satisfied that everything behaves as expected.
After you have completed all your tests, you should finally “Check In” the runbook. Simply righ-click on the Runbook Name tab, and select the Check In option from the context menu. After a few moments the Icon will change from “Edit” to “Runbook”. If you are feeling confident you could (and should) extend the runbook with some error handling, or additional steps to possibly automatically generate a password.
I look forward to your comments – and good luck!


