System Center 2012 SP1 – Orchestrator: Integration Pack
Continuing our series on System Center 2012 SP1 – Orchestrator! If you have being following the previous posts in this series:
- An overview of what is System Center 2012 – Orchestrator
- Understand the server components in Orchestrator
- Know the tools used to manage and maintain our Orchestrator environment
- Installing System Center 2012 SP1 – Orchestrator
- We completed the installation of our Orchestrator Server, along with the Web Services and Web Console, in addition to the all-important Runbook Designer.
System Center 2012 SP1 – Orchestrator: Getting Acquainted
I am sure you have taken the opportunity to get acquainted with these new tools, connecting to your Runbook servers, and maybe even attempted to create your first Runbook. As you being to find your way around the designer, which we will cover in greater detail in another post, you will no doubt have located the “Activities” panel docked to the right of the window. Here you will find a vast collection of different activities available to drop on your design canvas, ready for building your runbooks. However, as you spend some time studying the available options, you might be disappointed to find that an activity for a specific technology or action you expected to see is not present. In this post I will show you how to locate activities and install the System Center 2012 SP1 – Orchestrator Integration Pack.
Locating Activities
The first thing we are going to learn is that these activities are delivered in bundles that are officially called Integration Management Packs, or integration packs (IPs) for short. These packs are generally available from three primary sources, namely Microsoft, third-party vendors, and the wider public orchestrator user community. Your favorite search engine is going to come in useful in helping you to track down the relevant source for your desired integration packs.
To serve as an example, let’s assume you are looking for an integration pack for Microsoft Exchange. After a quick search, you will find that there are many hits, all of which are looking quite positive. After some additional scrutiny, you determine that there are essentially two possible solutions for our objective:
- Microsoft – which has a list of its officially released Integration Packs for System Center 2012 – Orchestrator
-
Community – where you have located two main landing pages
- http://orchestrator.codeplex.com/ – Microsoft managed landing page for some employee contributed open source Integration packs
- http://scorch.codeplex.com/ – Community managed landing page, listing and linking to a number of different open source integration packs, including some specific to Microsoft Exchange.
After taking a closer look at the list of Microsoft Exchange integration packs, you choose to try one or more of these for your project, since the collection of activities offered are very comprehensive when all the packs are considered. You go ahead and decide to download them.
Installing an Integration Pack
After downloading the integration packs, you may need to first extract the content (depending on the source). Integration packs end with the file extension of .OIP (short for Orchestrator Integration Pack). Once you have the .OIP files ready, we can begin to process of installing the packs.
Installation of Integration packs is a two-step process:
- Registering the new Integration Pack with the Management Server
- Deploying the registered Integration Pack to systems which have the Runbook Server or Runbook Designer components already installed
Registering the Integration Pack
On the Orchestrator Server, launch the Deployment Manager tool.
- In the Deployment Manager console, select the node titled Integration Packs, and right click to present the context menu.
- Select the option Register IP with the Orchestrator Management Server…
- The Integration Pack Registration Wizard will then be presented, read the welcome and click Next to proceed.
-
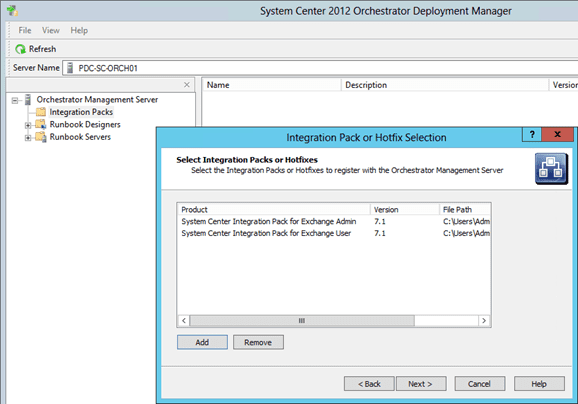
On the Select Integration Packs or Hotfixes page, click the Add button.
- In the Open dialog, navigate to the folder containing your extracted OIP files.
- Select the Pack you wish to register, and click Open.
- Repeat the process of adding OIPs until you have selected all you wish to register at this occasion. When ready click Next to proceed.
- The Complete the Integration Pack wizard page will then be presented, with a list of the OIP files you selected. Click Finish to begin registration.
- If any of the selected Integration Packs have user agreements, these will be presented now for you to review and accept.
The wizard will then complete its process and register these new Integration Packs with the management server. The Deployment Manager log entry pane will be updated with any status messages.
Deploying the Integration Pack
With the Integration Packs registered, in order for us to utilize the actives stored within the packs, we must now deploy these packs to the servers which will execute our runbooks, namely the “Runbook Servers”, and also to the systems we will design the runbooks on, namely systems with the “Runbook Designer”. At any time we chose to add additional servers or designers, we can return to this step and deploy these integration packs to the newly added systems.
From the console of the Deployment Manager tool.
- Select the node titled Integration Packs, and right click to present the context menu.
- Select the option Deploy IP to Runbook Server or Runbook Designer…
- The Integration Pack Deployment Wizard will then be presented, read the welcome and click Next to proceed.
- On the Deploy Integration Packs or Hotfixes page, enable the checkbox for each Integration packs you wish to deploy, then click Next.
-
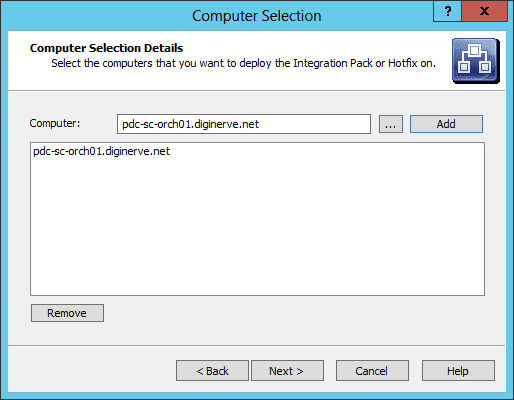
On the Computer Selection Details Page, In the Computer text field, enter the name of the “Runbook Server”, or “Runbook Designer” computers you wish to deploy the integration pack to, then click Add.
- Repeat this process, until all the desired computers have been entered, then click Next.
- On the Installation Configuration page, you have the option to schedule the installation of the Integration Packs for a time in the future, or to initiate the installation now. In a production environment you need to consider when to deploy the integration packs, along with the advanced options, which by default will stop all active runbooks during the installation, which might not be the desired result.
- Finally, the Complete the Integration Pack Deployment Wizard page will then be presented, with a list of the Integration Packs and servers which you wish them to be deployed to. Click Finish to begin Deployment.
The wizard will then complete its process to deploy the new Integration Packs, and as before a progress log will be presented in log entry pane of the deployment manager.
New Activities
If you now launch the Runbook Designer on one of the systems you just chosen to deploy your new integration pack, you will see that the Activities pane has been updated with a new group per integration pack, each containing a set of new activities ready for your use on the design surface.
In the next post, we will use the designer to create a runbook, to demonstrate just how easy this amazing tool is to use.


