Setting Up System Center Virtual Machine Manager (SCVMM)
Although Hyper-V Manager works well for managing virtual servers in smaller environments, it is definitely not an enterprise class solution. Fortunately, Microsoft makes a much more comprehensive virtual machine management product called System Center Virtual Machine Manager. In this article, I will show you how to install and configure this product.
Acquiring Virtual Machine Manager
Microsoft offers a free trial version of System Center Virtual Machine Manager that you can download at: http://www.microsoft.com/systemcenter/virtualmachinemanager/en/us/trial-software.aspx The download consists of three files totaling just under 3 GB in size. When you have downloaded all three files, place them into an empty folder and double click on the first file to launch the extraction and installation process.
Installing Virtual Machine Manager
When the extraction process completes, Windows should display the Virtual Machine Manager splash screen. Click the VMM Server link located in the splash screen’s Setup section. When you do, Windows will launch the Virtual Machine Manager Server Setup wizard. The wizard’s first screen displays the end user license agreement. Accept the license agreement, and click Next.
At this point, you will be taken to a screen that asks you if you want to participate in Microsoft’s Customer Experience Improvement Program. It’s entirely up to you as to whether or not you want to participate. Just make your decision, and click Next.
The next screen that you will encounter asks you to enter your name and the name of your company. Enter this information, and click Next.
The wizard will now run a quick prerequisite check to make sure that your server meets the various hardware and software requirements. When the prerequisite check completes, click Next.
The wizard’s next screen asks you to provide an installation path. You can usually get away with accepting the default installation path, so long as the server has adequate disk space. Virtual Machine Manager requires 540 MB of space on the system drive, and 2 GB of space on the Program Files drive.
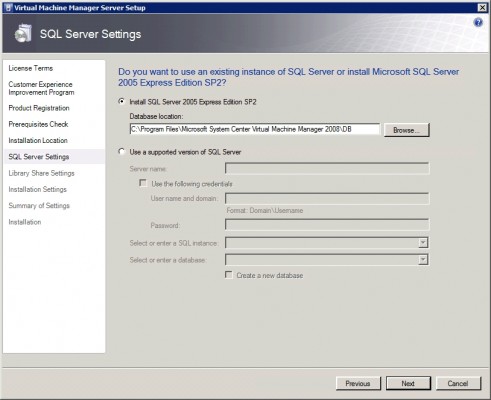
Click Next, and the Wizard will ask you for your SQL Server settings, as shown in Figure A. If you have a SQL Server on your network, you can use it or you can just tell the Setup wizard to install SQL Server 2005 Express Edition (formerly known as MSDE). In larger organizations with a lot of virtual machines to manage, I would recommend using a full blown SQL Server. If you do decide to use SQL Server, it will need to be running SQL Server 2005 with SP2 or higher.
Figure A
You can choose to install SQL Server Express if you do not have a SQL Server on your network.
The next screen that you will be taken to asks you if you want to create a new library share, or if you want to use an existing one. If this is your first Virtual Machine Manager server, then you will have to create a new library share.
You will need to carefully consider the path that you use for the share location. The library share is a collection of files that can be used by Virtual Machine Manager. A library share is required, and once it has been created, you will not be able to relocate or rename the share.
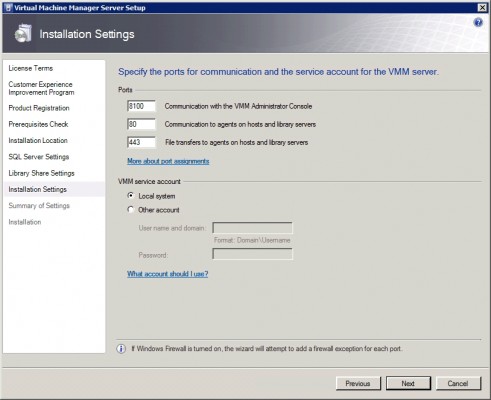
After choosing your library share settings, click Next and the wizard will prompt you to choose the ports that will be used by Virtual Machine Manager. You also have the option of specifying a service account, as shown in Figure B. Once again, I recommend going with the defaults.
Figure B
I recommend using the default port assignments.
Click Next, and you will see a summary of the installation options that you have choosen. Take a moment to review your choices and then click the Install button. Windows will now install SQL Server 2005 Express Edition if necessary, and install Virtual Machine Manager. When the installation process completes, click the Close button.
Installing the Administrator’s Console
When the installation process completes, you will need to install the Administrator’s Console. To do so, click on the VMM Administrator Console link found in the splash screen’s Setup section. When you do, Windows will launch the Setup wizard. This wizard asks you many of the same questions as you had to answer when installing the main Virtual Machine Manager Server component. Basically all you have to do is to accept the end user license agreement, pass a prerequisite check, and verify the port assignments.
Conclusion
As you can see, the installation process is fairly simple. Of course you will need to make sure that your server meets the system requirements, which vary depending on the number of hosts that are being managed. You can access the full system requirements at: http://www.microsoft.com/systemcenter/virtualmachinemanager/en/us/system-requirements.aspx


