SBS 2011 and SharePoint Foundation: Configuring Outgoing & Incoming E-mail Settings
Due to the unique circumstances of SBS (Small Business Server), there is a need for very specific configuration of SharePoint email settings. Are you a Small Business Server 2011 admin looking for help on configuring SharePoint Foundation for email settings? Well, that would be the most logical reason for reading on. Any other scenario may prove to be an effort in futility since these are very specific instructions for a very specific task: that of outgoing/incoming email settings for SharePoint Foundation on SBS 2011.
Outgoing and Incoming Email Settings Overview
Why configure outgoing and incoming email settings? Quite simply, the outbound side is what is used for users to configure alerts to track items on a site like lists, libraries and document changes. These alerts can also benefit site administrators with various aspects of their admin responsibilities, like receiving a message that storage space has been exceeded. So, obviously the outbound email has to be configured. As for the incoming side, the purpose of configuring this is so that SharePoint can receive email messages and attachments in lists and libraries.
In the case of both outgoing and incoming, if you research the configuration through TechNet, you’ll find the first step is installing and configuring the SMTP service on the SharePoint server. This is the case even if you are working with an in-house Exchange Server. However, with SBS 2011 and SharePoint Foundation you do NOT install and configure the SMTP connector.
TechNet articles for incoming and outgoing email settings for a typical SharePoint Foundation configuration setup are included here:
http://technet.microsoft.com/en-us/library/cc288949.aspx
http://technet.microsoft.com/en-us/library/cc287879.aspx
(Instructional video below provides a detailed walkthrough of the steps included in this article.)
Getting to the Settings
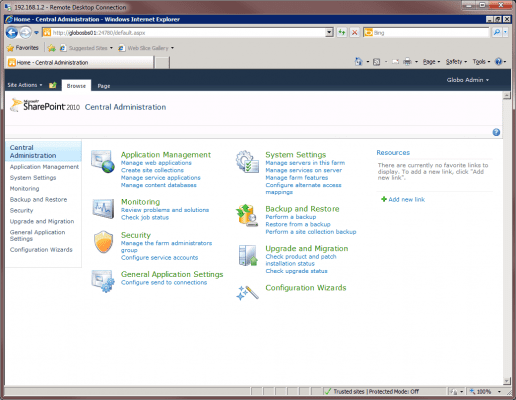
In both cases (outgoing/incoming), you need to open the Central Administration site for your SharePoint Foundation. To do this, on the SBS 2011 server, you click Start | All Programs | Microsoft SharePoint 2010 Products | SharePoint 2010 Central Administration (shown in Figure 1)
Figure 1 (below): The Central Administration Home Page
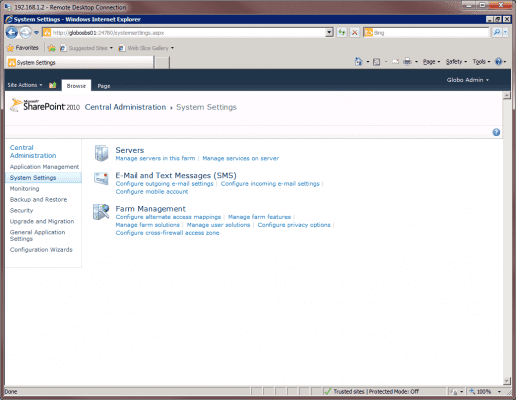
From here you select the System Settings link from the left navigation pane (shown in Figure 2). From here you can see under the E-Mail and Text Messages (SMS) options there are two links:
1) Configure outgoing e-mail settings
2) Configure incoming e-mail settings.
Figure 2 (below): The System Settings Page
Configuring Outgoing E-mail Settings
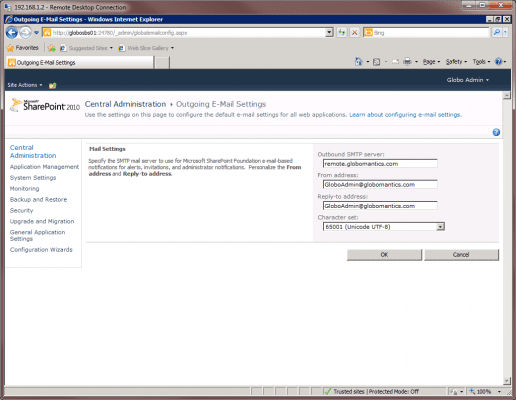
When you select the outgoing link, you will see that there are only a few Mail Settings to configure. They are as follows (you can see the options we chose in Figure 3)
- Outbound SMTP Server: With SBS this is easy enough. Use the FQDN that will be handling all your requests. In the case of SBS we are looking at something like remote.<name of domain>.com.
- From Address: This is the address that users will see that the email came from for alerts. It doesn’t even have to be a real address.
- Reply-to Address: In this case you should indicate an email address that they can reply to. Note, we used our primary SBS admin in both cases for consistency for the users.
- Character Set: Choose the character set that is appropriate for your language.
Figure 3 (below): Outgoing E-mail Setting Choices
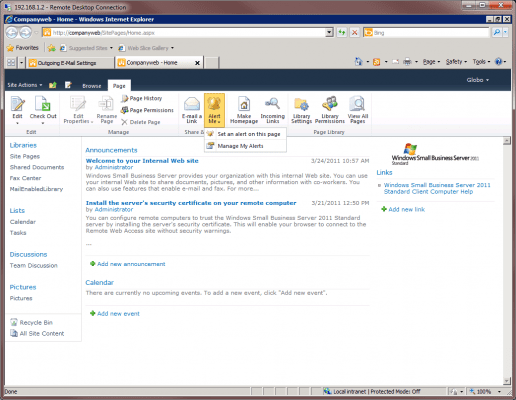
Note that immediately after configuring these settings you will want to test them. To do this you utilize the Alert Me options by going to the page, list or library, selecting the Page tab at the top, choosing the Alert Me option from the Share & Track options, and selecting Set an alert on this page (shown in Figure 4).
Figure 4 (below): Setting Up Alerts
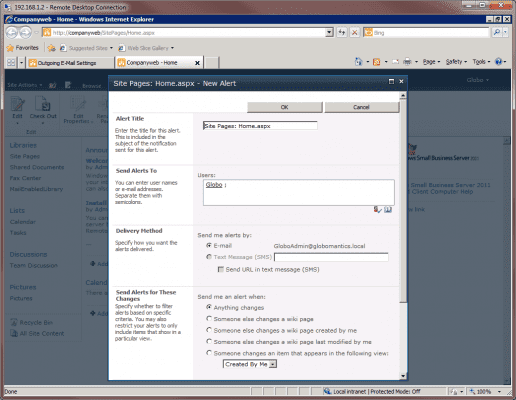
You can define how elaborate you want the alert to be (options are shown in Figure 5). For testing, it is best to choose to send an alert when Anything changes. Once you have alerts set up, test it by making any change to that site then checking your email for that change to come through. This will indicate that your alerts are working and by extension, your outgoing mail is working.
Figure 5 (below): Configuring Alert Settings
Configuring Incoming E-mail Settings
While the previous section might give you hope that this next part is easy, this isn’t the case. Outgoing and incoming email settings are completely unrelated. While not incredibly difficult, incoming email configuration includes a few extra hoops.
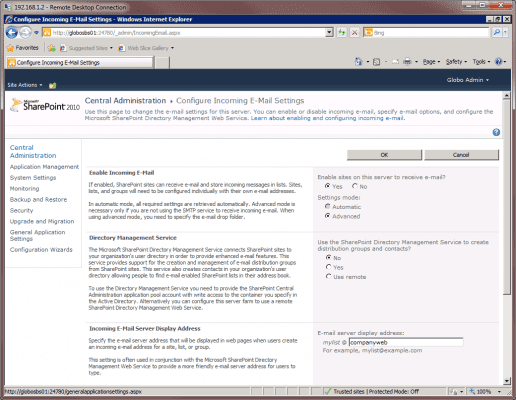
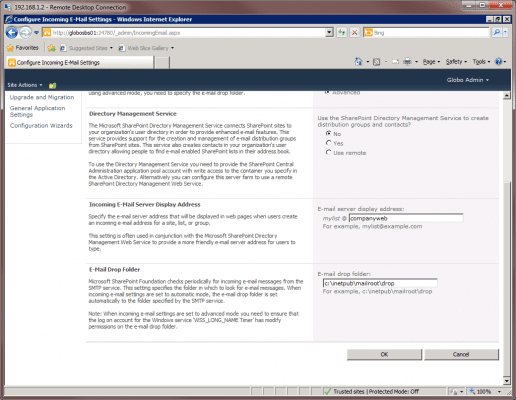
We start by selecting the Configure incoming e-mail settings link from System Settings. This will take you to a collection of incoming email settings (options are shown in Figure 6 & 7). Note: you will receive a message warning you that the SMTP service is not installed on the server. That is ok, do not install the IIS SMTP service!
Figures 6 (below): Enable Incoming Email Settings
All of the settings in the figures are exactly the settings you need to configure to make this work. You are welcome to experiment with alternative options later, but for now, just trust all the settings provided to make your incoming email work.
Figures 7 (below): Enable Incoming Email Settings
Note: These settings were provided specifically by the SBS Team through their Official SBS Blog http://blogs.technet.com/b/sbs/archive/2011/03/18/how-to-configure-email-routing-to-sharepoint-in-sbs-2011.aspx.
| Settings | Configuration |
| Enable sites on this server to receive e-mail? | Yes |
| Settings mode: | Advanced |
| Use the SharePoint Directory Management Service to create distribution groups and contacts? | No |
| E-mail server display address: mylist@ | companyweb |
| E-mail drop folder | c:\inetpub\mailroot\drop |
Create Document Library
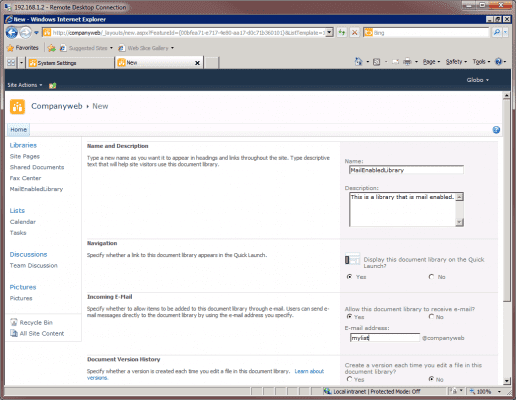
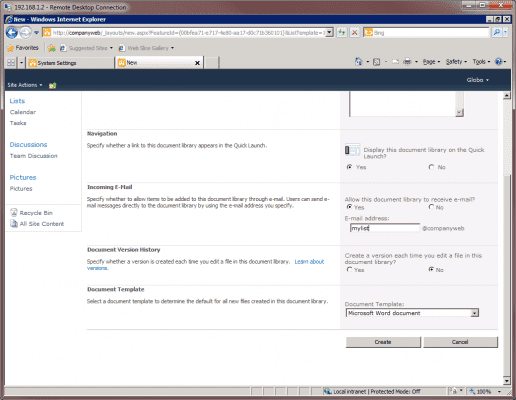
The next step is to create the document library (as an example) with mail configured. To do this go to your http://companyweb site. From the left hand side select Site Actions and then choose New Document Library. The settings are shown in Figures 8 and 9 and in the table below.
Figures 8 (below): Create a Document Library
Figures 9 (below): Create a Document Library
| Settings | Configuration |
| Name: | Insert the name for your Library |
| Description: | Insert a description for your Library |
| Display this document library on the Quick Launch? | Yes or No (we chose Yes for easy access) |
| Allow this document library to receive e-mail? | Yes |
| Email address | mylist |
| Create a version each time you edit a file in this document library? | Yes or No (we left at No) |
| Document template | We left at the default of Microsoft Word document |
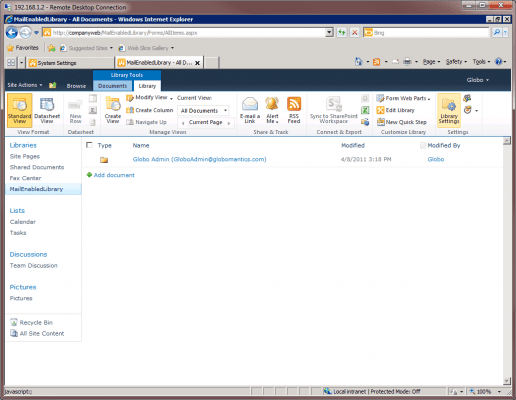
After you click Create you will be taken to the Library Tools options and on the Library tab, under Settings select Library Settings, (shown in Figure 10).
Figure 10 (below): Accessing Library Settings
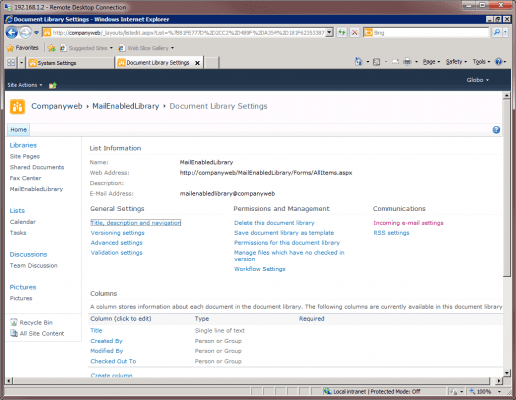
From the Document Library Settings you need to look for Communications and select the Incoming e-mail settings (shown in Figure 11).
Figure 11 (below): Document Library Settings
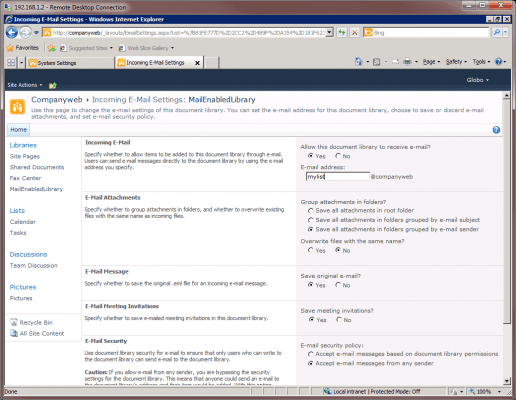
From the Incoming E-mail Settings you configure the options in the way you see in Figure 12 and in the table below. Note, many of the options are not right or wrong but simply a matter of preference.
Figure 12 (below): Configuring Incoming E-mail Settings
| Settings | Configuration |
| Allow this document library to receive e-mail? | Yes |
| E-mail address: | mylist (In our test we used different email addresses just to see if we could get mail sent to different libraries and we could) |
| Group attachments in folders? | There are several options that are your choice based upon your needs. |
| Overwrite files with the same name? | Yes/No |
| Save original e-mail? | Yes/No |
| Save meeting invitations? | Yes/No |
| E-mail security policy: | You can choose to accept email based upon document library permissions or accept email from any sender (we chose from any sender) |
Create Foreign Connector to the Drop Folder
The last part of the process is a bit convoluted if you are new to some of the concepts and technologies involved in SBS administration. But this is the way the SBS Team laid it out and so this is the way it has to be. We need to physically connect our Exchange and our SharePoint with regard to SMTP. Exchange is going to need what is called a “foreign connector” in order to know that email sent to @companyweb has to be sent to the drop folder we mentioned in our configuration settings. Oh… and along that line of thought, the drop folder doesn’t exist. So, we have to first create the drop folder and make sure it has the proper permissions.
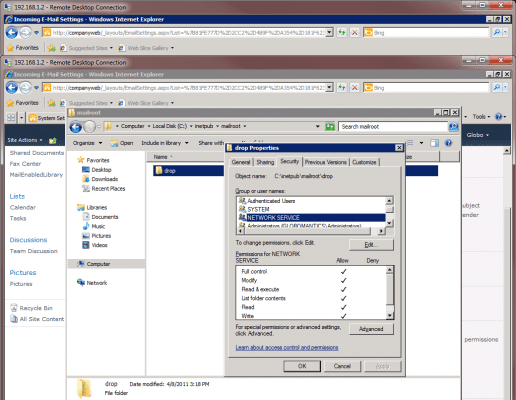
To start with you need to open the c drive, open the inetpub folder and you’ll note there is no mailroot folder. Create that folder (if you get an message telling you to confirm, just click Continue). Then go inside and create another folder called drop. Make sure you go into the permission settings of the drop folder and add the Network Service and Authenticated Users to the permission setting and give them Full Control (as you can see in Figure 13). The permissions are important because without them, Exchange can’t place mail in the folder and SharePoint can’t pick up mail from the folder.
Figure 13 (below): Permission Settings for the Drop Folder.
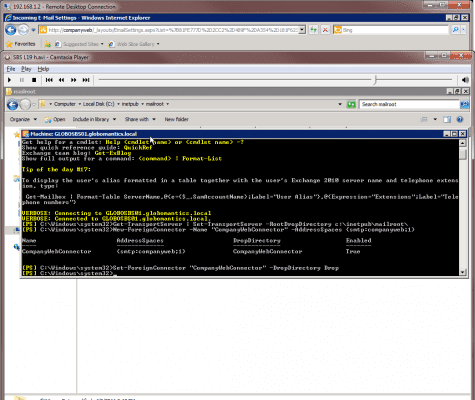
Next, on the SBS server launch the Exchange Management Shell. Don’t be nervous if you have never used this before. Just type in exactly what we have below (also shown in Figure 14):
Get-TransportServer | Set-TransportServer -RootDropDirectory c:\inetpub\mailroot\
New-ForeignConnector -Name “CompanyWeb Connector” -AddressSpaces {smtp:companyweb;1}
Set-ForeignConnector “CompanyWeb Connector” -DropDirectory Drop
Figure 14 (below): EMS CMDs to Create the Foreign Connector to the Drop Folder.
Now, I know what you are thinking. This isn’t going to work. Right? It seems too wild and crazy for it to be the solution. That’s what I thought. Along with thoughts like “seriously… they make wizards for everything else but they couldn’t make this a wizard or couldn’t assume we wanted to do this and just have it configured by default?” But I digress…
It will work. Prove it to yourself by sending an email to mylist@companyweb (from OWA) and include a document if you have one handy, and then go back and check the document library to see that it really did go right in. Keep in mind that mylist is only one option here. You can use another name if you choose, and you can use different names for different libraries (because you may want to enable more than one library, list and so on).
Final Note and Summary
We mention above using OWA for the email. That is because OWA doesn’t give you a problem if you are sending the email to an address that doesn’t have an ending (.com, .net, etc…). If you use Outlook, you will need to configure a mail contact first in the Exchange Management Console so that the address book will recognize the email address.
This article has covered configuring outgoing & incoming email for SharePoint Foundation on SBS (Small Business Server) 2011, including specific configuration details which are required for setting up SharePoint email with SBS 2011.


