Setting Application Control Policies with Microsoft’s AppLocker
In today’s Ask the Admin, I’ll show you how best to set up application control policies in Windows using AppLocker.
AppLocker was introduced in Windows 7 and can be used to prevent users from running executables, scripts, Windows Installer packages, and Windows Store apps (Windows 8 and higher) in Windows 7, Windows Server 2008 R2 and later. AppLocker is only available in Enterprise and Ultimate editions of Windows.
Why is application control important?
Removing administrative privileges from users goes a long way in protecting devices from unwanted configuration change and malware, but alone doesn’t provide protection against scripts and portable software that might install itself into the user’s profile. That’s where AppLocker comes in, by preventing users from running installer packages or scripts that haven’t been identified as trusted by IT.
Configure AppLocker
AppLocker is much easier to set up than Software Restriction Policies (SRP), which is the Windows XP technology that AppLocker replaces. In this article, I’ll show you how to set up AppLocker in Local Computer policy in Windows Server 2012 R2, but you could easily apply the same settings to multiple computers using Active Directory Group Policy.

Let’s start by configuring a management console. Alternatively, you can configure a Group Policy Object for your domain following the instructions in “How to Create and Link a Group Policy Object in Active Directory” on Petri.
- Log in to Windows Server 2012 R2.
- Click the Start button and on the Start screen type mmc.
- In the search results pane on the right, right click the MMC icon and select Run as administrator from the menu. Enter administrative credentials if prompted.
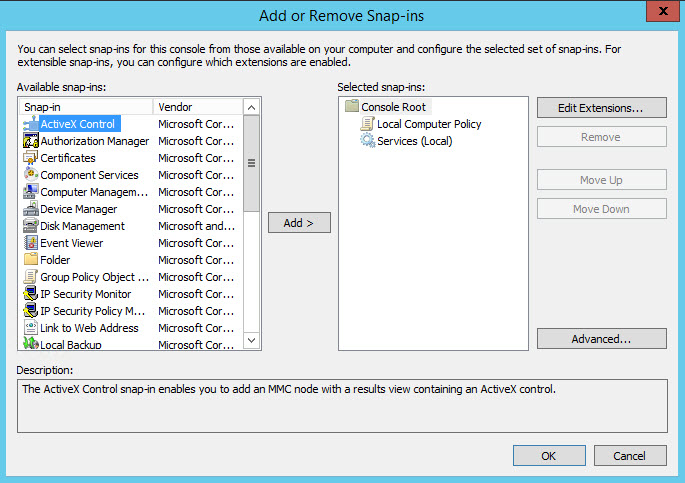
- In the MMC console window, press CTRL+M to add a new snap-in.
- In the Add or Remove Snap-ins dialog, select Group Policy in the list of available snap-ins, and click Add.
- In the Select Group Policy Object window, keep the default setting of Local Computer and click Finish.
- In the Add or Remove Snap-ins dialog, select Services in the list of available snap-ins, and click Add.
- In the Services dialog, keep the default setting of Local Computer and click Finish.
- In the Add or Remove Snap-ins dialog, click OK.
Create default rules
To ensure that AppLocker policies don’t completely disable Windows, there’s a set of default rules that enable trusted applications, scripts and installer packages to run. Trust is defined as an executable or script located in a protected system location, such as the %windir% directory, or signed by a certificate.
- In the left of the MMC console, expand Local Computer Policy, Windows Settings, Security Settings, Application Control Policies, AppLocker.
- Right click Executable Rules and select Create Default Rules from the menu. You’ll see the rules appear to the right. Note that members of the built-in Administrators group are allowed to run all files.
- Repeat the previous step for Windows Installer Rules, Script Rules, and Packaged app Rules.

The default rules block many scripts, executables and Windows Installer packages, but the default Windows Installer rule extends trust to a wide range of publishers. For example, I don’t want users to install Google Chrome, which doesn’t require administrative rights to install and can be downloaded as an .msi package. The Chrome .exe installer package will be blocked by the default executable rules because it cannot be added by a standard user to the trusted locations defined in AppLocker policy.
The exception to the rule — blocking Google Chrome
It’s best practice to avoid using AppLocker to deny rules because deny always take precedence and can be circumvented by modifying the files the rule is designed to block. To block the Google Chrome .msi installer I’m going to add an exception to the default Windows Installer rule that allows all digitally signed .msi files to run.
To perform the following steps, you’ll need to download the Chrome .msi file from Google’s Chrome for Work website.
- Click Windows Installer Rules in the left of the MMC window.
- In the central pane, right click the Publisher rule that allows All digitally signed Windows Installer files, and select Properties from the menu.
- In the Allow Properties dialog, click the Exceptions tab.
- Make sure that Publisher is selected under Add exception and then click Add.
- In the Publisher Exception dialog, click Browse to select a reference file.

The reference file will be the Google Chrome .msi file downloaded earlier, which contains information about the certificate Google uses to sign the Windows Installer file.
- In the Open dialog, locate the .msi file and click Open.
- In the Publisher Exception dialog, move the slider upwards to Product Name. This ensures the exception only blocks installers signed by Google named Google Chrome.
- Click OK in the Publisher Exception dialog.
- In the Allow Properties dialog, click OK.
Enable rule enforcement
AppLocker can run in enforcement or audit only mode. Audit mode is useful for observing how your rules will work in your environment. In audit only mode, AppLocker writes to the Event Log when a user launches a script or application that matches a rule.

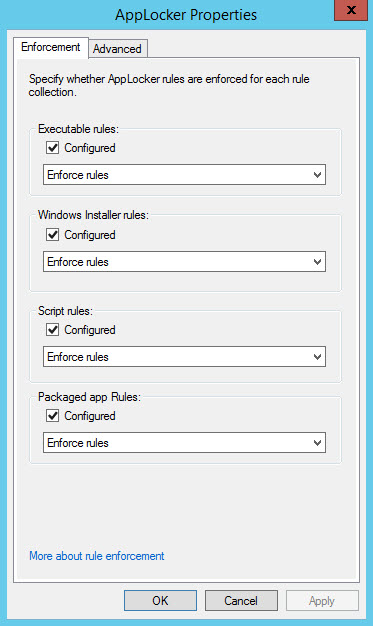
- Right click AppLocker in the left of the MMC window and select Properties from the menu.
- On the Enforcement tab of the AppLocker Properties dialog, check Configured for each of the rule types and make sure Enforced is selected in the menus.
- When you’re done, click OK.
Start the Application Identity service
The final piece of the puzzle is to make sure that the Application Identity service automatically starts when Windows boots.

- In the MMC console window, click Services in the left pane.
- Locate Application Identity in the list of services and double click it.
- On the General tab of the Properties dialog, set the service startup type to Automatic in the dropdown menu.
- Click Start under Service status, and then click OK.
Testing AppLocker
To test AppLocker, you should log on to the server as a standard user because the default rules allow administrators to run all applications.

Any applications or scripts defined by the AppLocker rules as untrusted should fail to start, including the Google Chrome .msi file we downloaded previously. An error message will be displayed stating that system policy prevents installation.


