Recreate a Virtual Machine in Microsoft Azure
In this easy Ask the Admin, I’ll show you how to quickly recreate a virtual machine configuration in Microsoft Azure without having to reinstall or back up the virtual hard disk.
On rare occasions it might be necessary to recreate a virtual machine configuration in Azure. This can be easily achieved using the management portal and doesn’t involve having to restore your image from a backup or reinstall the operating system.
Delete the Existing Virtual Machine
- Log on to the Azure Management Portal.
- In the left pane, click the Virtual Machines icon.
- In the right pane, click the name of the VM you want to recreate.
- Click Delete in the grey bar at the bottom of the portal and select Keep the attached disks from the menu.
- Confirm the action by clicking OK and wait for the operation to complete.
- In the left pane, click Cloud Services.
- In the right pane, click the cloud service for the VM you just deleted and switch to the dashboard tab. The name of the cloud service and VM are usually the same.
- Click Delete in the grey bar at the bottom of the portal window.
- Confirm that you want to delete the cloud service by clicking Yes.
Note that if you delete a cloud service, there is no guarantee that you will be able to use the same external DNS name again. Additionally, external IP addresses are generated automatically when a cloud service is created, so if you rely on an external addresses for any reason, you should retain your existing cloud service.
Create a New VM Using an Existing Disk
Now we can create a new VM by selecting the disk from the VM we deleted in the previous steps.
- In the left pane, click the Virtual Machines icon.
- Click New in the bottom left corner.
- Select From Gallery.
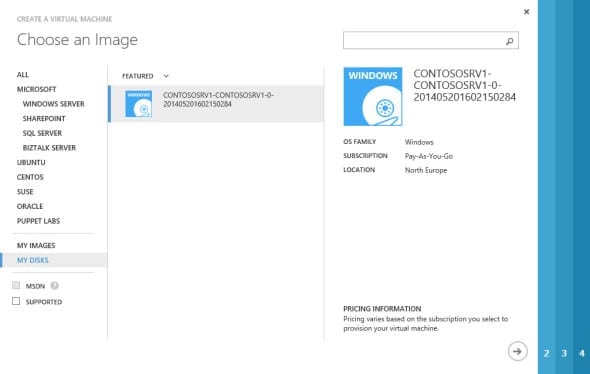
- In the Create a virtual machine wizard on the Choose an Image screen, select My Disks on the left. Azure automatically shows any OS disks that are not currently attached to a VM.
- Select the disk of the VM you just deleted and click the forward arrow.

- On the Virtual machine configuration screen, give the VM a name and click Next.
Note that you are not asked for a username and password for the VM as would usually be the case when creating a VM using an image from the gallery. This is because we have selected a disk with a preexisting OS.
- Create a new cloud service or select an existing service. Configure any additional options to match the settings of the deleted VM and click Next.
- On the final screen, check any configuration and security extensions you would like to add and click OK.
The new VM will now be provisioned. After it is running you will be able to connect to it remotely.


