New in Windows Server 2016 Technical Preview 2, DNS Policies allow system administrators to create rules that determine how DNS servers respond to client queries based on several different factors, including the client’s location, time of day, and transport protocol. This enables new traffic management scenarios, such as redirecting users to specific servers based on location, a new way to implement split-brain DNS, and blocking malicious domains or ensuring clients can only resolve specific names.
DNS Client Subnets and Zone Scopes
Before DNS Policies can be applied, it’s necessary to define DNS client subnets and zone scopes. DNS client subnets define IPv4 or IPv6 address ranges from which DNS server queries might be received. Bear in mind that authoritative DNS servers usually receive queries not directly from clients, but from a DNS server hosted by the client’s Internet service provider (ISP). Nevertheless, ISP DNS servers are usually located geographically close to the clients they serve, so it’s reasonable to expect that the IP address of the ISP’s DNS server gives a fair approximation of the location of the client that originated the query.
Zone scopes divide DNS zones so that tailored responses can be returned depending on criteria set in DNS policy. Each zone contains a different set of records so that depending on the DNS policy applied to the query, a different IP address can be returned for a given domain name.
Configuring Client Subnets and Zone Scopes
To use DNS Policies, you’ll need to be running Windows Server 2016 Technical Preview 2 and have the DNS server role installed. For more information on installing Windows Server 2016 TP 2, see How to Install the full UI on Windows Server 2016 on the Petri IT Knowledgebase.
In the example that follows, we’ll redirect users to specific servers based on location, but I’ll also give examples of how to create other kinds of policies. You should also note that at the time of writing, DNS client subnets and zone scopes are not displayed in the DNS management console and can only be created and viewed using PowerShell.
Install the DNS Server Role and Create a Primary DNS Zone
If you don’t have the DNS server role installed with a DNS zone already configured, you’ll need to do some basic preparation. Log in to Windows Server 2016 with a local administrator account. Open a PowerShell prompt by clicking the PowerShell icon on the desktop taskbar and run the command below to install the DNS Server server role:
Once DNS has been installed, you'll need to add at least one DNS zone. The command below adds a standalone DNS zone for contoso.com. A zone file is specified because the zone isn't integrated with Active Directory.
Client Subnets
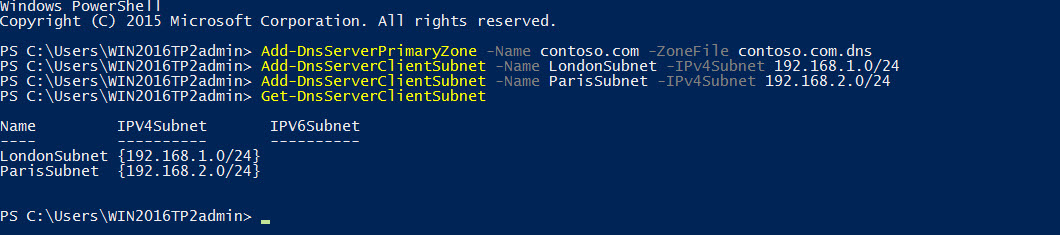
In this example, I'm going to configure two DNS client subnets using the Add-DnsServerClientSubnet cmdlet, one for the London Office (192.168.1.0) and a second for Paris (192.168.2.0), both with a 24-bit subnet mask.
Adding DNS client subnets in Windows Server 2016 (Image Credit: Russell Smith)
To list the configured DNS client subnets on the server, type Get-DnsServerClientSubnet into the PowerShell prompt and press ENTER.
Zone Scopes
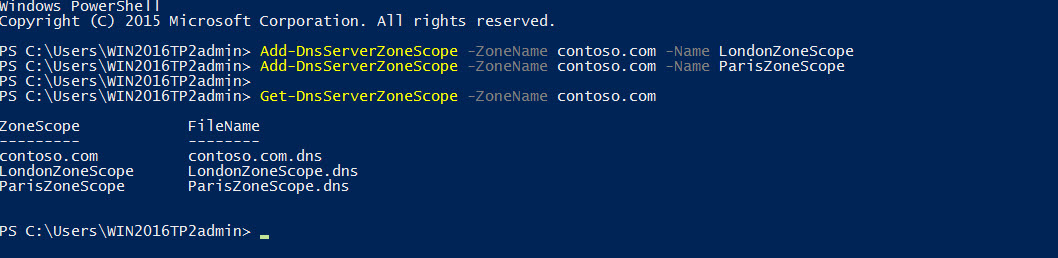
Now we’ll divide the contoso.com DNS zone into zone scopes, so that queries received from different client subnets can be answered using different DNS resource records. Here two zone scopes are created, one for London, and a second for Paris.
To list the zone scopes created in the contoso.com DNS zone, type the command below:
Adding DNS zone scopes in Windows Server 2016 (Image Credit: Russell Smith)
Add Resource Records to Zone Scopes
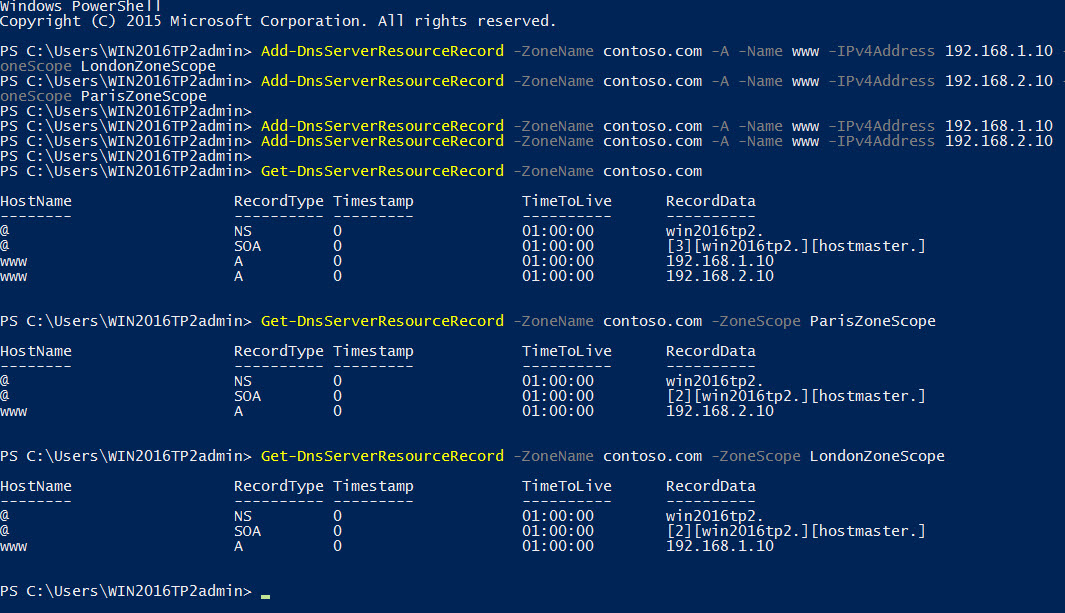
Now that the contoso.com DNS zone has been divided into zone scopes, we can add resource records to each zone scope. The commands below add an address (A) record – www – with a different IP address for the London and Paris zone scopes:
You might also want to add the records to the default zone scope, so that everyone is able to access the servers:
Add-DnsServerResourceRecord -ZoneName contoso.com -A -Name www -IPv4Address 192.168.2.10
To list the records in each zone scope in the contoso.com DNS zone, run the three commands below:
Adding DNS resource records to zone scopes in Windows Server 2016 (Image Credit: Russell Smith)
Create DNS Policies
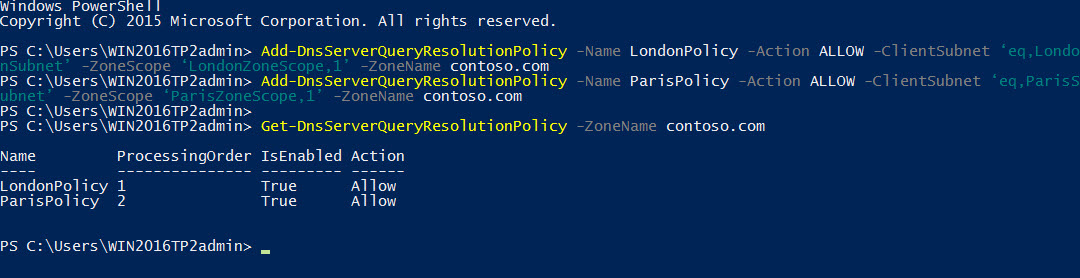
Once the zone scopes and DNS client subnets have been created, all we need to do is add some policies. The PowerShell commands that follow create policies to redirect queries from the London and Paris subnets to the corresponding zone scopes in the contoso.com DNS zone.
The –ClientSubnet parameter starts with an operator, EQ for equals or NE for not equals, followed by a list of client subnets. Operators can be combined in a string, such as ‘eq,LondonSubnet,ne,ParisSubnet,BerlinSubnet.’ The –ZoneScope parameter is a string of zone scopes, each followed by a weighting.
Creating DNS Policies in Windows Server 2016 (Image Credit: Russell Smith)
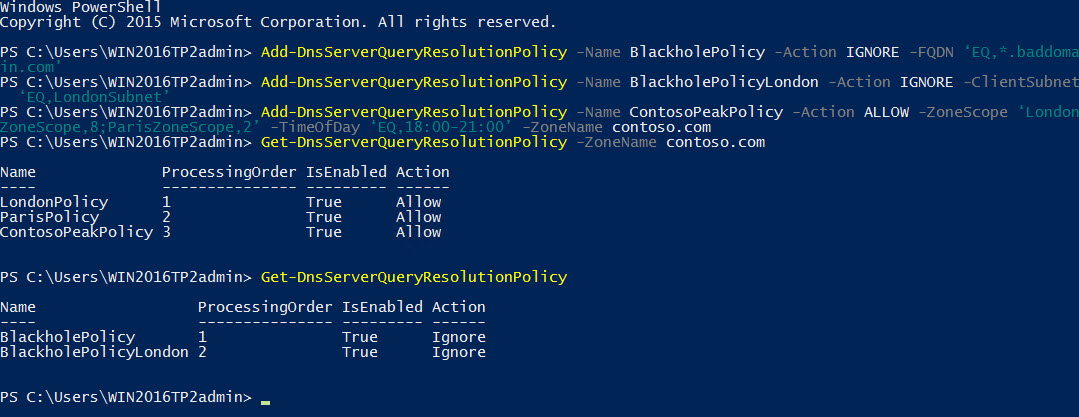
There’s no need to reboot the server. Once a policy has been added, it becomes effective immediately; and in the example above, queries for www.contoso.com received from Paris should resolve 192.168.2.10, and from London 192.168.1.10. To see the policies configured for the contoso.com zone, type:
Policies can be removed using the Remove-DnsServerQueryResolutionPolicy cmdlet:
Sink Hole and Time-Based Policies
Here are some other examples of how you can use policies to manage network traffic. The policy below ensures that queries for baddomain.com are not resolved by the DNS server:
Creating DNS Policies in Windows Server 2016 (Image Credit: Russell Smith)
On the flip side, the policy below blocks a subnet, preventing it from using the server for DNS resolution, which might be useful in cases where a subnet is identified as being infected with malware:
Time-based policies allow servers to respond differently at times where specific load conditions need to be addressed. The policy below is effective between 18:00 and 21:00, according to the local time of the server, and directs 80 percent of requests to London, and 20 percent to Paris.
To see all available parameters of the Add-DnsServerQueryResolutionPolicy cmdlet, type: