How to Customize the Windows 10 Start Menu with Group Policy
In this Ask the Admin, I’ll show you how to manually customize the Windows 10 Technical Preview Start menu and how to configure the layout using Group Policy.
- Related: Hands-On with the Windows 10 Technical Preview
The Start menu in Windows 10 is a combination of the Windows 7 Start menu and the tiled Start screen in Windows 8. The left side of the menu is divided into several sections not dissimilar from Windows 7, but different nevertheless, and the right is exclusively for Windows 8-style live tiles.
Tip: To completely remove the live tiles section of the Start menu, unpin all the tiles. To reinstate the area, right click a Windows Store app in the MRU list or under All Apps, and select Pin to Start from the menu.
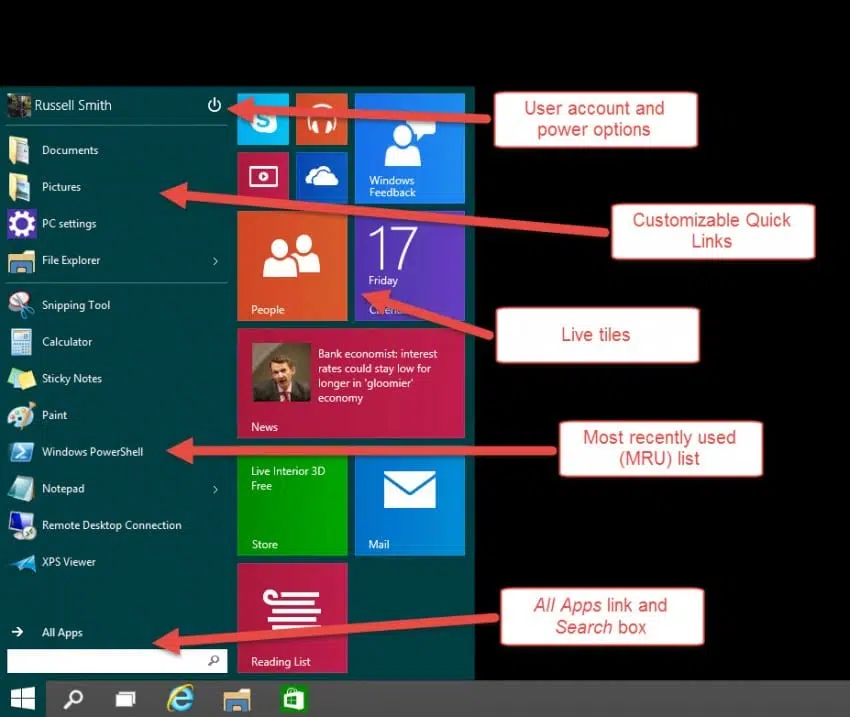
The classic Start menu
Starting from the top left, there are buttons to sign out, shutdown, and restart the device. The menu for the currently logged-in user allows them to change their account picture, lock the device, and sign out. Under those options, any other local user accounts on the PC are shown so that you can switch users.

Further down, quick links provide a fast way for users to get to their Documents and Pictures folders, PC settings and File Explorer. The links can be customized by right-clicking the Start menu and selecting Properties from the menu. The Taskbar and Start menu Properties dialog will appear, where you can switch to the Start Menu tab and click Customize. In the Customize Start Menu dialog, select and deselect the links to be displayed on the Start menu.

Below the quick links is a list of the most recently used (MRU) items. Although you can remove an item from the list by right clicking it and selecting Remove from the menu, it’s not possible to add items to this area yourself. Windows can be prevented from auto-populating the MRU list in the Taskbar and Start menu Properties dialog, by deselecting Store and display recently opened programs in the Start menu and Store and display recently opened items in the Start menu and taskbar.

At the bottom of the Start menu is the All Apps link, which works the same as in Windows 7, and the Search everywhere box, which in Windows 10 also searches the Internet and is powered by Bing. You can disable Internet search from the Start menu by enabling the Don’t search the web or display web results in Search policy under Computer Configuration, Administrative Templates, Windows Components, Search in Group Policy.
Live tiles
The right side of the Start menu is for pinning live tiles, which happens in the same way as it is possible on the Windows 8 Start screen. Look for apps you want to pin to the Start menu under All Apps or the MRU list, right click and select Pin to Start from the menu. Live tiles can be resized and unpinned by right clicking them and selecting the required action. And to change the layout, drag and drop the tiles into position to get your preferred arrangement.

Tip: To disable to Start menu and use the Start screen like in Windows 8, deselect Use the Start screen instead of the Start menu in the Taskbar and Start menu Properties dialog box.
The Start menu can be resized vertically and horizontally by hovering over the top edge or right side, and moving the mouse while clicking and holding the left button as the double-headed arrow appears, similar to how desktop Windows are resized.


Change the Start menu color
The color of the Start menu can also be personalized. Right click the Start menu and select Personalize from the menu. Choose a color in the Color and Appearance dialog and click OK.

Controlling layout using Group Policy
A new Group Policy setting in Windows 10 allows administrators to determine which live tiles will be pinned to users’ Start menus. When the setting is enabled, users cannot add or remove tiles. All you need to do is pin and arrange the tiles on the Start menu as required, and use the PowerShell command below to export the layout to an .xml file.
In this example, I’ve saved the layout file on a server share that will be accessible to PCs in my domain. You should change the file path as appropriate.
c:configsstart.xml –for startmenu
Once the layout has been exported to an .xml file, enable the
Start Menu Layout
setting in Group Policy. For more information on working with Group Policy, see
on the
Petri IT Knowledgebase
.
- In the Group Policy Object Editor, expand User Configuration, Administrative Templates and click Start Menu and Taskbar.
- In the center pane, double click Start Menu Layout.
- In the Start Screen Layout dialog box, click Enabled.
- In the Start Layout File box, type the path to the .xml configuration file you previously created using export-startlayout. The file should be located on a share (see the image below).
- Then click OK.

When the policy gets applied to a logged on user, they should see only the tiles defined in the .xml file.
Russell Smith, the Editorial Director at Petri IT Knowledgebase, has over two decades of hands-on experience in IT, in both small business settings and government IT infrastructure projects. Russell started writing for Windows IT Pro Magazine in t...
