How to Git Branch Checkout a Remote Branch

If you are new to Git, understanding how Git commands work is really important. And one of the most important tasks is using git checkout remote branch. The git checkout command allows you to collaborate with your peers or teammates in a way that allows everyone in the team to work on their specific branch without impacting the application.
This tutorial will teach you how to check out a remote Git branch step-by-step, so let’s get into it.
Prerequisites for Git Checkout Remote Branch
Before you drive into the practical section of this tutorial, make sure you have the following in place:
- A remote Linux computer to test out the Git commands. This tutorial uses Ubuntu 20.04.3 LTS as the remote node.
- A GitHub account with one private and one public repository created in GitHub containing a hello.py Python file.
What is a remote Git branch?
Do you know where your commits, files, and code live? The answer is in the Git repository, which is where you can keep track of all the changes made to the files in your project.
A remote Git branch contains all the code that everyone in your team uploads or check. You can directly work on remote branches using the Git UI console, or work on your local machine and then later commit all your changes in the remote branch.
What is the ‘git checkout’ command?
Working within a big team of developers in a big organization requires you to handle and manage various branches and repositories. Thankfully, to work with various branches, we have the aforementioned git checkout command, which allows you to work with multiple branches and repositories based on commits, files, and branches.
This command allows you to fetch all the commits you are looking for in a particular branch in the working directory on your local machine to keep things in sync.
Creating new branches and checking them out
Enough theory! Let’s jump into the practical and learn how the git checkout command lets you switch between two branches containing a different version of the code to test the functionality back and forth, all that without breaking the application running on the production code.
? You need to create a new branch other than the master branch to switch to another branch.
To create a new branch on your local machine, first, you will need to clone the repository to your machine. Let’s clone the repository from GitHub that you already have set up.
- Open your favorite SSH client and log in to the Ubuntu machine.
- After you log in to the Ubuntu machine, switch to the home directory with the cd ~ command. This directory will hold the content of the Git repository that you will create.
cd ~
Next, clone the repository to your home directory by running the git clone command below.
git clone https://github.com/ShankyTheBlogger/Petri.git

After successfully cloning the Git repository, go to the Petri directory and run the git checkout command to create a new branch.
The command below will create the branch (shanky-branch), then you can switch to this branch.
git checkout -b shanky-branch

How to check out branches
Earlier, you learned how to create a new Git branch locally on your machine, and you switched to it using the git checkout command. But if any of your team members create a local branch on their machine using the same remote repository and update it, then you might end up missing those commits of the remote branch on your local machine.
To retrieve all the latest changes to the remote branch on your local machine, you need to use the git checkout command again.
- Initially, you had only the master branch created in the repository, then you created a shanky-branch on your local machine.
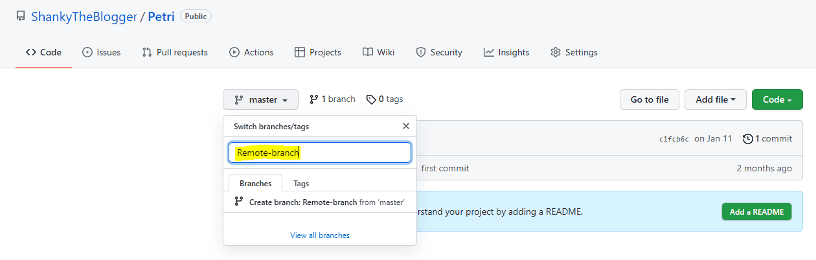
- Next, create another branch named Remote-branch in the repository. Navigate to the switch branch option by clicking on the master branch, as shown below. This is a collaborative process, so you have to imagine that someone else from your team performed this step.
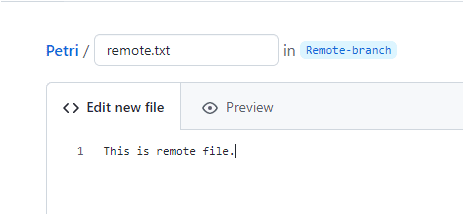
- Now, add a file named remote.txt with the text “This is remote file” in the Remote-branch by clicking on the Add file button.
- Again, on your local machine, run the git branch command, as shown below, to display all available branches, both local and remote.
git branch --all
As you can see, when you run the git branch — all command, it shows that a new remote branch (Remote-branch) is available.

- Next, switch to the new branch (Remote-branch) using the Sudo git checkout Remote-branch command. After you switch to the Remote-branch, you will be able pull the changes on your local machine.
Sudo git checkout Remote-branch

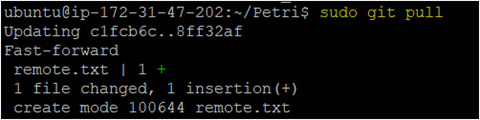
- Now, you can run the git fetch command followed by the git pull command to fetch the contents in the Remote-branch. The git fetch command tells your local Git to retrieve the latest metadata information from the original remote branch, and the git pull command will copy the content to your local machine.
git fetch --all
Sudo git pull

- Finally, verify the files by listing them in your current directory using the ls command.
ls
As you can see, the latest file created in Remote-branch (remote.txt) is now available on your machine.

Conclusion
Now you know how to work with remote branches, manage remote commits, and track remote branches. Finally, you successfully checked out a remote branch using Git commands.
It should now be easier for you to manage remote branches. Which remote branch do you plan to do manage next?
Related Article:

Sagar is a DevOps consultant and the founder of automateinfra.com. Sagar brings DevOps technology expertise to Petri.com, writing about Terraform, AWS Cloud, Microsoft Azure, Ansible, Kubernetes, Docker, Jenkins, Linux, and Windows.